MiToS re-built/fit- versilcraft Mystery43

jfm

Well-known member
Joined
16 May 2001
Messages
23,710
Location
Jersey/Antibes
Visit site
Virtuvas, apropos nothing in particular, here are some pics of sistership in Antibes today. Pity it has so many covers on it. It has been here a few years
IMG_4021.jpg

IMG_4022.jpg

IMG_4023.jpg

IMG_4024.jpg

IMG_4025.jpg

IMG_4026.jpg
 

vas

Well-known member
Joined
21 Jun 2011
Messages
7,947
Location
Volos-Athens
Visit site
jfm,

thanks a lot!

that's a well kep albeit too well wrapped up Mystery you've got there in the marina!
Do you have the photos at original resolution? Wouldn't mind having a look at all the bow fittings and deck edging details, bow roller, bow nav.light, etc etc. PM to follow with my email address if you can fwd them plz ;)
May help me asking for particular details at a later stage if it's not too much of a hassle..

cheers

V.
 

jfm

Well-known member
Joined
16 May 2001
Messages
23,710
Location
Jersey/Antibes
Visit site
jfm,

thanks a lot!

that's a well kep albeit too well wrapped up Mystery you've got there in the marina!
Do you have the photos at original resolution? Wouldn't mind having a look at all the bow fittings and deck edging details, bow roller, bow nav.light, etc etc. PM to follow with my email address if you can fwd them plz ;)
May help me asking for particular details at a later stage if it's not too much of a hassle..

cheers

V.
Ah, I deleted them off my camera chip last night, doh! But no worries, I'll shoot them again next weekend and email then (at ~7Mb each, off a Canon EOS). The boat is a permanent resident in Antibes so I can easily get you any pics you want during this summer, when the owner removes the covers!
 

vas

Well-known member
Joined
21 Jun 2011
Messages
7,947
Location
Volos-Athens
Visit site
Ah, I deleted them off my camera chip last night, doh! But no worries, I'll shoot them again next weekend and email then (at ~7Mb each, off a Canon EOS). The boat is a permanent resident in Antibes so I can easily get you any pics you want during this summer, when the owner removes the covers!

ok, not to worry, I guess you will be there again sometime :rolleyes:

Since mine has a few non-standard items and solutions which I'm not happy with, I'd very much appreciate pics showing details of the bow fittings as in pic3. also gunwale to sunpad detailing, bow roller, railings etc.

cheers

V.
 

vas

Well-known member
Joined
21 Jun 2011
Messages
7,947
Location
Volos-Athens
Visit site
after a 5week break (due to a broken rib) I'm slowly starting again. Weather's been fine over the last 2-3 days (temps up to 15-18C and sunshine) and it looks like it's going to be like that for the next 5-6months :p

So, having a go at clearing up the cabling on the lower helm, amazing mess I have to say... I realised that I have to clear the mess on the flybridge as well. Had noticed that the fb a/p control wasn't doing much (iow was dead) thought it was good time to remove it and check it out. The lower CETREK controller is at my desk ready to be fitted to its new position on the new panel next week.
So unbolted the control, pulled the cable out carefully and realised why it wasn't functioning, it was plain cut 20cm down the box...
I also noticed a small custom box with three buttons and one led that seems to be connected to the 8wire cable that was originally going to the a/p controller. I have a feeling that the previous owner had a custom built controller stored in the cupboard under the f/b helm enabling him to switch on and off the a/p and change track.

Anyway, back home after half an hour of swearing and trying to unbolt the back cover of the alloy box (mild steel screws all around...), I had a go with a 8mm drill and had it open in a few minutes :)

Exterior in a v.sorry state with lots of coats of white paint on it.
On the left is the toggle switch for engaging dissengaging (that fell on my desk when I removed the rubber seal :rolleyes: 
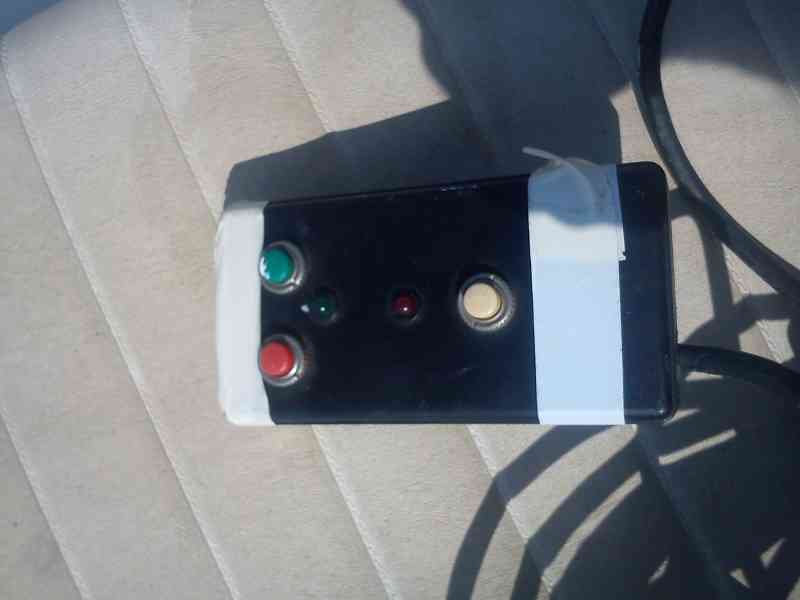
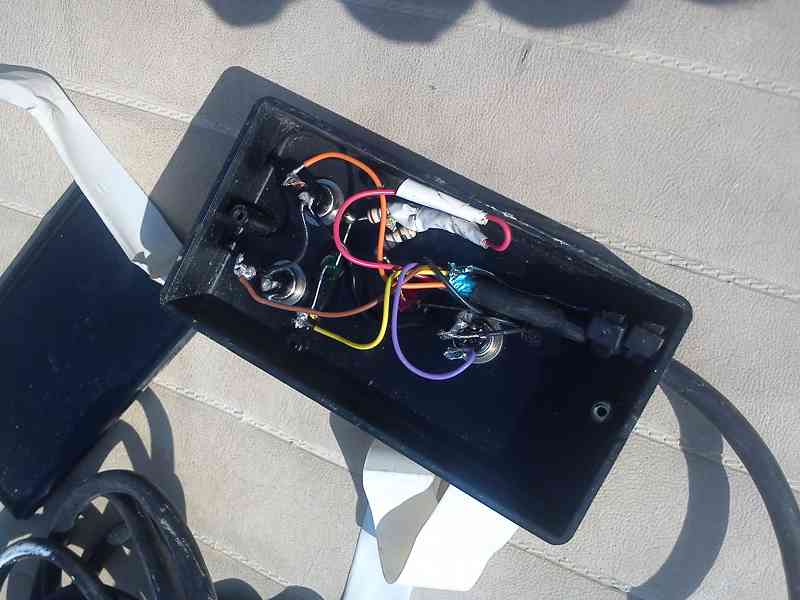
) and on the right the pot for arranging the route.
fb_ap_1.jpg


inside things are fairly clean and simple, all covered with clear silicone...
fb_ap_2.jpg


fb_ap_3.jpg


So, my options are:

1. rebuilt this mess and fit it again somewhere. Actually if the pot does work, and after a bit of searching with a multimeter, I should have it running fairly easily with a new waterproof toggle switch.

2. dismantle the functional (?) box with the 3 buttons and install them in the new dash I'm currently designing (more on that later, maybe tomorrow)


not made my mind up as yet, but either should be okay, designwise, I have to see the space and type of toggles/buttons/leds I'll be installing in the new dash to decide which one I prefer (although a pot and a toggle is better than two buttons and a toggle). Will have to wait for a week before I refit the lower helm a/p control so that I can test it and establish if the custom box actually works.

BTW, anyone has suggestions for watertight sockets to fit on various removable electronic devices? For example, lower helm a/p control has something like 8 cables that were cut and need refit, but would be nice to be able to remove it easily if needed.

so, slowly coming back and v.worried on the month lost and if I'll be able to make it or get back in the water in a rather unfinished state :(

cheers

V.
 

jfm

Well-known member
Joined
16 May 2001
Messages
23,710
Location
Jersey/Antibes
Visit site
I'd go for option 2 and fit it neatly in the new dash. The box isn't exactly a thing of beauty...!

You have loads to do and it's Easter. Maybe a rework of the project schedule and a new launch date of end-2012 makes sense?
 

vas

Well-known member
Joined
21 Jun 2011
Messages
7,947
Location
Volos-Athens
Visit site
I'd go for option 2 and fit it neatly in the new dash. The box isn't exactly a thing of beauty...!

You have loads to do and it's Easter. Maybe a rework of the project schedule and a new launch date of end-2012 makes sense?

Spend a few hours today, even managed to work on the flybridge but it was 20C, bl00dy sun shinning could end up with sunburn soon...

Opened the box, it is indeed the new a/p control, absolutely dead simple and straightforward, one resistor for each led, three push buttons and that's it!

Will do my homework re wiring of controllers on a/p control box, not sure they are NMEA or custom interfaces, does look too simple to be true.

here it is:
fb_ap_contr_1.jpg


and the insides are this simple...
fb_ap_contr_2.jpg


Seems that in order to clear up the big mess of cabling from lower helm to f/b and to e/r, I need someone with me, wiggling cables in the lower helm and myself up or down figuring out what is going where. Have a few dead ones identified on both ends but difficult to trace them through. Undid the side panel by the lower helm seat in order to see the cable route going up to the f/b, but I have to remove the beautiful panel with the flag holes and in order to do so, I also have to remove the side panels to the salon (top of the side windows), so looks like a non trivial job for next week. Of course dirty option is to leave as is, since I've got enough cables going through to carry all currents needed, just not tidy and nice. Plus a sh1load of cables from the detroits going up doing bugger all...
Ah, managed to find the first cable that is indeed destroyed from the elements. It's a massive 3X2.5mm cable about 15mm in overall dia, that simply falls apart on touching and bending it. Good thing its' not doing anything, bad thing is that it's well tucked and twisted to other usefull cabling to be able to pull it off :(

I think I'll keep the take it easy approach for the next week (off to Brussels for 3 days tomorrow) making sure the rib doesn't hurt and will be on the serious dismantling of partition walls and hull scraping the week after.

JFM, I knew the original plan was pushing it a bit (but I hadn't counted the accident...), if I manage to get the exterior prepared and painted properly by mid June, I'll probably fit the teak (not on the f/b just on the gunwales), reassemble the interior with no lining for the cabins and get on the water for a few weeks with the family during August (pref mid august to early Sept), then either continue work inside the water on the marina (3min bike ride from home), or out on the hard for work throughout the winter (6min car ride from home) for next spring fully speced and ready ;)
Not going to be using her properly over winter, so not much point in a end of 2012 commission tbh. Have work plan sorted, I'm able to work on her for 3-4 days a week from now on, and I mean 7:30 to 3:30 effectively drop the kids to school and go pick them up on the way back ;) so with the help of a friend for two days a week, should be able to progress rather quickly. We'll see...

cheers

V
 

BartW

Well-known member
Joined
9 Oct 2007
Messages
5,223
Location
Belgium
www.amptec.be
(off to Brussels for 3 days tomorrow)

I'm NOT sad that I can't meet with you in Bxl, ...
as I 'm going to Rome tomorrow, and I'm looking forward to that :)

these remore controlls is very simple electronics,
yes wait with that, and try to fit in later in your new dash,

regarding timing, You've already done some serious work, but I'm afraid that during the progress you will discover other and new unexpected issues.

I noticed you do the jow thorrowly, and I like that,
But I believe you would like to do some cruising this summer, (so would I)
so I would advice you to make a priority list, especially on jobs that take some time, and make sure you can use the boat in a unfished state,
I have lost the overvieuw, but priority's would be:
- both engines running OK
- hull bottom water tight, clean and antifouled.
- basic functions, rudders, bilge pumps, ... working perfect,
- .... you know better

and as you say, do the internal and detailed finishing next winter.

about these water tight connectors,
make a list of the wiring, number and thikness of the cable bundles,
I might have some remaining watertight connectors from finished jobs, that we don't need anymore.
You don't need to be compatible with nothing else, so if they fit, I'll send some to you by post.
 

vas

Well-known member
Joined
21 Jun 2011
Messages
7,947
Location
Volos-Athens
Visit site
yes, Bart, that's the way I'm going to move forward from now on. Except that for example today rib is hurting a lot (out of the blue without doing any manual work, so I may have more lost days due to it...)

Anyhow, I'm taking it v.easy, trying not to do any demanding manual work, so just fooling with cabling/measuring/dismantling still. So, I've come up with some sketches for the flybridge control that for me seem reasonable, minimal (v.important so that it matches the whole craft!) and rather clean and easy to implement (nice added bonus :D).

fb_sketch1.jpg


Going minimal and judging from what was already installed originally, it looks that I'd be content with just v.few stuff up there. Mind you not going to be doing the galactic mileage some ppl in here are clocking, waters are deep and clean, there's no fog for at least the 6-8months I'll be using the craft, will be v.lucky if it ever rains, etc, etc.

Todate there were:
  • IVECO engine gauges (rev counter start stop and 4-5 ind. lights per motor)
  • toggle for nav lights
  • toggle for anchor light
  • a double toggle (or however you call a up/off/down toggle) for windlass
  • push button for the horn
  • two fugly toggles for the trim tabs
  • Autopilot control (ahem, sort of...)
[ok, in the photos you can also see the old detroit gauges, but that' going to be removed next week]

In the sketch you can see the areas left and right of the steering wheel were I'm thinking of grouping the toggles and controls. A/P & trim tabs on the right and there rest on the left.

OK, there will be a compass up there as well (not sure where I'll put it though). The only thing I'm planning to introduce is a toggle for f/b lighting (or two). Will install some led lights up there for evening chilling away from the kids ;)

Anything essential I'm missing (and no I don't mean gps/ plotter/ sounder/ radar) as I'm not happy to helm under the greek sun no matter what so some of them will reside on the shadow downstairs, don't fancy the sunburns and probably wont have any bimini or whatever you call them cover for the first year or two before I have time to redesign the arch and reorganize it in a half hard/softtop setup along the lines that MM has gone...

The simple design I'm considering means that it's dead easy to cover could even have a perspex cover for the instruments that tilts up and slides in under the console top cover and easily covers and protects the lot (with just one slot for the steering column) so no messy canvas cover for the controls needed.

Suggestions?

cheers

V.
 

kashurst

Well-known member
Joined
10 Oct 2003
Messages
10,919
Location
Spain
Visit site
nice looking control pod, touch of the fairline about it with the peak over the gauges.
I would probably keep the engine controls together, so when reversing you can look backwards and keep one hand on both engine controls. keep posting the pics, and good luck with your rib.
 

jfm

Well-known member
Joined
16 May 2001
Messages
23,710
Location
Jersey/Antibes
Visit site
Nice concept imho. I'd put both engine controls to the right, then stretch the whole prism to port by 450mm so that in 2 yrs time when you have done the bimini you can install a plotter screen
 

MapisM

Well-known member
Joined
11 Mar 2002
Messages
20,357
Visit site
I would probably keep the engine controls together, so when reversing you can look backwards and keep one hand on both engine controls.
It's funny how different experiences can lead to opposite conclusions.
In my boat, not only I have the controls located as per above drawing, but also with separate levers for gear and throttle.
And the situation where I find such layout more convenient is exactly when reversing in a stern to mooring.
Imho, it's much more convenient to control each engine with one hand (right hand for port engine, left hand for stbd engine), and to do that it's obviously better if the controls are NOT placed together.
 

vas

Well-known member
Joined
21 Jun 2011
Messages
7,947
Location
Volos-Athens
Visit site
thanks for the comments,

It's funny how different experiences can lead to opposite conclusions.
In my boat, not only I have the controls located as per above drawing, but also with separate levers for gear and throttle.
And the situation where I find such layout more convenient is exactly when reversing in a stern to mooring.
Imho, it's much more convenient to control each engine with one hand (right hand for port engine, left hand for stbd engine), and to do that it's obviously better if the controls are NOT placed together.

and thanks MM for the support :)
I also do find this practice working fine for stern to mooring.

I do have a feeling that JFM and kashurst have electronic engine controls (i.e. soft and accurate) which I don't. In my case I cannot see how I could do it in one hand in a smooth maner as the cables are creating a lot of friction making it difficult to have accurate control of the movement.

Further, MiToS unfortunately does something like 5knots in gear on idle, so mooring manouvres mean engaging and disengaging gear all the time. I'd really like to test MM twin levers per engine, I think it would help a lot.
Anyway, being on a tightish budget and trying to recycle stuff for the time being, I'll probably stick to my design.

JFM, I have all the slanted area around the controls that I can use for a chart plotter/sounder once bimini, time and money are available ;)

Since I posted here, just to let you know that I'm getting closer to sorting out the cabling in and around the helm/electr.panel and restoring it to factory condition. I noticed all sorts of interesting things, luckily the guys weren't bothered to trace cabling back to the fusebox and use the proper ones, but would stick new cables whenever they wanted something. Now these new cables were typically NYA 3X1.5mm2 or 2X0.75mm2 on a white lining, so dead easy to spot and rip out.
Managed to remove 3-4 useless supplies and have targeted another 5 to go.

Q time:

The added 2X2.5mm2 cable for the electric macerator motors. Any reason for that, other that they probably couldn't bother sourcing the right cable off the WC fuse on the panel?

The Verricello fuse (that according to google translate is windlass) features a measly 1mm2 cable. No way that's the cable I want, and tbh I cannot trace any thick monster in the electr.panel. So it is safe to assume that this fuse feeds a relay living somewhere down under that drives the thick cable to the bow? If that's so, do these relays fail, as no matter what I do with the windlass fuse on the el.panel, there are 24v on the bow. So I'm thinking that sometime the relay packed in and they simply wired the cables straight on the batteries :(

On a 24V boat, what is the policy for 12V? There's only one fuse for 12V and it says radio on it (they're also running the second VHF on it, but that's not a big deal) does it take a line straight off one of the batteries, or is there a transformer somewhere (I doubt)?

There's also a largish fusebox for 8fuses BELOW the lower deck in the bildge. This feeds two bildge pumps and a set of lights for the bilges. This is definitely an addon by the last owner. Is there any gain in such a (rather messy I should point) setup, or should I rip them all off and use a proper line for the pumps and another for the two bulbs?
There's going to be a third one for the shower pump as well, but I feel there's plenty of wiring (original one) unused that can be employed for these jobs.

Checking the aircon unit, the condensations are plainly dropped in the bilges! FFS, on a plywood hull, will lead them to a heads' sink outlet that's nearby and is now redundant. Problem is that on same skin fitting I was planning to have the return flow of seawater after the aircon, so that's not going to work...

More tomorrow after the morning session. I should have some pics of the factory restored el.panel (hopefully!)

cheers

V.
 

BartW

Well-known member
Joined
9 Oct 2007
Messages
5,223
Location
Belgium
www.amptec.be
my Verricello broke in La Spezia
It’s the one word of Italian that I know quite well,
The thin wire for the Verricello is the command wire for the relay,
No matter if that relay breaks quick, you need a small fuse on that wire, just like on all DC supply’s in the boat

Don’t you hear the relay switching when you operate the Vericello ?
These relay’s are usually fed directly from the battery, and also have a "big" fuse in that thick power supply cable

12V policy,
I don’t know on other boats, but on BA, we have a separate 12V DC circuit, for ao:
generator starter motors, VHF’s, Alarm, stereo, and a few spare sockets.
There are two 12V battery’s separately from the 24V banks.
There is separate 230V/12V battery charger, and these battery’s are also charged from the generator alternators
There is a “backup” switch to connect the 12V battery’s to the center point of the 24V engine battery’s.
A 24V to 12V transformer doesn’t exist, (its DC not AC)
but if you have no separate 12V battery’s, you could have a DC –DC 24v to 12v convertor, (first investigate how much 12V amps you need)

that separate fuse box below deck level, is something that I don’t like,
re access, moisture, where to look when you have a electric problem, ….
if you are re-doing the central electric box, I would bring it all to one place

by the way, nice FB helm design !
make sure you have space for future, for a plotter, VHF, and autopilot
90% of my helming is from the FB
 
Last edited:

jfm

Well-known member
Joined
16 May 2001
Messages
23,710
Location
Jersey/Antibes
Visit site
The 12v policy tends to be a 24-12v dropper trnasformer on a smaller boat, and on larger boats a dedicated 12v battery with a 230v-12v charger and also 24-12v dropper charger from the 24v engine alternators. It's not good to wire to one 12v battery out of a pair that make up 24v, except for miniscule loads

Aircon condensate normally goes to a little plastic sump with flat switch and pump out. Made by Attwood, Whale, etc. Same thing that is used for shower pump outs.
 

vas

Well-known member
Joined
21 Jun 2011
Messages
7,947
Location
Volos-Athens
Visit site
thanks guysr the comments, things are slowly clearing out...
A lot to type so I'll also post some pics to keep you reading :p

Right, the following pic is the output of the 4hours work today (as in redundant cabling that was in/around the el.panel of the craft and some going all the way to the bow for some unknown reason to me) I have another 2 cables spotted that don't seem to be doing anything but I think they go down to the engine room, so that's going to be next week's work, not happy with my rib hurting to start folding in two searching down there.
Guess around 3+ times the length of the craft :eek:
redundantcabling_28-03.jpg


I'm very close to returning the el.panel to it's original condition and then I'll start reconnecting equipment to power as they should and not in a spagetti maner they were. Will end up with a setup that uses properly the existing fuses as well. Spotted two fuses doing bugger all, trim tabs (I assume that's what FLAPS mean) is going nowhere, WC is empty and FRIGOR which I don't know what it means (thought it was fridge but its on another one).
Apologies for the quality of the closeups, that's the best my xperia will do. BTW, the two thick aftermarket white cables are from the genny (I think!) the one and from the aircon the other (OK, that I'm sure)

elpanel_2.jpg


elpanel_3.jpg


elpanel_gaugesrear.jpg


Re Varricello, yes, the thin cable obviously is the signal, I've not found the fuse on the main cable coming to the bow from the e/r. Will do investigate further next week. I stupidly disconnected the thick cables of the relay which lives in the bow, so need to reconnect it tomorrow and/or remove the fuse in the e/r.

In the following pics you can see the redundant cabling to the f/b. I need to gain access to the route of the cables up to the top in order to remove them completely and add a couple of cables that will be useful for the trimtabs and extra relays. Alas, no luck as yet, need to remove the side panel lining the stbrd side over the salon window (slightly stuck there I'm afraid...) and then check what else is needed to be able to pull and push new ones in and old ones out.

redundantcables_from_fb_1.jpg


By clearing up the mess, I can see now better the leaking control box of the steering. Unfortunately there's this red fluid everywhere down there and some cables are soaked and need a good clean once I sort it out. Will try tightening the nuts and pray. It did work for the trim tabs after all ;)

helm_leaking_steeringbox.jpg


The below lower deck fusebox is a joke. Six fuses, 3 used, one is for the bilge pump, one for the shower pump (currently extra bilge pump) and third for a 40W bulb... Needless to say, various bits of cable and connectors rotting away around the area. Started working down there, but rib wasn't happy at all so postponed it for next week.

@JFM, will be able to figure out exactly next week and come back with photos and Qs re 12V. I do remember seeing a 12V smallish (car size) bat for the genny, don't assume they use this for it. The other lot is 4batteries (truck size dunno 120Ah or more) and not sure on the wiring of them. Will check.
Re the aircon condensation, since I have the ex head washbasin skin fitting still nearby and the heads outlet next to it, I thought I'd lead them all down there and avoid an extra pump. It's well above sealevel (maybe a good half metre) Anyway, will see what's left and report.

@Bart, tired/confused even reading the descriptions re 12 vs 24V. Will try to understand the system better and report.
Glad you like the design of the f/b helm, one Q though, since you've not got a bimini (iirc), how do you manage to helm from up there under the blazing sun? I know you're a northener, but it must be tiring. Unless you do all the moving in the evening/night...
A/P controls are going to be included (as in engage/disengage, course trim and led to show we're in the right track) v.minimal and hopefully effective ;)
Space for the rest in available, may extend the lip covering the instruments to both sides to shade plotter and/or vhf (tbh the last one is pretty much useless down here, except for emergencies but noone is usually listening...)

Q time:

Seems there is a clear feed from down below to the el.panel for 12V. Since it's recharging and behaving properly, I wont bother, just make sure everything is properly connected and well within the rating. TBH, only the new VHF and the radiocd seem to be using 12V. Confident that as the search progresses I'll find a few more :rolleyes:

What annoys me, or should I say amuses me, is the fact that with all fuses off, main switch off and disconnected shore power, a few things are working. And no, I'm not talking about bilge pumps, so need to investigate and get everything back through the panel.
Anything else that can/should be bypassing the el.panel?
On this, there is a bilge pump fuse on the el.panel (POMPA SENTINA or something like that) So, am I meant to be able to turn them off from the panel? Needless to say they wont turn off, but it's easy to correct if it makes sense to the panel...

Final Q for tonght, is it normal practice to have cabling for nav lights routed through railings? I have a second anchor light that is on the bow and I'm trying to figure out how it's wired (or how it should be wired as it's not functioning atm)

Tomorrow will only have a couple of hours, see what I can manage and w/e should be a bit more time on it.

cheers

V.
 

BartW

Well-known member
Joined
9 Oct 2007
Messages
5,223
Location
Belgium
www.amptec.be
one Q though, since you've not got a bimini (iirc), how do you manage to helm from up there under the blazing sun? I know you're a northener, but it must be tiring. Unless you do all the moving in the evening/night...

actually BA has a bimini, but it doesn't reach over the helm position.

how I manage is very simple I do like to sit in the sun, it gives me energy.
I alway's wear a T-shirt, and occasionally some sun lotion in my face, thats all,
but I agree and realise thats this is not at all healthy, re skin cancer and all that...
during navigation there is alway's some wind, ...
and when its really hot, a few times a day I take a swim, as learned in Croatia.

In some years time when I get older :eek:, I might place a fixed / permanent canopy, but for now I don't need it.
I would never helm from the inside, unless its raining or very cold.
the vieuw from up there is totally different in all aspects.
 
Top