3D Printers

DavidJ

Well-known member
Joined
15 Jun 2001
Messages
5,930
Location
home in Brum. S37 sold, was in Med Spain.
Visit site
Freecad have just announced that their latest development is going into Release Candidate state.
Version 1.0 - its been a long time coming.
I've been playing with the weekly builds and really like it.
There are loads of new features and of course the Topological fix.
Here's a video on the RC1 release.


Since my last post, I've been honing my skills in FreeCAD.
Getting along well - mostly using the pre-release weekly builds and switching back to the stable version every now and then.
This week, I made this clip with a tensioner.

View attachment 182762

This is a link to it in my 3D viewer
stl 3D viewer

Got the idea from Printables on the internet but then made my own using FreeCAD.
SWMBO always strings lines on our flybridge when she wants to dry the washing and it is a PIA to tie them up and take them down.
So a few of these clips might do the job.
Thanks for the update
That clip is amazing, did you make it solid for strength?
My plan to keep the Bambu upstairs has been scuttled (guess who) so it’s now in the garage but I have a concern about humidity, as although I put a couple of 112g silica gel bags in the Bambu (P1S) the marker nodules in the bag go green after only a few days and the weight goes to 140g
(Of course a blast in the microwave brings it back close to 112 again)
I’ve taken your idea of plastic cereal boxes with silica gel bags for the filaments and that works well. (Not kept in the garage!)
My FreeCad development has taken a step back since the grandkids have discovered we can make Pokémon figures from the Bambu library.
Great toy!
 
Last edited:
  • Haha
Reactions: vas

Hurricane

Well-known member
Joined
11 Nov 2005
Messages
9,562
Location
Sant Carles de la Ràpita
Visit site
Thanks for the update
That clip is amazing, did you make it solid for strength?
My plan to keep the Bambu upstairs has been scuttled (guess who) so it’s now in the garage but I have a concern about humidity, as although I put a couple of 112g silica gel bags in the Bambu (P1S) the marker nodules in the bag go green after only a few days and the weight goes to 140g
(Of course a blast in the microwave brings it back close to 112 again)
I’ve taken your idea of plastic cereal boxes with silica gel bags for the filaments and that works well.
My FreeCad development has taken a step back since the grandkids have discovered we can make Pokémon figures from the Bambu library.
Great toy!
Have a look at post #69 - I made some plastic parts that hold silica beads and fit into the AMS - might help.
I keep my printer in my study.

Interesting thing happened yesterday.
We had a 3 minute power cut whilst the printer was running.
After the power restored, the printer booted up with a message "I've had a power loss during a print - if the job is still attached to the build plate, press resume" - so I did and it finished the job - now thats clever software.

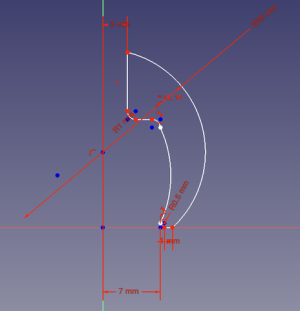
I have also made some of these:

Screenshot_2024-09-10_21-34-46.resized.png

.
.
.
.
.
.

.
.
.
.
.
.
.
.
.
.

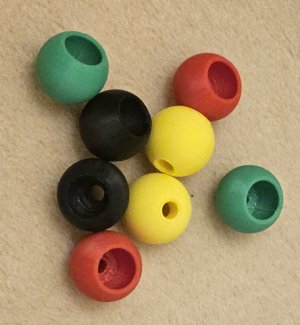
Which those of you professionals in 3D design will know turns out to be these:-

20240910_213750.resized.jpg

I printed several of the Red and Green today to take down to the boat to put into my odds and sods rope drawer.
 

Hurricane

Well-known member
Joined
11 Nov 2005
Messages
9,562
Location
Sant Carles de la Ràpita
Visit site
Ah! I missed #69 or maybe didn’t understand it at the time. Was that something from the Bambu “library” or home made?
I've just looked again and there are loads of designs for the AMS on Printables.
But the one I used is this one:-
Printables

The middle pod holds a cheap hygrometer that I bought on Amazon
Ones like these:-
https://www.amazon.co.uk/AITRIP-The...all+Digital+Hygrometer&qid=1726044857&sr=8-39
I use the same hygrometers inside the cereal boxes with a printed bush that fits into the spool's core.
 

DavidJ

Well-known member
Joined
15 Jun 2001
Messages
5,930
Location
home in Brum. S37 sold, was in Med Spain.
Visit site
I've just looked again and there are loads of designs for the AMS on Printables.
But the one I used is this one:-
Printables

I use the same hygrometers inside the cereal boxes with a printed bush that fits into the spool's core.
Thanks
Ah yes I’ve made a note of your bush and for others it’s on #138

I’m sure there are dozens of free design sites but a friend suggested thingiverse.com
 

Refueler

Well-known member
Joined
13 Sep 2008
Messages
19,972
Location
Far away from hooray henrys
Visit site
Thanks
Ah yes I’ve made a note of your bush and for others it’s on #138

I’m sure there are dozens of free design sites but a friend suggested thingiverse.com

Thingiverse is OK .. I get quite a few designs from there ... but recently a lot of 'authors' I know who used to upload to Thingiverse have stopped ... not sure why. Most moved to Cults3D

But now I am hearing similar with Cults3D .... interested to see where they go now ....
 

markc

Well-known member
Joined
16 May 2001
Messages
2,147
Location
Bucks & St Raphael SoF
Visit site
I've been teetering on the edge of buying a 3D printer for ages, and this thread pushed me over! Thanks for all the useful information in this thread :cool: I went for a Bambu PS1 with AMS, and only had it a few days, but the simplicity and quality are outstanding. My first boat project is to build a 'wedge' bezel for my flybridge Axiom display, as the surface mount position is not at the best viewing angle. Have been learning FreeCAD and am beginning to get the hang of it.
 

Hurricane

Well-known member
Joined
11 Nov 2005
Messages
9,562
Location
Sant Carles de la Ràpita
Visit site
Have been learning FreeCAD and am beginning to get the hang of it.
Well done
Keep plugging away at it - it is worth it and very satisfying when you finally print your own design.
The new Version 1.0 software is very good but it is still in RC release so there are still a few bugs.
One of the biggest improvement in 1.0 is that it will now extrude multiple sketches in the same operation.
I remember one of my first designs I created a separate sketch for each hole that I wanted - silly me.
But it highlights how much you learn as you go along.
Well worth persevering.

For newcomers to FreeCAD - just start with the PardDesign workbench - that workbench will automatically open the 2D Sketcher Workbench as required and return to PartDesign when finished.
Don't confuse the PartDesign Workbench with the Part Workbench.

On a separate FreeCAD point, I have tried to use the Draft Workbench - I don't like it.
The Draft Workbench is mostly used for Architectural and 2D drawings - for us with 3D printers, PartDesign/Sketcher is much better and easier to use.
I think this is FreeCADs main problem - just start straight away in the PartDesign and it is all far more intuitive.
 

Hurricane

Well-known member
Joined
11 Nov 2005
Messages
9,562
Location
Sant Carles de la Ràpita
Visit site
I have been doing this course - nearly finished it, and it been really helpful Basic Beginners FreeCAD 0.22 (Public)
Yep Darren is really knowledgeable and informative.
Although I have found some of his stuff a bit difficult to understand.
But he is high on my subscription list and I like his enthusiasm for Open Source software.
I sent him an email a few weeks ago asking for help and he answered with a pleasant reply.
I find this guy's videos easy to follow Adventures in creation
 

Hurricane

Well-known member
Joined
11 Nov 2005
Messages
9,562
Location
Sant Carles de la Ràpita
Visit site
This guy posted this about 2 months ago - just after they "froze" the development for new features.
Although it is all about the new features, I found this video very useful "to get my head around" some of the new and old concepts.


There are lots more recent videos but I thought this guy presented it well.
 

Refueler

Well-known member
Joined
13 Sep 2008
Messages
19,972
Location
Far away from hooray henrys
Visit site
Having had my Windex tail broken off - probably by some fat Seagull perching on it ... I am printing a replacement tail ...

This will then be joined to the remaining arrow / pivot part by small CF rod insert .... balance of the final by 'blobs' of epoxy with fishing shot ...

Yes I know - I can buy a replacement .. in fact I have a stainless steel set on its way from China for later fitting ... (the existing repaired will then transfer to another boat...)
 
Top