3D Printers

Hurricane

Well-known member
Joined
11 Nov 2005
Messages
9,562
Location
Sant Carles de la Ràpita
Visit site
That’s firstly clever then obvious afterwards :)
That particular model had a little more to it - a female thread to screw onto the salt pot.
Fairly early on, I learned how to use the Boolean process.
In 3D design, a Boolean process adds or subtracts material.

This was the original 2D sketch
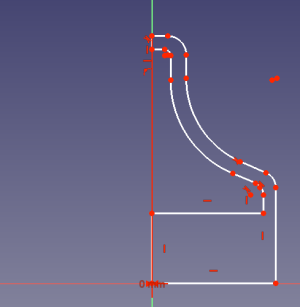
Screenshot_2024-08-07_09-18-11.png

When rotated it turns into this solid - in fact there is a hollow space inside.
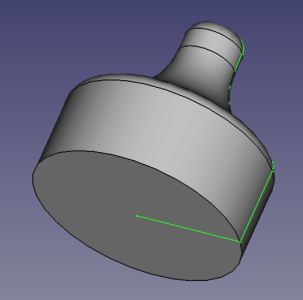
Screenshot_2024-08-07_09-27-41.png

And then the thread is Boolean'd removing material to produce a female thread
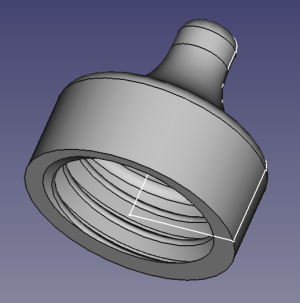
Screenshot_2024-08-07_09-28-22.png

In that case, I wasn't sure of the actual thread so I inserted something that looked correct.
Then a bit of measurement and trial/error on a test piece until it fitted.

I didn't do it in the above case but most of the female threads that I've made, I make a male thread first as a separate part, then place it where I need it and then Boolean it out
Like this
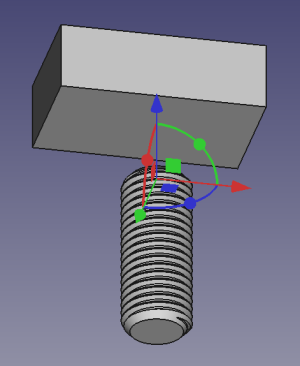
Screenshot_2024-08-07_09-38-49.png

Screenshot_2024-08-07_09-39-23.png

Screenshot_2024-08-07_09-40-28.png

There is probably a better way but this allows precise positioning of the thread.
As I say, I'm only a novice at this stuff.

But I am finding it all a lot of fun.
 

Hurricane

Well-known member
Joined
11 Nov 2005
Messages
9,562
Location
Sant Carles de la Ràpita
Visit site
The Bambu printers can be supplied with an AMS unit that allows you to print multiple colours in the same print.

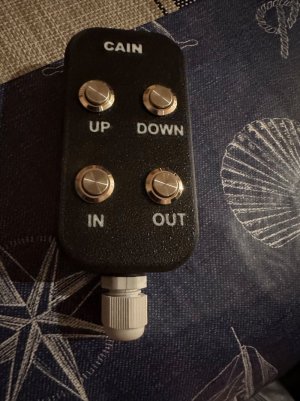
Yesterday, I did some experimenting with embedded text.
Useful when making a control panel or generally putting a name on an object.
I experimented with various embedded depths.
1 layer deep doesn't look good
2 layers better
3 layers OK
But I eventually settled on 4 layers deep.
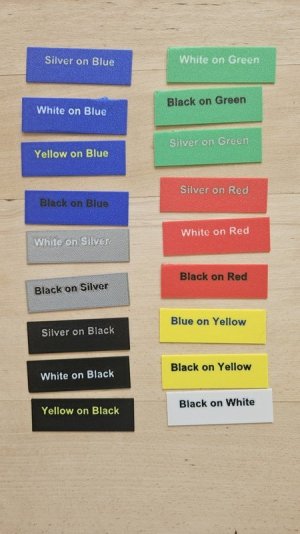
I then tried lots of different colours - a good colour contrast seems to work best.
Here's the result
These prints are on a 1mm thick background and the text is embedded 4 layers
The printer set to 0.2mm per layer
Colour Test.resized.jpg
 

Kendal

Member
Joined
24 Jan 2004
Messages
81
Location
Newcastle Upon Tyne
Visit site
That's impressive. Being able to print 2 colours opens up a whole new world of opportunities. When I bought my printer (Flashforge Dreamer), there was an option for a dual print head but I went for the single model :-(
 

Hurricane

Well-known member
Joined
11 Nov 2005
Messages
9,562
Location
Sant Carles de la Ràpita
Visit site
That's impressive. Being able to print 2 colours opens up a whole new world of opportunities. When I bought my printer (Flashforge Dreamer), there was an option for a dual print head but I went for the single model :-(
I believe that the Bambu Lab X1 and the Bambu Lab P1 use the same AMS multi colour unit.
The AMS holds up to 4 rolls of filament.
So that means you can use 4 different colours in a model.
The printer automatically rolls back a filament roll and re-feeds another roll for each layer that it prints.
This makes multi colour printing very slow.
Also, between colours, it extrudes enough filament to purge any old colour out of the nozzle.
After purging the filament, it "chops" off any surplus and discards the unused bits which flow down a hole in the back of the printer.
I printed a box that I place at the back of the unit to catch these bits
The bits are fondly referred to as "poop"

However, one extra use for this feature is when a roll of filament runs out.
You can set it up to automatically use a fresh roll of filament.

EDIT
As said earlier, if you buy Bambu's own filament, it comes with RF tags built into the filament's cores.
These tags are electronically read by the AMS unit so it knows what colour to use and what settings are required.
 
Last edited:

riverliver

Member
Joined
20 Mar 2011
Messages
53
Visit site
This is a fascinating thread thank you. Its infuriating when a small low value bit of plastic breaks on a more expensive item. In my case a strimmer spool cover broke. replacement cost about £6 except for the fact that I cant track down such a spare The strimmer itself was a cheapie but £100 piece of kit now unusable for want of a (proverbial) nail. some other stuff in the same space. However buying a £1k 3D printer might not be the most economical answer particularly when I see the technical skills some of you guys needed to acquire.
From an idle google even a commercial 3D operation would want a CAD design and I suspect wouldn't want a 6 quid gig. I do however hate the idea of junking an otherwise useable item

So 2 questions please:
Are there clubs out there (Men in sheds type) or evening classes where you could go along and play with their machine and have a go? haven't found anything online.

Looking at the Bambu/Additive+ websites they have some very very basic machines - £140 odd at the bottom end. would this be a sensible way to dip a toe in this water or would that itself be a waste of time/money.

Anyway please keep this thread going as I have really enjoyed reading this.
 

Hurricane

Well-known member
Joined
11 Nov 2005
Messages
9,562
Location
Sant Carles de la Ràpita
Visit site
Just ordered my P1S
……best birthday present ever :)
Jeff Geerling is one of the Youtube channels that I subscribe to for Raspberry Pi stuff.
He did an "unboxing" video on the P1S.
He now has 3 different 3D printers - IMO, the Bambu is streets ahead of the others.
Not one of his better videos - he doesn't have the same enthusiasm as he does with his Raspberry Pi projects.
But at the end of his video, he did say that he didn't want to get sucked into 3D printing and stick to the Raspberry Pi stuff.
But, of course, 3D printers fit nicely into Raspberry Pi projects.
This is NOT the best video for a Bambu Printer - I wouldn't have done the things he does in this video.

Anyway, this is a link to his unboxing video.

You might fid it interesting.
 

Hurricane

Well-known member
Joined
11 Nov 2005
Messages
9,562
Location
Sant Carles de la Ràpita
Visit site
As some people seem to be enjoying this thread and whilst on the subject of electronics, a couple of months ago, I made a little addition to my Home Assistant project.
I wanted Temperature, Pressure and Humidity around my house to be reported back to my Home Assistant server.
I didn't want to run wires everywhere so WiFi seemed to be a good option.
WiFi devices need power so I came up with this idea.

Rather than using Raspberry Pi, on this occasion I decided to use an ESP device.
ESP 32 and the older ESP 8266 are devices with WiFi and input/output connections all in an extremely small package.
This is the ESP device, similar to the one that I used - size only 34 x 26 mm complete with its antenna.
Price - 5 of them for 20 quid so cheap as chips - please excuse the pun.
Screenshot_2024-05-10_20-01-12.resized.png

That little circuit board can be powered by USB so I decided to power it with one of these chargers:-
Screenshot_2024-08-09_18-04-01.png

Software was all done inside my Home Assistant server so all I needed was way of bringing the project together.
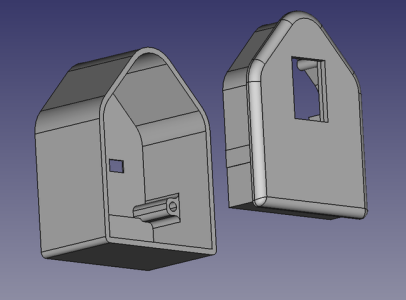
So, I loaded FreeCAD and designed this little case.
Screenshot_2024-05-14_13-07-06.resized.png

Screenshot_2024-05-14_13-05-45.resized.png

The idea is that the charger would slip inside and held in place by the cover (screwed from underneath)
And the ESP circuit board simply screws inside on the "stand off" stalks made within the design.

I designed the hole in the front to take a temperature, pressure and humidity sensor.
That sensor screws into its own little cover that locates inside the case top.
Screenshot_2024-05-15_21-59-11.resized.resized.png

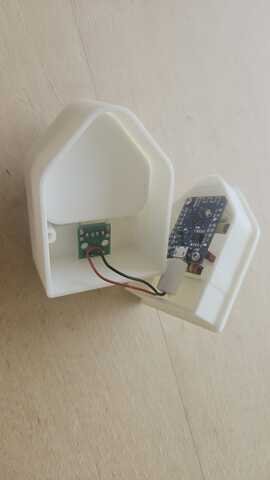
The end result has worked out really well
Here are some photos of the final project.

p5.resized.jpg

p6.resized.jpg

It worked so well that I made 3 more.
I simply plug them in, anywhere in the house, and the connect back to Home Assistant over WiFi.

Just thought some people might find this little project interesting.

I'm sure there are going to be lots more projects like it.
 

Refueler

Well-known member
Joined
13 Sep 2008
Messages
19,977
Location
Far away from hooray henrys
Visit site
Just started a new print ... Gloster Meteor RC plane ...

Using Ender 3 Pro with direct dual Z drive, direct head feed ..... basically fitted with Creality's own modifications. LW-PLA which prints at about 60% of usual PLA weight.

a18529337-173-Meteor maiden 1.jpg


Not mine - but another guy who has already printed and flown ..
 

Hurricane

Well-known member
Joined
11 Nov 2005
Messages
9,562
Location
Sant Carles de la Ràpita
Visit site
Just started a new print ... Gloster Meteor RC plane ...

Using Ender 3 Pro with direct dual Z drive, direct head feed ..... basically fitted with Creality's own modifications. LW-PLA which prints at about 60% of usual PLA weight.

a18529337-173-Meteor maiden 1.jpg


Not mine - but another guy who has already printed and flown ..
Presumably, your models are printed in parts.
If so, how do you join the parts?
 

DavidJ

Well-known member
Joined
15 Jun 2001
Messages
5,930
Location
home in Brum. S37 sold, was in Med Spain.
Visit site
Jeff Geerling is one of the Youtube channels that I subscribe to for Raspberry Pi stuff.
He did an "unboxing" video on the P1S.
He now has 3 different 3D printers - IMO, the Bambu is streets ahead of the others.
Not one of his better videos - he doesn't have the same enthusiasm as he does with his Raspberry Pi projects.
But at the end of his video, he did say that he didn't want to get sucked into 3D printing and stick to the Raspberry Pi stuff.
But, of course, 3D printers fit nicely into Raspberry Pi projects.
This is NOT the best video for a Bambu Printer - I wouldn't have done the things he does in this video.

Anyway, this is a link to his unboxing video.

You might fid it interesting.
Actually that’s really useful. I had a different expectation for “works right out of the box”
 

Hurricane

Well-known member
Joined
11 Nov 2005
Messages
9,562
Location
Sant Carles de la Ràpita
Visit site
Actually that’s really useful. I had a different expectation for “works right out of the box”
To be fair, it DID work "out of the box" for me.
There was a lot of upgrading firmware and tests that it did automatically first but after that, I just went to the Benchy model that is already in the printer and it worked.
Produced a very good quality print as well.
Since then, I haven't used the X1's screen to print - done everything from the computer - connect over WiFi - I haven't needed an Ethernet connection.
The P1 should be just the same as my X1 once you have it connected to your computer.
 

Hurricane

Well-known member
Joined
11 Nov 2005
Messages
9,562
Location
Sant Carles de la Ràpita
Visit site
Hobby Grade CA (Cyanocrylate).

Not the silly tubes you get in Supermarket ...

Here's example by 3DLabPrint .... a really excellent company who design and flight prove all their models.

Thanks for that.
I've tried lots of different glues which haven't worked.
In fact, I gave up glueing and resorted to making my models screw together.
Seems like I've got to get some Hobby Grade CA (Cyanocrylate) and try again.
 

Hurricane

Well-known member
Joined
11 Nov 2005
Messages
9,562
Location
Sant Carles de la Ràpita
Visit site
New project started today.
I'm going to replace my home server with a solid state solution.
Involving a Raspberry Pi 5 and an addon card carrying 4 NVMe SSDs.
Once I've got it all working, I will be making a suitable enclosure.
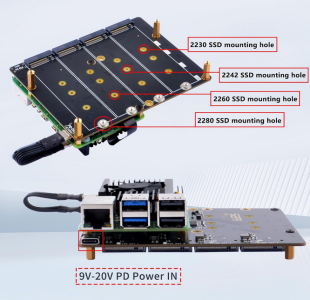
This is the hardware
Screenshot_2024-08-10_09-24-04.png

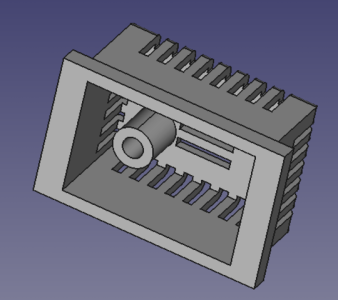
Whilst waiting for the components, I've been experimenting making some ventilation grilles/holes that will be built into the top and base of the enclosure.

Two different grid/grille options currently being printed - see this link
stl 3D viewer
 

jakew009

Well-known member
Joined
29 May 2012
Messages
425
Visit site
Thanks for that.
I've tried lots of different glues which haven't worked.
In fact, I gave up glueing and resorted to making my models screw together.
Seems like I've got to get some Hobby Grade CA (Cyanocrylate) and try again.

If you want to glue stuff up ts mix her easier to print in ABS / ASA. PETG is almost impossible to glue. PLA is no good for functional parts.

But ABS you can glue with solvent weld adhesive from screwfix used for plumbing and it’s super strong.
 

Refueler

Well-known member
Joined
13 Sep 2008
Messages
19,977
Location
Far away from hooray henrys
Visit site
Thanks for that.
I've tried lots of different glues which haven't worked.
In fact, I gave up glueing and resorted to making my models screw together.
Seems like I've got to get some Hobby Grade CA (Cyanocrylate) and try again.

The filament will of course affect what glue ... but generally Medium Visco CA with accelerator (Kicker) does the trick.

Wtach the guy in video ... he applies the CA ... brings pieces together and holds in correct position - then he sprays the accelerator to lock and set the CA.
With CA - if it fails first time - then like every other job with CA - its a lost cause !! CA relies on surfaces close fit and touch ...
 
Top