3D Printers

vas

Well-known member
Joined
21 Jun 2011
Messages
8,076
Location
Volos-Athens
Visit site
New project started today.
I'm going to replace my home server with a solid state solution.
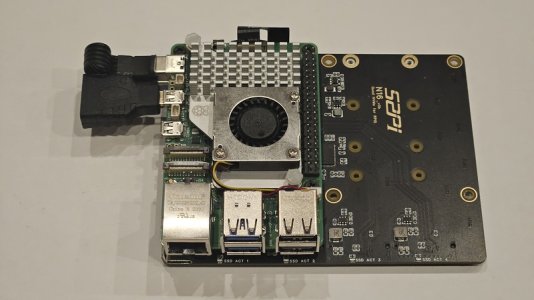
Involving a Raspberry Pi 5 and an addon card carrying 4 NVMe SSDs.
Once I've got it all working, I will be making a suitable enclosure.
This is the hardware
View attachment 181218

Whilst waiting for the components, I've been experimenting making some ventilation grilles/holes that will be built into the top and base of the enclosure.

Two different grid/grille options currently being printed - see this link
stl 3D viewer
would be worried of dust settling on the internals with such large holes Mike.
unless you have the hole's panels vertically and force vent it somehow. Else you'll have to remember to remove and air pressure the thing once a year or so (at least down here with lots of dry weather and dust around)
 

Hurricane

Well-known member
Joined
11 Nov 2005
Messages
9,562
Location
Sant Carles de la Ràpita
Visit site
would be worried of dust settling on the internals with such large holes Mike.
unless you have the hole's panels vertically and force vent it somehow. Else you'll have to remember to remove and air pressure the thing once a year or so (at least down here with lots of dry weather and dust around)
Thanks for those comments - I've been thinking hard on those points. The important hardware won't arrive for a couple of days but my current thought is to move the RPi fan to force air out of the top and allow a flow of air into the bottom of the enclosure. I'm a bit worried about the air "short circuiting" around the upper half of the enclosure - maybe add baffles - not sure at the moment. I might be over thinking it. Being a file server, I think that in this application, the RPi won't get very stressed. Raspberry Pi themselves say that a RPi 5 under no load doesn't require cooling so my thoughts are to add some small passive heat sinks to the RPi and use a PWM fan to move air through the enclosure. They also say that there is no danger of damage to the RPi if it allowed to overheat - it just throttles itself accordingly. That said, the NVMe drives themselves will contribute to the internal space overheating.

Anyway, thanks for your input - any other comments would be welcome.
 

vas

Well-known member
Joined
21 Jun 2011
Messages
8,076
Location
Volos-Athens
Visit site
Only thing I can confirm is that my RPI running VenusOS onboard sees and runs at 60-65C every day from June to September. Still alive after 4 yrs 24/7

That's with the factory 7in touch screen and a CANBUS HAT

V
 

Hurricane

Well-known member
Joined
11 Nov 2005
Messages
9,562
Location
Sant Carles de la Ràpita
Visit site
Only thing I can confirm is that my RPI running VenusOS onboard sees and runs at 60-65C every day from June to September. Still alive after 4 yrs 24/7

That's with the factory 7in touch screen and a CANBUS HAT

V
I've got lots of RPis running - VOIP servers etc
Several are running 24/7/365
One in particular is on the roof of our marina - feeding AIS into MarineTraffic and Vesselfinder.
This is a link to it's live data.
Details for AIS Station Sant Carles Marina, Spain - VesselFinder

It has been running for about 5 years
 

Hurricane

Well-known member
Joined
11 Nov 2005
Messages
9,562
Location
Sant Carles de la Ràpita
Visit site
Update on my Raspberry Pi Server project
I got the electronics working last week.
My main problem is that I didn't want to use the official Raspberry Pi OS distribution.
I am trying to keep all my systems from the same distribution and same desktop environment.
I use the Manjaro Linux distro and the XFCE desktop environment - I'm a dinosaur so I like my systems to have the look and feel like Windows 95/96/XP etc.
Anyway, I got that all done last week.

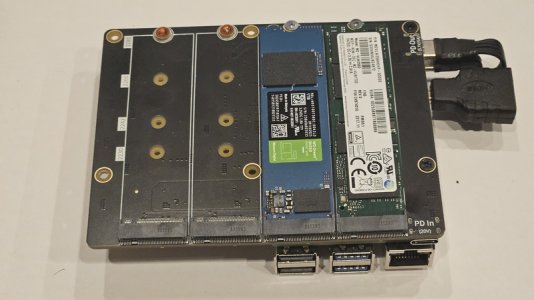
This is the Raspberry Pi 5 bolted onto a 4 channel NVMe SSD card
20240819_203849.resized.jpg
This is the underside where the SSDs are located
20240819_203906.resized.jpg
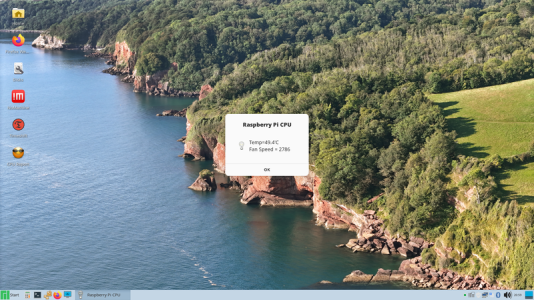
And this is a screenshot from the XFCE desktop - note that I have the ability to monitor the CPU temperature and the speed of the cooling fan.
Screenshot.resized.png

So now it needs some clothes

I decided to make the case out of three 3D printed parts - a central frame - a top inverted tray and a bottom panel that locates into the bottom of the frame.
Here are a couple of links to my 3D viewer that shows the pieces - virtually.
Sorry, my 3D viewer only supports 2 pieces so there are 2 separate links
The central frame piece - stl 3D viewer
The Top and the Bottom pieces - stl 3D viewer
From those links, you can see the Top and the Bottom pieces have loads of holes for cooling.
Interestingly, the 3D printer takes a VERY long time just printing holes!!

After a few changes, here are some photos of the finished job.
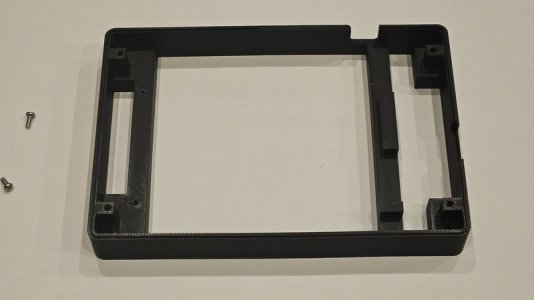
The frame piece
20240819_203808.resized.jpg
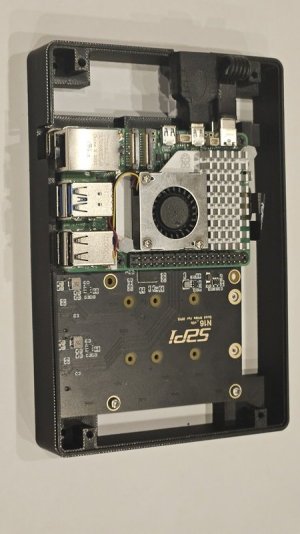
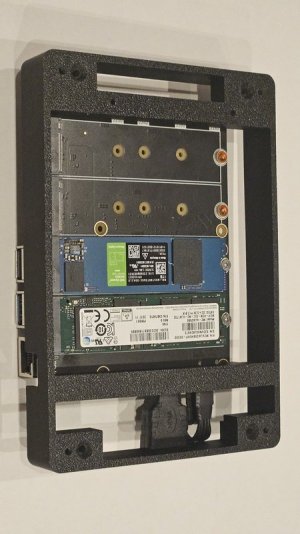
The frame piece with the electronics fitted (viewed from the top)
20240819_204210.resized.jpg
And viewed from the bottom - with two NVMe SSDs fitted
20240819_204221.resized.jpg
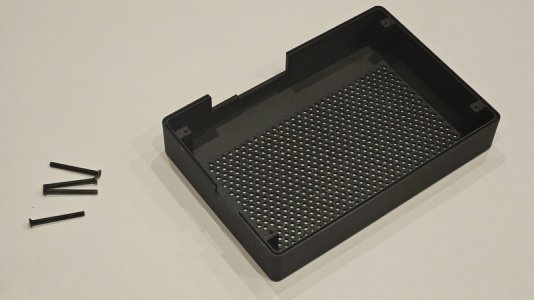
The top piece (inverted tray) with cutouts for connectors
20240819_203702.resized.jpg
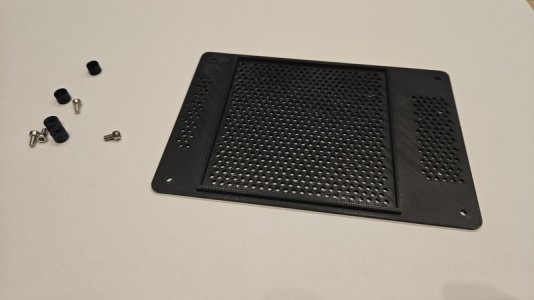
The bottom panel - more ventilation holes!! - I also printed some little feet to allow air to flow freely underneath.
20240819_203522.resized.jpg

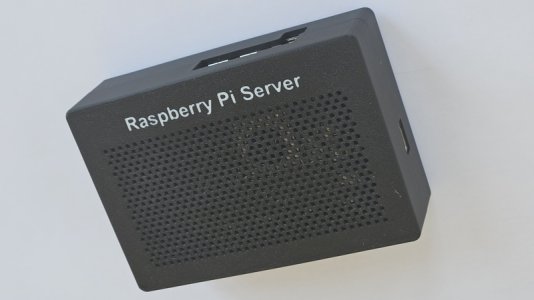
And the final assembly - the white text (Raspberry Pi Server) is embedded into the black plastic by 0.8mm
20240820_110954.resized.jpg

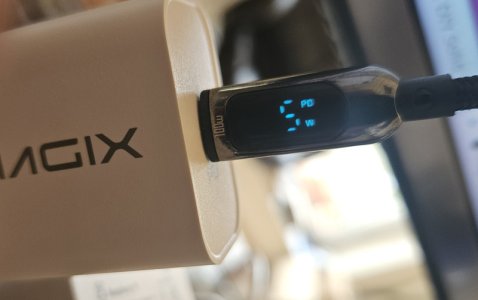
I bought a new 30 watt PD power supply and one of these neat cables with LCD screen in the connector.
This photo shows that the power supply is running in PD mode and drawing 5 watts.
Power Supply.resized.jpg

I did some temperature tests.
The Raspberry Pi on its NVMe board - running but not under load - settles with the CPU at about 45 degrees C and the fan off.
Under a typical load that I will be using (copying files etc), the temperature rises to around 55 degrees C and the fan running slowly.
Inside the enclosure - running but not under load, the CPU settles to around 50 degrees C with the fan running slowly all the time.
Inside the enclosure with a typical load, the CPU runs at around 58 degrees C and the fan runs faster.
I believe that the Raspberry Pi 5 will start to "throttle" at temperatures above 80 degrees C
So this system is well below those extremes.
That said, I think I might add a small fan to the top part to see if is makes any difference.

I also ran some speed tests against my old server that uses 3.5" mechanical drives.
On the old server, I copied a directory full of videos from one of its 3.5" mechanical drives to another of its 3.5" mechanical drives.
It took 86 seconds to transfer all the videos.
That same directory copied on the new Raspberry Pi from one of its NVMe drives to another of its NVMe drives only took 24 seconds.
So there seems to be a significant improvement.
More importantly, it is all solid state and a lower power consumption.

Anyway, I thought you might find the whole project interesting.

And maybe as a ships PC, this new Raspberry Pi 5 is powerful and cheap enough for lots of people to use.
For example, even the old Raspberry Pi versions will run OpenCPN so you could make your own DIY plotter.
 

DavidJ

Well-known member
Joined
15 Jun 2001
Messages
5,930
Location
home in Brum. S37 sold, was in Med Spain.
Visit site
Update on my Raspberry Pi Server project
I got the electronics working last week.
My main problem is that I didn't want to use the official Raspberry Pi OS distribution.
I am trying to keep all my systems from the same distribution and same desktop environment.
I use the Manjaro Linux distro and the XFCE desktop environment - I'm a dinosaur so I like my systems to have the look and feel like Windows 95/96/XP etc.
Anyway, I got that all done last week.

This is the Raspberry Pi 5 bolted onto a 4 channel NVMe SSD card
View attachment 181781
This is the underside where the SSDs are located
View attachment 181782
And this is a screenshot from the XFCE desktop - note that I have the ability to monitor the CPU temperature and the speed of the cooling fan.
View attachment 181783

So now it needs some clothes

I decided to make the case out of three 3D printed parts - a central frame - a top inverted tray and a bottom panel that locates into the bottom of the frame.
Here are a couple of links to my 3D viewer that shows the pieces - virtually.
Sorry, my 3D viewer only supports 2 pieces so there are 2 separate links
The central frame piece - stl 3D viewer
The Top and the Bottom pieces - stl 3D viewer
From those links, you can see the Top and the Bottom pieces have loads of holes for cooling.
Interestingly, the 3D printer takes a VERY long time just printing holes!!

After a few changes, here are some photos of the finished job.
The frame piece
View attachment 181784
The frame piece with the electronics fitted (viewed from the top)
View attachment 181785
And viewed from the bottom - with two NVMe SSDs fitted
View attachment 181787
The top piece (inverted tray) with cutouts for connectors
View attachment 181788
The bottom panel - more ventilation holes!! - I also printed some little feet to allow air to flow freely underneath.
View attachment 181789

And the final assembly - the white text (Raspberry Pi Server) is embedded into the black plastic by 0.8mm
View attachment 181790

I bought a new 30 watt PD power supply and one of these neat cables with LCD screen in the connector.
This photo shows that the power supply is running in PD mode and drawing 5 watts.
View attachment 181791

I did some temperature tests.
The Raspberry Pi on its NVMe board - running but not under load - settles with the CPU at about 45 degrees C and the fan off.
Under a typical load that I will be using (copying files etc), the temperature rises to around 55 degrees C and the fan running slowly.
Inside the enclosure - running but not under load, the CPU settles to around 50 degrees C with the fan running slowly all the time.
Inside the enclosure with a typical load, the CPU runs at around 58 degrees C and the fan runs faster.
I believe that the Raspberry Pi 5 will start to "throttle" at temperatures above 80 degrees C
So this system is well below those extremes.
That said, I think I might add a small fan to the top part to see if is makes any difference.

I also ran some speed tests against my old server that uses 3.5" mechanical drives.
On the old server, I copied a directory full of videos from one of its 3.5" mechanical drives to another of its 3.5" mechanical drives.
It took 86 seconds to transfer all the videos.
That same directory copied on the new Raspberry Pi from one of its NVMe drives to another of its NVMe drives only took 24 seconds.
So there seems to be a significant improvement.
More importantly, it is all solid state and a lower power consumption.

Anyway, I thought you might find the whole project interesting.

And maybe as a ships PC, this new Raspberry Pi 5 is powerful and cheap enough for lots of people to use.
For example, even the old Raspberry Pi versions will run OpenCPN so you could make your own DIY plotter.
Amazing use of the 3D printer. Mine is sitting patiently in its box while I learn FreeCad which is going well and my first design is now finished. I’ve noticed that I can export direct to STL format. Do I need to go through the mesh setup if I don’t need to make any changes?
 
Last edited:

Hurricane

Well-known member
Joined
11 Nov 2005
Messages
9,562
Location
Sant Carles de la Ràpita
Visit site
Amazing use of the 3D printer. Mine is sitting patiently in its box while I learn FreeCad which is going well and my first design is now finished. I’ve noticed that I can export direct to STL format. Do I need to go through the mesh setup if I don’t need to make any changes?
I worked that out about a week ago,
I've been unnecessarily running it through the Mesh Workbench and then Exporting it.
Doh - it seems all you have to do is make sure that the part of the model you want to print is selected (either by clicking in the main design screen or clicking in the design tree on the left).
Once you have it selected, just Export to STL.
Then either open the STL file using Bambu Studio or Import it into Bambu Studio.

Bambu Studio will take a bit of learning as well.

If it is still in the box, you haven't printed anything yet - I printed a Benchy first (from the library of models) - to check that it actually prints!!
Good luck - and enjoy - I'm having great fun with this 3D stuff - keeps the grey matter active.
 
  • Like
Reactions: vas

DavidJ

Well-known member
Joined
15 Jun 2001
Messages
5,930
Location
home in Brum. S37 sold, was in Med Spain.
Visit site
I worked that out about a week ago,
I've been unnecessarily running it through the Mesh Workbench and then Exporting it.
Doh - it seems all you have to do is make sure that the part of the model you want to print is selected (either by clicking in the main design screen or clicking in the design tree on the left).
Once you have it selected, just Export to STL.
Then either open the STL file using Bambu Studio or Import it into Bambu Studio.

Bambu Studio will take a bit of learning as well.

If it is still in the box, you haven't printed anything yet - I printed a Benchy first (from the library of models) - to check that it actually prints!!
Good luck - and enjoy - I'm having great fun with this 3D stuff - keeps the grey matter active.
Many thanks and good idea to do a Benchy first because if there was a problem I would immediately assume it was me.
It certainly activates the grey matter and recently I’ve been ignoring SHMBO for hours at a time (have to be careful there! :rolleyes: )
Bambu Studio next!
 

DavidJ

Well-known member
Joined
15 Jun 2001
Messages
5,930
Location
home in Brum. S37 sold, was in Med Spain.
Visit site
Very simple against what you guys are doing but I’m very pleased with my first (right first time) design. I skipped the “Benchy” and just went for it.
Lots to learn but the awesome Bambu Studio allows you skip ahead so you can get satisfying results very quickly.
…..and a surprise that my P1S has a camera in it!!!
IMG_7523.jpeg
 

vas

Well-known member
Joined
21 Jun 2011
Messages
8,076
Location
Volos-Athens
Visit site
seems that most 300+ 3dprinters come with a camera nowadays.

I think i've mentioned it before, make sure you store your opened filament reel in a sealed bag if not used for long and throw a few silicone gel sackets in there for good measure.
filaments is hygroscopic and if they do soak humidity they wont stick to the plate nor one to another
 

DavidJ

Well-known member
Joined
15 Jun 2001
Messages
5,930
Location
home in Brum. S37 sold, was in Med Spain.
Visit site
seems that most 300+ 3dprinters come with a camera nowadays.

I think i've mentioned it before, make sure you store your opened filament reel in a sealed bag if not used for long and throw a few silicone gel sackets in there for good measure.
filaments is hygroscopic and if they do soak humidity they wont stick to the plate nor one to another
Thanks
I wont be using it for a week so just done it.
Do you use genuine Bambu spools or third party?
 

vas

Well-known member
Joined
21 Jun 2011
Messages
8,076
Location
Volos-Athens
Visit site
David I have various ones but not a Bambu yet.
I'd recommend you get Bambu ones for now that you're new in the business, once you're more confident you can dwelve to fancier (or cheaper if you rather) filaments.

V.
 

Hurricane

Well-known member
Joined
11 Nov 2005
Messages
9,562
Location
Sant Carles de la Ràpita
Visit site
Thanks
I wont be using it for a week so just done it.
Do you use genuine Bambu spools or third party?
Yep - as Vas says - use Bambu filament - not for those reasons though.
Did you buy the AMS unit?
If so, then it is WAY easier to use the Bambu filament because the printer uses the RFID tags embedded into the spools and sets all the parameters up for you (including colour).
Bambu are also amongst the cheapest of suppliers as well.
Tip - have a look at the Bambu discounts page and also consider buying replacement refills as well as the full spools.
See this link Bambulab UK Store |Filament discounts up to 30% off
The Bambu RFID tag is fixed to the core so you can use a refill roll in any of the old used spools.
Note that their bulk prices are very good - as little as £12.99 a kilo (roll) when you buy 10 or more refills.
Like me though, you won't use that much but you may well order 4 rolls.
When ordering 4 rolls - PLA Basic comes down to £13.99 for a refill and £16.99 on a spool.
I haven't found filament any cheaper - its a no-brainer - just use Bambu - it works.

Other materials.
Again, I suggest that you stick to Bambu supply - especially if you have an AMS unit.
I found that ABS works well - produced a much better result than I expected.
Again, I just stuck it in the printer and let Bambu set all the settings for me via the AMS

Any questions, please PM me (I also have some experience now of FreeCAD - and its anomalies)
 

DavidJ

Well-known member
Joined
15 Jun 2001
Messages
5,930
Location
home in Brum. S37 sold, was in Med Spain.
Visit site
Yep - as Vas says - use Bambu filament - not for those reasons though.
Did you buy the AMS unit?
If so, then it is WAY easier to use the Bambu filament because the printer uses the RFID tags embedded into the spools and sets all the parameters up for you (including colour).
Bambu are also amongst the cheapest of suppliers as well.
Tip - have a look at the Bambu discounts page and also consider buying replacement refills as well as the full spools.
See this link Bambulab UK Store |Filament discounts up to 30% off
The Bambu RFID tag is fixed to the core so you can use a refill roll in any of the old used spools.
Note that their bulk prices are very good - as little as £12.99 a kilo (roll) when you buy 10 or more refills.
Like me though, you won't use that much but you may well order 4 rolls.
When ordering 4 rolls - PLA Basic comes down to £13.99 for a refill and £16.99 on a spool.
I haven't found filament any cheaper - its a no-brainer - just use Bambu - it works.

Other materials.
Again, I suggest that you stick to Bambu supply - especially if you have an AMS unit.
I found that ABS works well - produced a much better result than I expected.
Again, I just stuck it in the printer and let Bambu set all the settings for me via the AMS

Any questions, please PM me (I also have some experience now of FreeCAD - and its anomalies)
Yes I have the AMS unit
Thanks for your offer of help by PM. I will try not to bombard you and thanks for the tips on spools
Something I found conceptually interesting. I want to take off the spool unit to safely carry it upstairs so need a little device to undo the PTFE tube ……of course, they are available to print off.
What fun!!
 

Hurricane

Well-known member
Joined
11 Nov 2005
Messages
9,562
Location
Sant Carles de la Ràpita
Visit site
I think i've mentioned it before, make sure you store your opened filament reel in a sealed bag if not used for long and throw a few silicone gel sackets in there for good measure.
filaments is hygroscopic and if they do soak humidity they wont stick to the plate nor one to another
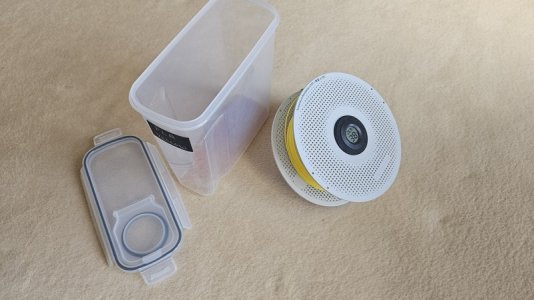
I've bought several Cereal Containers.
Each container takes a spool of filament.
I also found that the old silica gel packets you get in packaging don't work as well as loose silica beads.
So in each of my cereal containers, I place a scoop of silica beads (about £15 for more than you can use in a year).
I also bought some of these
https://www.amazon.co.uk/AITRIP-The...tal+hygrometer+thermometer+10,aps,103&sr=8-30
The ones that I bought were slightly cheaper - £10 for 10 of them but that supply seems to have dried up.
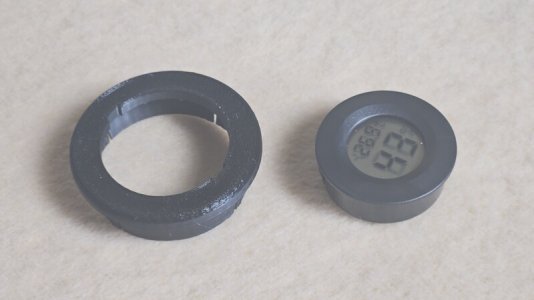
I then made a plastic bush to fit these hygrometers inside a Bambu Labs spool.
I then drop the whole thing into the cereal container like this

20240824_144754.resized.jpg

20240824_144832.resized.jpg

I could send you the FreeCAD design and/or the printable STL file for the little bushes.
 

Hurricane

Well-known member
Joined
11 Nov 2005
Messages
9,562
Location
Sant Carles de la Ràpita
Visit site
Yes I have the AMS unit
Thanks for your offer of help by PM. I will try not to bombard you and thanks for the tips on spools
Something I found conceptually interesting. I want to take off the spool unit to safely carry it upstairs so need a little device to undo the PTFE tube ……of course, they are available to print off.
What fun!!
Yep - I have made loads of these
20240824_145614.resized.jpg
Without them, the filament goes everywhere.
You can't see it in the previous post photo but, believe me, its there!!

Upstairs then!!!
I use the airing cupboard but I had to ask SWMBO nicely!!
 

Hurricane

Well-known member
Joined
11 Nov 2005
Messages
9,562
Location
Sant Carles de la Ràpita
Visit site
Freecad have just announced that their latest development is going into Release Candidate state.
Version 1.0 - its been a long time coming.
I've been playing with the weekly builds and really like it.
There are loads of new features and of course the Topological fix.
Here's a video on the RC1 release.


Since my last post, I've been honing my skills in FreeCAD.
Getting along well - mostly using the pre-release weekly builds and switching back to the stable version every now and then.
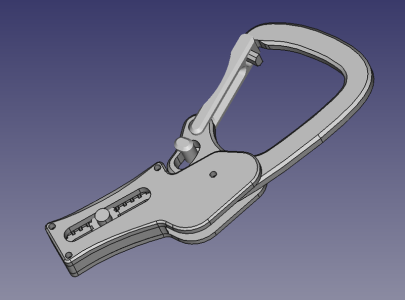
This week, I made this clip with a tensioner.

Screenshot_2024-09-10_18-40-22.resized.png

This is a link to it in my 3D viewer
stl 3D viewer

Got the idea from Printables on the internet but then made my own using FreeCAD.
SWMBO always strings lines on our flybridge when she wants to dry the washing and it is a PIA to tie them up and take them down.
So a few of these clips might do the job.
 
Top