The major restoration of Chance (Token) James Silver Western Isles Motor sailer

john_morris_uk

Well-known member
Joined
3 Jul 2002
Messages
27,314
Location
At sea somewhere.
yachtserendipity.wordpress.com
I think these days to make up new portlights you get a teenager to model them in cad, add the casting allowance, 3d print the pattern and take it to a foundary.
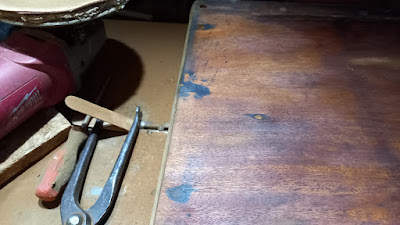
Or get a bit of plywood and make a pattern. Clamp it up against the window cutout and draw round from the inside to get the shape and a few minutes with dividers to scribe the width then a jigsaw and router and sanding block and you’d have a pattern. A job I’d enjoy.
Quicker and cheaper than the 3D printer…
 

penfold

Well-known member
Joined
25 Aug 2003
Messages
7,732
Location
On the Clyde
Visit site
Are there any jobbing brass foundries left in the UK? I'd have thought they are probably near if not at unicorn status. 3D printing of the brass is perhaps more realistic, but the process is still pricy. There are hobbyists who do backyard casting; perhaps a trawl of UK model engineering fora might yield someone willing to do it as a project.
 

john_morris_uk

Well-known member
Joined
3 Jul 2002
Messages
27,314
Location
At sea somewhere.
yachtserendipity.wordpress.com
Are there any jobbing brass foundries left in the UK? I'd have thought they are probably near if not at unicorn status. 3D printing of the brass is perhaps more realistic, but the process is still pricy. There are hobbyists who do backyard casting; perhaps a trawl of UK model engineering fora might yield someone willing to do it as a project.
Lots of bronze casting still around. Mostly for art and sculpture. However Lunt’s of Birmingham do architectural and art casting. G.W. LUNT
(I assume Chance would have had bronze fittings and not brass?)
 

jstarmarine

Active member
Joined
21 May 2021
Messages
439
Visit site
I am looking for original parts that I can refurbish not new portholes as the cost is like buying them made out of gold. nearly £700.00 each
 

jstarmarine

Active member
Joined
21 May 2021
Messages
439
Visit site
In which case you’ll have a choice. I don’t imagine the price of one off castings will be that different?
The price is not different just the cost of the raw materials. However, I would like to put original age portholes back as refurbishing old portholes is going to be a lot less costly.
 

jstarmarine

Active member
Joined
21 May 2021
Messages
439
Visit site
Input from a fellow traditional boat builder which I have known and respected

Yesterday a fellow boat builder came to Chance to give the team a his view on the way on the replacement of the transom framework and the starboard beam shelf and how he would tackle the job. His view was much along the same lines as the team's view of the job. Like the team's view, prop up the starboard corner of the last frame just ahead of the transom. This frame is the last frame before the transom framework itself.
He said that once this last frame was back in its correct position, the hull would be in the same position as the port side. As he said, the port side last frame which is still in good condition, take a pattern of this frame and make up a replacement frame for the starboard side and bring the hull up to fit this new frame buy more use of props until the hull is bad where it should be and re-fix any planks which are still there. and make any new planks which will be the correct size and shape to bring the correct shape back to this part of the hull.
Once that is achieved then remove the beam shelf after it as been exposed along is total length and remove the beam shelf only after the hull as been secured so it can not move apart any more and in some cases pulled back into its correct position as it was originally build.
He advised that we make up temporary tie rods to put in place between the old carlin and the new beam shelf to help any further movement of the hull.
Also to make up new aft deck deck beams to also help keep the starboard side in position.
So over the coming weeks it will be the task of the team to mark and remove whole of the deck planking on the aft deck to expose the deck beams and so they can be removed and replacement deck beams made in readiest to refit as soon as the new beam shelf is made and fitted.
So as you can see our hands are going to be full for the coming weeks and into the spring.
So if any of you out there wish to give us a few hours of your time it will help.
 

jstarmarine

Active member
Joined
21 May 2021
Messages
439
Visit site
This is a 36ft. silverlette currently at his boat yard.it ii 4 feet shortly than Chance. It,however, has many of same features on deck as Chance. A raised foredeck and a lower aft side and aft deck.

Chance is in many ways similar to this James Silver. The largest difference being that Chance as a full size sailing rig not just steadying sails. The deck layout between the two boats is very similar in that they have both got the same number of deck hatches on both fore and aft decks in much the same position.

The major other difference is that Chance has two sets of davits, one on the transom and the other set of davits on the port side along the aft cabin. From my research is was an option for the owner to have a tender for the crew and one for himself. The smaller tender to hang off the transom and the longer tender along the side.
The other difference being that Chance has a bow davit for lifting the anchor onboard.
All these features will be refitted to Chance when the deck is relaid later in the restoration. In the meantime the work on the transom will continue as we sort out the starboard side deck and the beam shelf and transom and rebuild these parts back they were build.
 

jstarmarine

Active member
Joined
21 May 2021
Messages
439
Visit site
A day in the lake district and visiting the Windermere Jetty Museum
Yesterday my wife Tricia and I when to the Lake District to talk to the staff at the Windermere Jetty Museum about their work on the restoration projects they have underway at the present time and the methods they use to restore and converse the craft they have at the museum.

They have to make many difficult decisions about which craft to restore, which to conserve and which to just hold until a decision as been made to go in either direction.

Having talk to the manager of the restoration team about the work they are doing on the vessels in their workshop, we both are using very similar methods gained over many years of doing traditional boat building methods to restore and converse the vessels we both work on in different parts of the UK.

One point, we agreed on was, that we need to train the younger generation in the skills they will need to restore and maintain the historic vessels we have around the UK and beyond. Some areas of the UK appear to be able to engage with the younger generation and other areas it is not so easy to engage with the younger generation. So it is up to people like myself to show that it's a pathway to pursue and that there is sense of reward that you have saved an historic vessel that would otherwise be lost to the historic fleet of vessels and the methods of construction that was used in their build.

The main driving force behind us restoring Chance, is that she is a unique "Western Isles" motorsailer which was a vessel that John Bain designed for her first owner, Lovett Crossley who wish to explore the western isles of Scotland during his and his wife's retirement.

John Bain was during this time the owner of the James Silver boatyard and was the James Silver boatyard chief designer during the time when Chance was build at the boatyard in1948.

While we were at the Windermere Jetty Museum we saw a couple of boats which fired my lifelong love of boats and in turn my career into boat building when I was 16 years old and which made me move from West Yorkshire to Norfolk. The two boats were the Swallow and the Amazon was were the names of the boats from novel by Arthur Ransome of the same name. These two boats which as a child fired my imagination about sailing small boats and having adventures were still in existence. They may not be original boats, however, the fact they are reproduction boats to a design of the original boats does not matter.the fact that the boats are still around for people to enjoy them and remember their own childhood is still good.

We are at the moment editing a video of our trip to the Windermere Jetty Museum and hope to have it release on Friday next week for our patreon to view before releasing it to the Public on the following Tuesday.
 

jstarmarine

Active member
Joined
21 May 2021
Messages
439
Visit site
Having weathered the winter in good condition it is now time to get into sorting out the list of jobs we need to do to get the hull sorted out over the spring and summer.


While Simon gets on with the transom and the other major jobs to sort out the back of the boat, Tricia and friends will be able to make a start on removing the rotten planks and make patterns to spoilt


This is the photo of the forward port side davit base with the casted bronze plate removed for use as a pattern for the other four deck plates needed to be replaced as they are missing, because they have been removed by previous owners. The other deck plates are for the aft port side davit the two needed for the transom davits for the small dinghy and the starboard bow davit to recover the bow anchor.


The port side side deck which has not been messed about with over the years unlike the starboard side deck which has been chopped about a lot.


Main mast tabernacle position which need patterning up to have a new tabernacle made


The size of the foredeck is massive and will need a lot of sanding and re-caulking in the future


The wheel house which is in need a lot of work and sanding back to bare wood so it can be varnished like it was originally done.


jstarmarine

Active member
Joined
21 May 2021
Messages
439
Visit site
Today, our son Michael has been sanding down the first of four butterfly hatch lids which have been removed from Chance before Christmas and now that they have had a chance to dry out Michael is sanding down the hatch lids and has been highlighting any damage that they have, so between us we can make any repairs necessary to restore them to their former original condition.

Together, we both have to still have to remove the base parts of the hatch from the foredeck of Chance which have been proving to be a bit of a job to remove to say the least. Although, we have already started, they are proving to be not coming out even after all the fixings have been removed holding them down to the deck beams.

However, it is on the job list to get done shortly. given that we need to get the hatch bases removed as part of the bigger jobs on the hatches and the fore deck.

Simon has been making a replacement hatch rail holder for the one that is missing off the hatch lids. Simon is also going to measure up for a set of replacement rods to fit the hatch lids protection. These new rods will stop people from putting their feet through the glass in the hatch lids and with these rods in place the hatches will look like they were originally made when Chance was build and commissioned. Simon is also a full time boat builder and in his spare time when not restoring Chance or his other restoration project Mai Star II does a little bit of car restoration. So he has his hands full and not a lot of spare time. He says that he would not be doing this job for the past 47 years if he did not enjoy the daily challenges of his varied job and that everyday is different.
 

jstarmarine

Active member
Joined
21 May 2021
Messages
439
Visit site
This is the original galley worktop before it was sanded down to see the condition of the top and see if it could be used again.


After a good sanding down with course to fine sandpaper it came back up to a reasonable condition and it can be salvaged.


The trim around the edges will have to be removed and a trim which should be on the worktop will be made and re-fixed in position to be like it was when the galley top was originally fitted.


There is a small area of rot along the back edge, however, with a bit of cutting and letting in it will okay to be refitted when the locker is rebuild that this worktop sits on.


A bit of screw sickness from the builders using steel screws to fix down the worktop.


This is a worktop that was removed from the galley area which covered the original worktop and was longer than the original worktop which was fitted a some stage in the past to make a longer worktop. The original worktop when be going back in and the galley area rebuild as it was originally build.


tillergirl

Well-known member
Joined
5 Nov 2002
Messages
8,380
Location
West Mersea
Visit site
You remind me of the experience with Tiller Girl - steel screws. When I bought her, she had a genuine teak deck: 1" teak on 1/4" ply. Lovely but the deck leaked. Of course I recaulked the deck but in my second season I had to do it again. I thought I had done it poorly the first time but even when I did a second time, there was a persistent leak after perhaps a month of sailing.

I put up with that for a few years until we hopped round from Dover back to Ramsgate on a very windy rough day. We spent several hours with significant on the deck and when we berthed in Ramsgate below wasn't great. Everything was damp. So that winter I decided I had to lift the deck and refit it. I started trying to remove individual screws but it averaged me about an hour and a half without damaging the teak. Given that I was working then, I worked out that it would take me 7 winters to lift each screw! But I discovered why the deck had failed: steel screws! You can hear the builder telling the commissioning owner that the steel screws would outlive him. And they did but after 35 years, they now failed. When I did strip out the deck I discovered there was an area where most of the steel screws had rotted away and the caulking could not withstand the movement of the by then loose deck. Of course the deck wasn't loosen in the sense of being obvious but working to windward she 'worked'.

In the end I decided when I saw all the fresh water damage from the deck, I decided to fit a high spec. sapele ply rather than buying another teak deck. When I finsihed and sailed her I found that she was a much 'tighter' boat. It was more a sense of tightness that anything more and when I parted with her on the grounds of arthritis I thought the deck was still as good as new. Oh, buy the way, (fruedian spelling sorry) I used silicon bronze screws, all properly plugged!
 

jstarmarine

Active member
Joined
21 May 2021
Messages
439
Visit site
These are the three different sets of steps for different parts of the boat.
The left set of steps are the ones from the cockpit into the main cabin, the middle set of steps are the steps from the cockpit to the aft cabin and finally the right hand set are the cockpit entrance to deck steps.


The first job was to remove all the fittings off the steps and place them in individual pots so the fitting can go back on when the steps are re-varnished and ready to refitted to the boat.


The aft passage way steps which are blanked off at the back as this part of the steps leads into the aft end of the engine bay.


A tall set of steps to go from the cockpit down into the main cabin


An interesting way of locking the steps threads to the raisers by a square peg and a wedge hammered into position to lock the two parts together.


The rest of the steps were just screwed or pin together.


The first set of steps sanded down ready for a coat of varnish over the coming weeks.


You remind me of the experience with Tiller Girl - steel screws. When I bought her, she had a genuine teak deck: 1" teak on 1/4" ply. Lovely but the deck leaked. Of course I re-caulked the deck but in my second season I had to do it again. I thought I had done it poorly the first time but even when I did a second time, there was a persistent leak after perhaps a month of sailing.

I put up with that for a few years until we hopped round from Dover back to Ramsgate on a very windy rough day. We spent several hours with significant on the deck and when we berthed in Ramsgate below wasn't great. Everything was damp. So that winter I decided I had to lift the deck and refit it. I started trying to remove individual screws but it averaged me about an hour and a half without damaging the teak. Given that I was working then, I worked out that it would take me 7 winters to lift each screw! But I discovered why the deck had failed: steel screws! You can hear the builder telling the commissioning owner that the steel screws would outlive him. And they did but after 35 years, they now failed. When I did strip out the deck I discovered there was an area where most of the steel screws had rotted away and the caulking could not withstand the movement of the by then loose deck. Of course the deck wasn't loosen in the sense of being obvious but working to windward she 'worked'.

In the end I decided when I saw all the fresh water damage from the deck, I decided to fit a high spec. sapele ply rather than buying another teak deck. When I finished and sailed her I found that she was a much 'tighter' boat. It was more a sense of tightness that anything more and when I parted with her on the grounds of arthritis I thought the deck was still as good as new. Oh, buy the way, (Freudian spelling sorry) I used silicon bronze screws, all properly plugged!
Hi,
As I am getting more into working on Chance both on her and on the interior furniture, it is becoming clear that some of the work was done very well, however, the fixing they used to fix some parts together is not at the same high quality as some of the other James Silver's that build at the same time.

Places that you would expect brass or bronze screws to be used they have use galvanized steel screws, places such as the teak decking, some of the interior furniture which as been screwed together with galvanized steel screws and the deck planking screwed down with galvanized steel screws.

I put it down to lack of brass or bronze fixings after the Second World War and they were using what they had to hand at the time and to keep the costs down at the same time.

On a different note the three sets of steps the boat has are being up a few surprises in that they all are build differently in the way the threads are fixed in place. As you can see from a previous posting. Heavens knows why this should be?

All the decks on Chance will be coming up over the course of the restoration and the decks will all be re-laid on a sub deck so that the deck will not leak like they have in the past. I know that when I worked on Chance before someone had canvased the deck so to stop it from leaking in the short term, but between me working on her this had been removed and the deck started leaking again and starting the deck beams to rot where the freshwater could collect . But that's life it all make for an interesting restoration project and keeps me out of mischief.
 
Top