Making connections to DC panel

eddystone

Well-known member
Joined
18 Aug 2013
Messages
1,853
Location
North West Devon
Visit site
Total numpty with electrics. Few questions:

I'm taking out AIS receiver (Macmurdo with built in splitter), defective Garmin GPS128 and ICOM VHF.

New VHF with GPS built in is same make so should take all existing connections (just as well as VHF connection is supposed to bypass panel and i don't know how to do that)

Putting in AIS transceiver in same position as old one so can use same power lead - I'm assuming this goes to instrument terminal on panel. Separate splitter can use spare power lead formerly used by Garmin 128 - so far so good. I haven't needed to make any new 12V power connections.

However, I also need to fit:

a) combined 12v cigarette socket and twin USB at the chart table - this has a twin blade connector for each one.
b) another 12v socket to be installed in the hanging locker for a small coolbox.
c) a red LED chart table light on a wand/stalk to be wired to starboard interior light terminal - does this need a separate run to the panel or can I somehow splice it to nearest cabin light?

The sockets should be live when the battery is switched on so where would I connect these at the panel?
I can get a Xmas tree type extension for the positive terminals but the negative bar is completely chocker - there is no space for any further connections - is there a way of adding new attachment points?
What fuse rating in positive wire for a) instrument, b) 12v socket?

My aim is to do what I can then get someone to sort out the mess later
 

rogerthebodger

Well-known member
Joined
3 Nov 2001
Messages
13,520
Visit site
+1 for that. With all due respect to the posters on this forum, including myself, without seeing your set up or being "On site" I would suggest that you will get so much conflicting advice that you will be even more confused! :unsure:

Total agree with Vic and Alex.

The issue is finding some one who will just do as you ask and not to try to convince to do a complete rewire so he can maximize his inome.

word of mouth is the best kind of recommendation.

Decide what you need doing and stick to it with no extras until after the initial work is done
 

Tranona

Well-known member
Joined
10 Nov 2007
Messages
42,329
Visit site
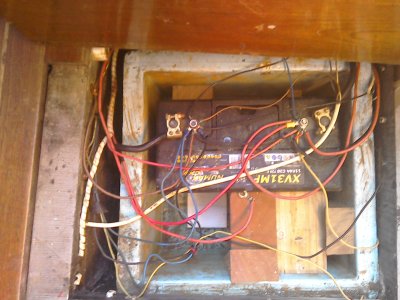
Agree with others. Really not possible to make any meaningful comment without seeing the current system, which I guess you have now outgrown. At some point you have to bite the bullet and replace the distribution panel to give you more circuits for the additional gear. No reason why you cannot group some related items together such as VHF, AIS and splitter on one circuit suitably fused, or interior lights which are individually switched. Adding in to existing circuits is what leads to messes like this (extreme example of my boat as bought - even though everything worked!)
 

Attachments

  • IMG_20211202_141302.jpg
    IMG_20211202_141302.jpg
    813.8 KB · Views: 51

KevinV

Well-known member
Joined
12 Oct 2021
Messages
3,013
Visit site
Total numpty with electrics. Few questions:

I'm taking out AIS receiver (Macmurdo with built in splitter), defective Garmin GPS128 and ICOM VHF.

New VHF with GPS built in is same make so should take all existing connections (just as well as VHF connection is supposed to bypass panel and i don't know how to do that)

Putting in AIS transceiver in same position as old one so can use same power lead - I'm assuming this goes to instrument terminal on panel. Separate splitter can use spare power lead formerly used by Garmin 128 - so far so good. I haven't needed to make any new 12V power connections.

However, I also need to fit:

a) combined 12v cigarette socket and twin USB at the chart table - this has a twin blade connector for each one.
b) another 12v socket to be installed in the hanging locker for a small coolbox.
c) a red LED chart table light on a wand/stalk to be wired to starboard interior light terminal - does this need a separate run to the panel or can I somehow splice it to nearest cabin light?

The sockets should be live when the battery is switched on so where would I connect these at the panel?
I can get a Xmas tree type extension for the positive terminals but the negative bar is completely chocker - there is no space for any further connections - is there a way of adding new attachment points?
What fuse rating in positive wire for a) instrument, b) 12v socket?

My aim is to do what I can then get someone to sort out the mess later
I'm not as negative about diy'ing this as the others, but I really do think you need to draw yourself a diagram before you start randomly adding bits. Split it into what's on each switch - makes it a lot simpler to envisage. It'll help you to think logically about one thing at a time - for instance, changing the negative post for a busbar is a piece of cake - obvious if you spend a few moments thinking about it rather than your current "everything at once" question.

I'd also consider carefully whether putting a socket and an electrical item in the wet locker is a good idea.

The 12v bible is a really useful book to have - it's much clearer than any post on here can be.
 

ylop

Well-known member
Joined
10 Oct 2016
Messages
2,445
Visit site
Total numpty with electrics. Few questions:

I'm taking out AIS receiver ...

Putting in AIS transceiver in same position as old one so can use same power lead
If you are going from receiver only to transceiver you probably want to check the power demand. The former is tiny, the latter I expect is a bit beefier, might blow a fuse, or worse not blow a fuse and melt your wiring after its been running for a while! Personally, I quite like individual switches for individual instruments/items so a fault can be isolated either to help trace it or to let everything else work until you can repair it properly, or to save power.
However, I also need to fit:

a) combined 12v cigarette socket and twin USB at the chart table - this has a twin blade connector for each one.
b) another 12v socket to be installed in the hanging locker for a small coolbox.
Are you sure that's what you want to do?
I assume you mean a locker where your wet oilies would normally hang? Its a horrible damp place which is not good for electronics (if I had to put any there I would not use a cigarette socket - but would replace with a waterproof plug/socket). They are often also places which get warm from engine or a heater (to help dry the clothes) so are a bad choice for a fridge.
Small coolboxes consume lots of power - you'll want to spec your cable and fuses accordingly. Doing that involves understanding the distances from locker to battery.
c) a red LED chart table light on a wand/stalk to be wired to starboard interior light terminal - does this need a separate run to the panel or can I somehow splice it to nearest cabin light?
I'm not sure exactly what you mean - but I am guessing you've swapped cabin lights from halogen to LED at some point already so the wiring is already over spec so you can "tap into" that circuit if its easier without worrying about overloading it - especially as you'd only ever use the red light when the rest were off.
The sockets should be live when the battery is switched on so where would I connect these at the panel?
I'd strongly recommend having a switch for them (and given the cost of a switch one for each).
I can get a Xmas tree type extension for the positive terminals
I'm imagining what that looks like. depending where you plug the "master" end of that into you might be overloading the supply. you might be adding 20A of load to wiring that has no spare capacity.
but the negative bar is completely chocker - there is no space for any further connections - is there a way of adding new attachment points?
There's always a way to bodge more connections but its probably better to add a new bus bar.
What fuse rating in positive wire for a) instrument, b) 12v socket?
The one that is appropriate for both the load (instruments, cooler etc) and the wiring that supplies it.

In contrast to some who have commented already, I'd say its really worth putting the effort in to learn how your stuff works so you investigate and solve issues yourself. When you are bobbing around in an anchorage trying to work out where someone hid the fuse for whatever has stopped working its a lot easier if you fitted it yourself and labelled it all and drew a sensible diagram.
 

Supertramp

Well-known member
Joined
18 Jul 2020
Messages
1,022
Location
Halifax
Visit site
+1 for doing it yourself but only if you research the principles and make a wiring diagram and get the proper material and tools to do it. A lot of value in understanding your electrics and having confidence. I keep crimpers, heat gun and tape labeller on board and they get used.

I always like to have fuses between battery and components, and a switch board so everything can be turned off properly. Replacing existing wiring is relatively easy but piggy backing of existing devices is not a good practice.
 

lustyd

Well-known member
Joined
27 Jul 2010
Messages
12,398
Visit site
I'd suggest a book on 12V electrics?

I used one of these 6 way fuse boxes from ebay recently.
6 Way Blade Fuse Box Block FuseBox Holder Auto Marine Bus Bar Car Kit 12V 32V | eBay
It has a negative buss bar with a few screw connections for crimped eyes, it enabled tidying up old wiring and getting rid of a lot of choc blocks from last century.
I just fitted two of these plus a 12 way. One goes straight to main battery switch (who wants to be individually turning things on all the time?!) and the others to one switch each on the panel. Much, much neater now and everything is nicely fused with individual blade fuses. I have the odd in-line fuse too for smaller items which blades are too large for.
I bought from Amazon for similar price but with the various advantages that come with shopping at a shop. Identical kit though and excellent quality.
 

steve yates

Well-known member
Joined
16 Oct 2014
Messages
3,860
Location
Benfleet, Essex/Keswick, Cumbria
Visit site
As someone who has completely rewired a small boat, I would say pay someone to sort this for you, OR bite the bullet and do the whole thing yourself, but that means researching everything from hooking up the batteries to making switchpanels, to fusing, and getting the tools and materials to crimp and heat shrink connections.
I dont think there is any real half measure here. Its time and effort but you will know your electrics inside out. If no time, paying someone sorts it immediately and properly.
 

B27

Well-known member
Joined
26 Jul 2023
Messages
2,068
Visit site
Personally, I'd say a lot of boats have wiring that can be attacked in chunks.
A complete re-wire is a lot of work, running new cables etc, it's many hours.

Changing a switch panel and fuse box behind my main chart table control area was a 'chunk of work' done in 2 or 3 afternoons.
Label all the existing wires.
Remove old switch/fuse panel
Install new panel and fuse box
Transfer wiring.

It helps to do what prep you can before taking anything apart, like suss out as much of the old stuff as you can, make any panels or brackets, buy all the odds and ends, do any peripheral jobs, e.g. I had to put in fatter wire for my fridge, I did that before trashing the panel. I sorted a few dodgy connections outside the panel so when the nav lights didn't work I knew whether it was a panel fault or not.

Then I can deal with stuff one circuit at a time.

For me it was important to not have the boat in bits when I might want to use it, so I was happy to sort one 'chunk' and tick that off, then go sailing.
Next chunk is new cabin lights, one circuit at a time.

I now have a whole bunch of small jobs I can do one at a time without disabling the boat.
 

Neeves

Well-known member
Joined
20 Nov 2011
Messages
13,103
Location
Sydney, Australia.
Visit site
My only comment, repeating one above, don't use cigarette sockets for your socket. If nothing else, they corrode. There are plenty of appropriate sockets that are much better and reliable.

My other comment is take the time to label all the old and any new circuits, I think Tranona made the same comment. Before we ordered Josepheline we looked at a number of second hand yachts and too many were poorly presented. One had 3 generations of unlabelled wiring. The wiring in Tranona's picture was superb in comparison to what we saw, noodles came to mind. My thought was if this is the wiring - what is the state of other components.

Much of the time in yacht wiring is simply routing the cables. When you employ an electrician some of his time is simply installing cable neatly - you should be able to do this yourself - even if you have a sparky make the connections.

Jonathan
 

B27

Well-known member
Joined
26 Jul 2023
Messages
2,068
Visit site
Cig lighter sockets are carp, but they are useful because 'stuff' ends up on board which fits them.
If you choose your own 'superior' socket, someone will turn up with something to plug in, whether it's a drill charger or a soldering iron or a pump to inflate their SUP.
How many people can agree which 'better' socket to fit?

At least these days 5V USB is taking over!
 

Lomax

Member
Joined
22 Sep 2016
Messages
375
Visit site
Forgive me if I'm stating the obvious, but the most important piece of advice I can give to anyone who wants to DIY DC circuits on their boat (and who doesn't?) is to remember that a fuse is there to protect the cable, and not the piece of equipment at the other end. Fuses should never be larger than the current the connected cable(s) can safely carry (individually if more than one). Of course the cable needs to be dimensioned for the current requirements of the equipment, but as long as you follow this simple rule you've eliminated the majority of potential dangers. For the protection to be effective fuses should always be installed as close as possible to the distribution point from which power is drawn, with progressively larger fuses and thicker cables the closer you get to the battery bank, following the previous rule.

Edit: Another way to put it is that it's not underdimensioned cable but overdimensioned fuses which cause fires.
 
Last edited:

Lomax

Member
Joined
22 Sep 2016
Messages
375
Visit site
I would also recommend spending the extra £££ to buy tinned cable, and investing in a selection of glue lined heat shrink tubing, with which to cover cable joins and end terminals. Once installed, coat terminals with spray vaseline, which is very effective at preventing corrosion.
 

Lomax

Member
Joined
22 Sep 2016
Messages
375
Visit site
My other comment is take the time to label all the old and any new circuits
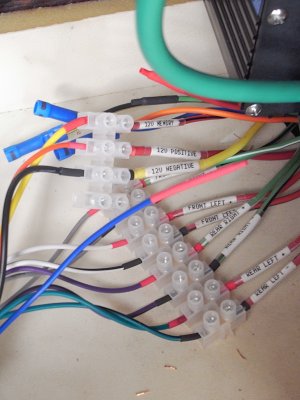
Yes please! Ideally in a way that allows both ends to be identified, and which doesn't fall off, fade, or get wiped out by fuel. Clear heatshrink tubing is great for protecting labels on cables. Virtually indestructible.
 

Attachments

  • labels+heatshrink.jpg
    labels+heatshrink.jpg
    407.9 KB · Views: 25

PaulRainbow

Well-known member
Joined
16 May 2016
Messages
17,049
Location
Suffolk
Visit site
Forgive me if I'm stating the obvious, but the most important piece of advice I can give to anyone who wants to DIY DC circuits on their boat (and who doesn't?) is to remember that a fuse is there to protect the cable, and not the piece of equipment at the other end. Fuses should never be larger than the current the connected cable(s) can safely carry (individually if more than one). Of course the cable needs to be dimensioned for the current requirements of the equipment, but as long as you follow this simple rule you've eliminated the majority of potential dangers. For the protection to be effective fuses should always be installed as close as possible to the distribution point from which power is drawn, with progressively larger fuses and thicker cables the closer you get to the battery bank, following the previous rule.

Edit: Another way to put it is that it's not underdimensioned cable but overdimensioned fuses which cause fires.
Not all fuse are there to protect the cable, some also protect the equipment the other end.
 
Top