Whats best Permateek or Flexiteek synthetic teak decking any problems encountered

Stewbabe

New member
Joined
20 Jan 2022
Messages
21
Visit site
Hi Guys whats the best synthetic teak decking out of Permateek and Flexiteek !! Anyone had any problems !! It would be for a 28 ft sportsboat cockpit and bathing platform !! What about warranty !! Thanks Guys
 

Hurricane

Well-known member
Joined
11 Nov 2005
Messages
9,393
Location
Sant Carles de la Ràpita
Visit site
I have Flexiteek on our bathing platform - done about 5/6 years ago.
And I've done/doing the rest with Trakmark (the trade division of Tekdek).
For me, Flexiteek has a problem in its colour fastness.
Tekdek (Trakmark) soesn't discolour over time.

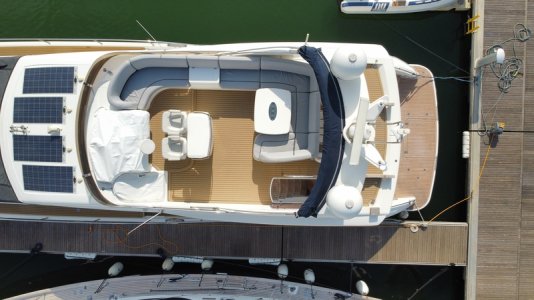
This drone photo shows the difference in colour.
The Flexiteek on the bathing platform has gone a shade of pink.
Photo_6553866_DJI_266_jpg_5026848_0_20217985840_photo_original.resized.jpg

Trakmark also supply for DIY
 

Stewbabe

New member
Joined
20 Jan 2022
Messages
21
Visit site
Thanks guys Permateek want £500 per square metre all in fitted !! I am going to measure but I think I need about four square metres !!
 

Hurricane

Well-known member
Joined
11 Nov 2005
Messages
9,393
Location
Sant Carles de la Ràpita
Visit site
Right now, I into my next phase of teak replacement (Trakmark).
This time its the cockpit.
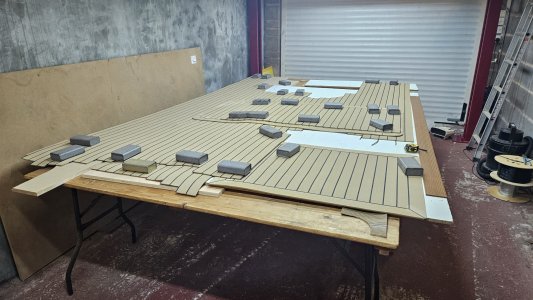
Here is a photo of the progress so far - only just fits in my garage.
Untitled.jpg

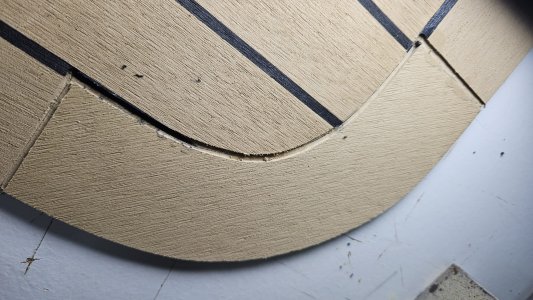
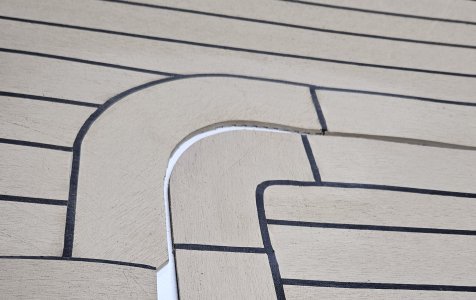
I am working on a new (to me) technique to make curved corners.

Untitled.jpg

Seems to work - this is the hatch for the lazerette

Untitled.jpg

Although I say it myself, I'm much better at welding than when I started. I think I've even cracked top welding!!
 

jfm

Well-known member
Joined
16 May 2001
Messages
23,679
Location
Jersey/Antibes
Visit site
I have Flexiteek on a couple of tenders and like it very much. I am a bit concerned about it going pink as per Hurricane's picture, though the tenders in my case are both stored out of the sun so should be ok.

I have had good results from Wilks Dek-King but this seems to have ended according to this post Last ever Dek-King installation?

I also have Marinedeck 2000 Stazo® marinedeck | Stazo on a tender and this gives absolutely the best grip, better than any of the others, but it's not the prettiest looking and not pretty enough imho for the mothership. Only builder I can think of using it wholesale is Amer, but imho it looks ugly on those 100 footer.

I have no experience of Permateek.

In sunny climates, eg the Med, I wouldn't use any of these products (apart from Marinedeck2000). OK on a tender, but not the mothership. I have tried it and they just feel too hot in the sun. Some manufacturers offer a version that they say doesn't get so hot, but these still get too hot imho. Perfectly fine in more northern climates eg UK

@Hurricane - huge respect and admiration for what you have done on JW!
 
Last edited:

harvey38

Well-known member
Joined
27 May 2008
Messages
1,623
Visit site
Thanks guys Permateek want £500 per square metre all in fitted !! I am going to measure but I think I need about four square metres !!
Tek-Dek were a piece cheaper than that, our link below has quite a few photos of their work.
 

Hurricane

Well-known member
Joined
11 Nov 2005
Messages
9,393
Location
Sant Carles de la Ràpita
Visit site
@Hurricane - huge respect and admiration for what you have done on JW!

I love challenges.
Having been retired for a long time, learning how to weld up synthetic teak is just one of the things that keeps my brain active.
Initially, my work in making the teak was average but, like most things, when you set your mind to it, you can achieve good results.
The difference between me and a professional job is that I take a lot longer over it - because I have the time.
Same with my sewing projects - a set of cockpit covers take me about a month to make and very little cost.
SWMBO lets me lay out my projects so that I can do a few hours and leave it where it is until the next day.
For example, today I only spent about 3 or 4 hours on this teak job.
Tomorrow I hope to do a bit more welding - maybe another 3 or 4 hours.
At this rate, I think it will be ready in a week or to take out to Spain at the end of March.

That said, when we did the flybridge (just SWMBO and I) it was VERY hard work.
So this time, we are making it easier and using a local one man contractor in SCM who has fitted Flexiteek several times before.
In deed he has just finished replacing a Princess 72 with Flexiteek - he stripped the old and laid the new after buying the deck from a dealer.
So, I'm making the panels and he will be fitting them.
I will post some photos of the work as it progresses.
 

dustywings

Active member
Joined
7 Aug 2011
Messages
441
Location
Home in Lymington boat in Mylor
Visit site
We had Permateek fitted to our Squadron 58 and were very pleased with it, we loved the colour and being in the UK the fact that on a sunny day it was hotter to the touch than real wood was rarely an issue (sadly!). Synthetic decks make maintenance very easy as you can just pressure wash them down when they get grubby. Real teak does have benefits of course but there is a cost differential too. You can see what mine looked like and what the process was here:
Squadron 58 Replacement Decks
 

Fire99

Well-known member
Joined
11 Oct 2001
Messages
3,481
Location
Bangor NI
Visit site
We had Permateek fitted to our Squadron 58 and were very pleased with it, we loved the colour and being in the UK the fact that on a sunny day it was hotter to the touch than real wood was rarely an issue (sadly!). Synthetic decks make maintenance very easy as you can just pressure wash them down when they get grubby. Real teak does have benefits of course but there is a cost differential too. You can see what mine looked like and what the process was here:
Squadron 58 Replacement Decks
Just looked at your install pics. It looks 1st class! Great work.. :cool:
 

benjenbav

Well-known member
Joined
12 Aug 2004
Messages
14,840
Visit site
Right now, I into my next phase of teak replacement (Trakmark).
This time its the cockpit.
Here is a photo of the progress so far - only just fits in my garage.
View attachment 171567

I am working on a new (to me) technique to make curved corners.

View attachment 171568

Seems to work - this is the hatch for the lazerette

View attachment 171569

Although I say it myself, I'm much better at welding than when I started. I think I've even cracked top welding!!
I like your router jig. How did you radius the curves for the board and the perspex block?
 

Canopy Locked

Well-known member
Joined
5 Dec 2006
Messages
1,045
Location
Nth East Scotland
Visit site
I'm going with Permateak - Not brave enough to measure & fit myself - too expensive to get wrong and too visible if a mistake is made - I'm paying around £2k for 4.8m2. But that includes 2 x 400 mile round trips for the guy to come and measure and then fit on the 2nd visit. I think it will be well worthwhile!
 

Hurricane

Well-known member
Joined
11 Nov 2005
Messages
9,393
Location
Sant Carles de la Ràpita
Visit site
My progress today.

Untitled.jpg

Untitled2.jpg

Doesn't look much further on - I had some interruptions today.
But I did manage to do the borders around the hatches today.
Ready for a measurement check tomorrow - then the bit under the cockpit table and then the border down to the transom gates.
 

Hurricane

Well-known member
Joined
11 Nov 2005
Messages
9,393
Location
Sant Carles de la Ràpita
Visit site
I like your router jig. How did you radius the curves for the board and the perspex block?
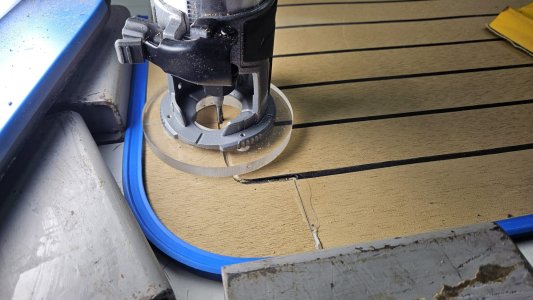
No set jig.
I have spent a lot of time thinking about borders - even some hairbrained ideas of CNC routing!!

The solution in the end is quite simple.
I cut two perspex discs - exactly 57.25mm radius
I fitted on onto a cheap Palm Router, making sure that the disc was centered.
The other disc has a hole in the center for a pencil.

The process is as follows:-
Draw the profile of one of the edges (I used an old school compass for the round corners).
If it is an inside border/curve, I draw the profile for the outside edge (in this case using a compass)
If it is an outside border/curve, I draw the profile for the inside edge (in this case using a compass)
I hope that makes sense.

After cutting the appropriate edge, I use one of those bendy French curves.
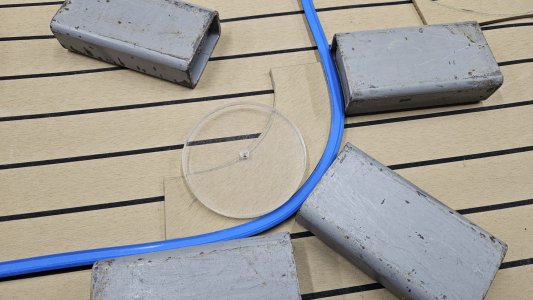
I push the French curve around the previously cut edge and hold it in place with some weights (a good set of weights are vital when making this stuff).
I then use the disc wit a hole in the center to draw the other edge.
And cut it.
That now leaves a border piece that is the exact size.

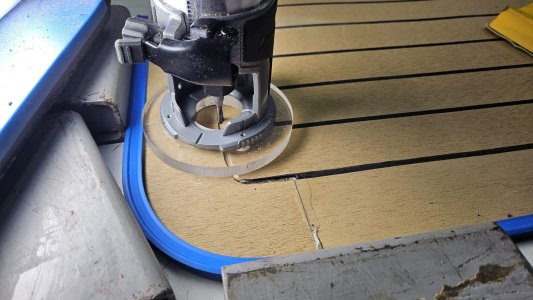
This pic shows the technique - in the pic, I've already cut the curve.
Untitled.jpg

I then glue that border piece into the job.
The reason for all this is that later when the that piece is fitted into the job, I can use the same edge and same French Curve but this time I use the disc that it fitted to the Palm Router.
Like this
Untitled1.jpg

This leaves a nice groove with smooth edges like this
Untitled3.jpg

Those straight grooves are made using a standard Plunge Router and a perspex fence.

Trakmark supply a special soft welding rod with a lower melting point for top welds.
Using the same weld tool and nozzle, the weld rod is fed into the groove.
Excess rod is cut off and the job sanded.

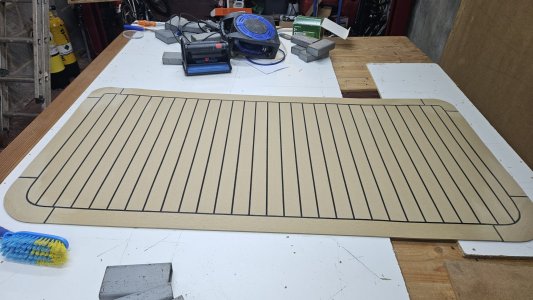
Final result
20240201_195907.jpg

Hope that answers the question.
 

benjenbav

Well-known member
Joined
12 Aug 2004
Messages
14,840
Visit site
No set jig.
I have spent a lot of time thinking about borders - even some hairbrained ideas of CNC routing!!

The solution in the end is quite simple.
I cut two perspex discs - exactly 57.25mm radius
I fitted on onto a cheap Palm Router, making sure that the disc was centered.
The other disc has a hole in the center for a pencil.

The process is as follows:-
Draw the profile of one of the edges (I used an old school compass for the round corners).
If it is an inside border/curve, I draw the profile for the outside edge (in this case using a compass)
If it is an outside border/curve, I draw the profile for the inside edge (in this case using a compass)
I hope that makes sense.

After cutting the appropriate edge, I use one of those bendy French curves.
I push the French curve around the previously cut edge and hold it in place with some weights (a good set of weights are vital when making this stuff).
I then use the disc wit a hole in the center to draw the other edge.
And cut it.
That now leaves a border piece that is the exact size.

This pic shows the technique - in the pic, I've already cut the curve.
View attachment 171642

I then glue that border piece into the job.
The reason for all this is that later when the that piece is fitted into the job, I can use the same edge and same French Curve but this time I use the disc that it fitted to the Palm Router.
Like this
View attachment 171643

This leaves a nice groove with smooth edges like this
View attachment 171644

Those straight grooves are made using a standard Plunge Router and a perspex fence.

Trakmark supply a special soft welding rod with a lower melting point for top welds.
Using the same weld tool and nozzle, the weld rod is fed into the groove.
Excess rod is cut off and the job sanded.

Final result
View attachment 171647

Hope that answers the question.
Thanks. All good thinking …and execution. 👍
 

Stewbabe

New member
Joined
20 Jan 2022
Messages
21
Visit site
I'm going with Permateak - Not brave enough to measure & fit myself - too expensive to get wrong and too visible if a mistake is made - I'm paying around £2k for 4.8m2. But that includes 2 x 400 mile round trips for the guy to come and measure and then fit on the 2nd visit. I think it will be well worthwhile!
Hi which company are you using and where is your boat! Does that price include preparing the floor/removing old teak! Thanks Stew
 
Top