Hurricane
Well-Known Member
My job has now got too big for my garage - I had to open the doors.
Maybe a bigger garage - or a smaller boat!!

Maybe a bigger garage - or a smaller boat!!
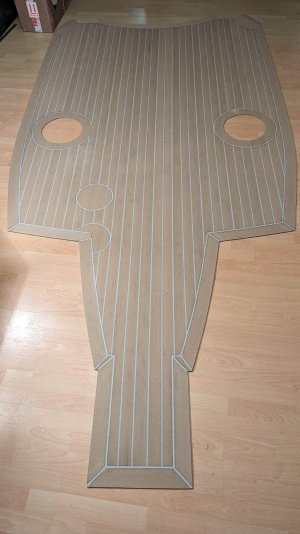
Hurricane, I'm curious about why - on the lazarette hatch - the corner pieces of the border are not the same on the corners close to the camera as on the corners away from the camera. The joints between the straight pieces of border and the corner border pieces intersect different planks, and the radii seem different. Are you copying the Princess original and is there a reason they did it that way?
Yep - it is a bit strange, the radii are different.Hurricane, I'm curious about why - on the lazarette hatch - the corner pieces of the border are not the same on the corners close to the camera as on the corners away from the camera. The joints between the straight pieces of border and the corner border pieces intersect different planks, and the radii seem different. Are you copying the Princess original and is there a reason they did it that way?


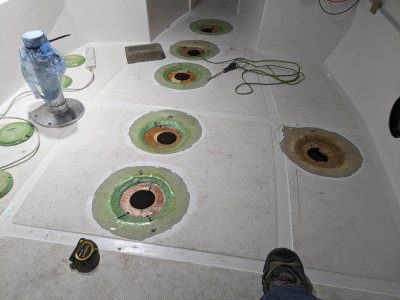
We had ours done in three sections over two years, upper helm, ring deck and coach roof, Roughly £3k per section. Tek-Dek did all the templating and fitting and travelling from their base in Hampshire to Ramsgate.I'm interested in the cost and fitting of the various options paid by forumites,
I've just been quoted 'telephone numbers' for about five square meters on cockpit and platform.
I had a price from the Spanish Flexiteek agent.I'm interested in the cost and fitting of the various options paid by forumites,
I've just been quoted 'telephone numbers' for about five square meters on cockpit and platform.


As harvey38 says, it does bend a lot after it is heated.The stuff I see advertised comes in straight strips.
How did you do the curved border edges.
Is there another product for this or does the stuff bend ?


I’m also blown away by Hurricane’s work on this. I think - and perhaps he will confirm or refute - that he followed the Princess OEM ‘caulking’ pattern for the new surface? In any event I do like the fact that there’s a king plank patterned in and the clever working of margins to avoid the appearance of unduly thin strips.Hurricane your work here really is superb. Huge respect. Requires plenty of patience and stamina I bet.
Ref post #23, your foredeck is 100x better than the other Princess 67.
Good idea to use the king plank raw material to make moderately curved border pieces.
It really does - thank you.Hope that helps
Trakmark were very helpful in getting started.It really does - thank you.
I'm just about to start my job, which is a much smaller project, but your info and advice is invaluable.
I too will source the materials from Trackmaster in Alton. Did you find them helpful at the beginning of your learning curve?


In fact, I don't follow the Princess caulking patterns.I’m also blown away by Hurricane’s work on this. I think - and perhaps he will confirm or refute - that he followed the Princess OEM ‘caulking’ pattern for the new surface? In any event I do like the fact that there’s a king plank patterned in and the clever working of margins to avoid the appearance of unduly thin strips.


.resized.jpg")