More of the jigsaw puzzle to sort out and repair as possible and remake if needed
This piece is the front of the hanging wardrobe in the main cabin has you come down the steps on the starboard hand side
This is the forward bulkhead to the hanging wardrobe which is going to be replaced, the only restorable part is the front rail which is the forward part of the wardrobe front, which will need carefully removing off the bulkhead.
More of the jigsaw puzzle to be sorted through over the next week to see what can be salvaged from the parts which were brought back from Chance at Woodplumpton
The chart table and the drawer unit which needs a good clearing down and repairing as necessary and then varnishing and painting before it is put back in place once the wheelhouse is sorted and repaired as necessary
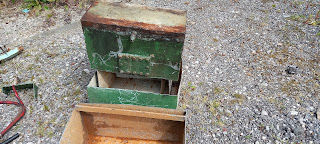
The wardrobe in the main cabin is made up of various parts which have to be taken apart and cleaned up. This photo is the bottom part of the lower part of the front of the wardrobe
The dowels which were in the two halves of the lower part were broken and now been drilled out so that new dowels can be made before gluing the two halves together.As before they were just dry fitted together
The two lower panels have several mortise and tenon joints on them which will have to be remade on the two vertical parts that make up the door frame.
This photo shows the tenon joints and the amount of mortises that have to be recut in the two vertical parts that make up the fdoor frames
The old vertical parts which are broken which are going to be remade
The triangle panel which makes up the shaped door that goes in inside this wardrobe front panel
A very difficult to understand they way was put together when she was built.
The more we take Chance to pieces the more difficult it is to understand the reasoning behind her build and the materials used to put her together. It appears that in some areas of the interior chromed plated fittings were fitted. Door handles coat hooks, then brass fittings such as lights around the interior in all the cabins. then the wood work screwed and nailed together in many places with steel screws. as in the furniture framework and even the cupboard tops and the cupboard fronts in many places.
The only reason for this use of steel screws and nails in the interior was that they may well of been a shortage of bronze or brass screws and nails in the aftermath of the war and supplies were thin on the ground.
Also while looking back at old photos from when I first saw Chance, she had galvanized deck fitting, stanchions davits bollards fairleads and tabernacles. All these fittings have long since gone. However, I am going to get new fittings made when they are needed to get fitted to the boat.
In the meantime , it is fun going through the bits I have and seeing what can be reused and what will have to be replaced along the way.
A YouTube link to the parts I have found that were put together with steel screws and nails
That's it I suspect: I've helped out mending a few wooden boats from the early to mid-1960s and anything from fasteners for deck planking to interior cabinetry were steel, which inevitably refused to come out cleanly. Cost and availability, but mostly cost.
Sorting out the jigsaw puzzle, some are taking more to sort out than others
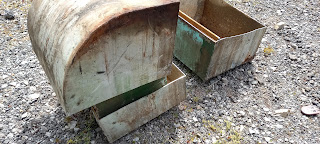
These bits are the two parts of the original galley top and two of the sides
The two sides of the corner of the galley unit which go up against the galley to main cabin door
The two doors that go under the long side of the main cabin settee unit, the framework is not in as good a condition as the doors so a new framework will have to be made to set these doors back in when the settee framework is rebuild
The cockpit chart table and drawer unit below to store the charts and other navigation equipment in while on passage
In this photo two parts of the cupboard front from under the sink on the starboard side of the galley area
The surviving part of the bunk front of the main cabin settee, this will have to be replaced when making a new bunk front and set the two original doors back in place
The starboard work top which all the other lockers were fitted too. The main problem is that it is not the original length as the front end was cut short to fit the diesel cooker in the main cabin and in doing so destroyed a drinks cabinet and other lockers which were originally in the area. One of the major jobs during the restoration is to put back the original configuration of the starboard part of the main cabin
A pile of parts that I have yet to sort out and sort out which bits can be reused or new parts made.
On the road in the morning from Essex up to Woodplumpton to make a start on the latest stage of the restoration of Chance. This week my brother John will be coming over from Yorkshire to help with some of the heavier jobs. His main job this week will be to get the fuel and water tanks out of under the side decks in the cockpit area. I will be sorting out the other ribs in the main cabin and the toilet compartment and finishing off the hull sanding to get rid of the last of the paint on the hull.
Once the hull is clear of the old paint I will find it easier to work out which of the planks need to be replaced and how long the runs will have to be to make the planking as strong as it will be once more. There is going to be an amount of removing sound planks which are to short and which not giving the hull any strength at all. The planking was possible done when Chance was a houseboat and was not in use as a moving boat.
So there is going to be a lot of planking removed to restore the strength back into the hull and give back the boat its strength once more and be able to be used as a moving sailing and motorboat.
Another job we hope to get done this week is the removal of the covering boards on the decks to expose the top of the ribs and frames that need replacing especially in the main cabin on the port and starboard sides and in the aft cabin on the starboard where it is a mass of doubled and sistered ribs
There will be vlogs of this work over the week posted every fortnight, possibly Sunday evening. In future I will try to post a video vlog of the work over the week are up on Chance and a blog every Wednesday evening to keep my followers informed of what is happening on the restoration both on Chance and back at the workshop where many of the bits of furniture are presently sorted and being worked on in the times we are not going up to Chance.
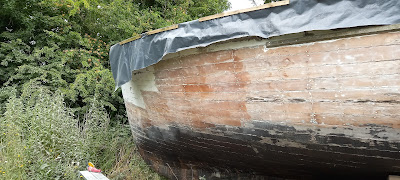
First full day back at Chance at Woodplumpton, straight back to sanding the hull back to expose the planking and highlighting any rotten planking covered by paint or filler.
Sanding back the paint is a mind dying job, however, you do see the benefits of all the hard work when you get back to a bare hull and you can better assess the condition of the hull.
By the ned of the day the port side hull was sanded down apart from a small section at the hull which will be sanded back in the morning and then turn my attention to the starboard side at he bow to finish off the sanding of the hull. then the long job of marking off the planks to be removed.
While I have been busy with the sanding back of the paint on the hull, my brother John has been busy dismantling the cockpit floor and the floor bearers to get the water and fuel tanks out from under the side decks in the cockpit to expose the hull planking and ribs and frames in this area of the boat. Photos to follow on his work on clearing the area of the cockpit. We have find that the tanks are well past their best and after 74 years have finally given up the ghost and they are just scrap metal.
So tomorrow it will be time to cut up the tanks to get them out of the cockpit and off the boat so that work can strt on the hull planking other repairs. We will also be scrubbing out the bilges and getting them clearer so that that part of the boat worked on without getting ourselves covered in thick oily dirt.
As we had looked into the tanks while they were still in position and find they were U/S we decided that the best course of action was to remove the tanks in which ever way was easiest. So out with the cutting disc and cut the tanks into moveable pieces. So wile I was sanding back the rest of the hull, brother John was in the cockpit with the cutting disc slicing up the water tanks in to reasonable size pieces that could be removed through the cockpit doors.
As you can make out the inside of the tanks are quiet rusty and you would not wish to use these tank once the restoration is finished.
The bottom edges of both water tanks was in a poor condition and would only be a matter of time before they would rust through and we would have to remove them. So, it was decided that out with the 74 year old tanks and have new ones made to the same size in Stainless Steel.
Chance had a large amount of water onboard about a 140 gallons of water, 70 gallons aside. The fuel tanks ahead of these tanks hold 90 gallons of fuel so Chance would a long range in the way of fuel and a fair amount of water, Seeing has chance only had three sinks and a later added shower.
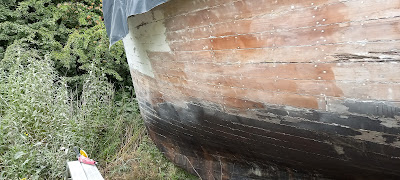
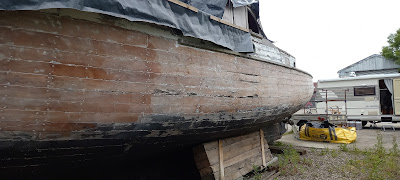
Yesterday I continued sand back the hull planking from the waterline to the decks as you can see from these photos.
The black sheet that has been over the decks as been removed as also the rubbing strakes if you wish to call them that. If were there but did not do much to protect the edge of the deck.
This was te last part to do on the port side and I finished off this part today and did the same on the starboard side, with this done the hull can be inspected and the planks which need removing can be marked off and then removed after the new ribs are steamed in during our next trip to Chance
A major goal for me in that the hull is now finally clear of any paint which could be hiding any problems under the paintwork
The next stage will be to get to grips with the covering boards around the edge of the decks so that the ribs can be put in from the top as steamed into position.
After cutting off the exposed part of the propeller shafts on both sides of the boat it was time to removed the outer gland fitting. The only problem being was that the outer gland came out not in one piece but just the outer collar fitting leaving the white metal bearing still in the
aft end of the stern tube.
AS you can see in this photo the white metal bearing is still in the stern tube and not fixed to the outer collar as it should be.
The collars were fixed into the stern tube logs with bronze coach bolts which in tree of the them had rotted apart.
This is the outer end there was still 8ft. of the shaft which had to come out of the stern tube which took a lot of use of a long 1 shaft and hitting the end of the shaft to remove the shaft out of the stern tube.
We are going to replace the bronze shafts with stainless steel shaft and the stern tube will be regraded to modern standards for faster running engines.
These water locks which were in the cockpit lockers are a part that was not in the boat when the engine were originally fitted. They are Volvo Penta water locks which are unlikely to have been fitted when Chance was built in 1948.
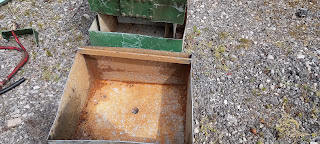
The port side engine drip tray now out of the cockpit and now the bottom of the boat under the drip tray can be assessed
The pile of floorboard bears and other parts which had to be removed to gain access to the tanks to remove them. Some of the parts will be reused if possible and other will be used as firewood.
The modern water locks are a lot lighter than these units
A view from the very forward end of the foredeck looking aft to show the position of the deck hatches and the cooker chimney which is getting removed as it is not to be in that position or in the boat at all.
The crew cabin forehatch which as been nailed closed with steel nails
The position of the foredeck large cleats and the hawse pipe hole for the windlass
On the foredeck there are a number of holes which are for different items, such as the smaller secondary cleats and the position of the forward cross rail which was positioned just behind the windlass so it did not interfere with the jib when Chance was rigged as a sailing Ketch
The covering board is notched to take the ends of the deck planking
The forward end of the foredeck showing the missing top part of the stem which will need remaking as part of the restoration
The position of tabernacle and the hole for the chimney for the solid fuel fire in the main cabin and the only ventilation in the main cabin apart from opening the skylight hatches
The skylight hatch open to let air into the main cabin the one ahead of this skylight is the one for the galley area
The port side aft deck davit hole the deck on the starboard is missing and so is the fitting like the port side hole but no deck plate
The port side aft side deck davit hole
The forward port side davit hole used to fit the holding tank pump out deck fitting
The propellers and shafts now removed out of the boat and on the pile of other scrapped items removed this time. The shafts are about 12 ft. long and were made from Bronze and the new shafts will be made from Stainless steel and the stern tube glands are going to be modernised to run faster revving engines through the glands, as the original outer glands are made from white metal which is not any good for modern stern tube set ups
The gearbox couplings were well engineered in the the coupling had a simple method of locking the nuts off.
The next trip up to Chance the "A" brackets will get removed along with the stern tubes in the stern tube logs as the planking is in need of replacing
The starboard fuel tank had to be moved along the length of the cockpit before it would move out into the centre of the cockpit ready to be craned out of the boat tomorrow.
There is not a lot of room to move the fuel tanks along the under the side deck . however, moving along the cockpit gave us enough room to roll the tank in towards the centre of the cockpit.
The top of the port side fuel completely rusted away
The forward crew cabin now stripped of all the furniture either taken back to workshop or throw away as it was rotten
The galley area now stripped of all its furniture
The area where the sink was fitted and the lockers ahead and below the sink. However, the present sink was not the original sink, so we are on the look for a period sink.
The engineering room stripped of any items which are not refitted at a later date in the restoration
The starboard side looking forward where the aft engine room bulkhead should be. One of the bulkheads which replacing along the way in the during the restoration.
The steering bulkhead which is going to sanding down and resorted
The aft heads room now stripped of all the skin fittings and bulkheads
The starboard and port sides of the main cabin
Some of the many more bits that have to come out of the boat and get taken back to the workshop
This week has been a very productive week on the restoration of Chance with the removal of the water and fuel tanks out of the cockpit and the removal of the propeller shafts out of the stern tubes.
Now that this is done, it is now possible to get to all the necessary parts of the hull to do the major repairs needed to be done on the hull in order to make it possible to move the boat back to Essex and my workshop. When the hull repairs are done it will be possible to lift the boat without causing need more hull damage.
The next trip to Woodplumpton we will start on the removal and replacement of the ribs and planks. This is a major milestone in the restoration project has it is the start of the rebuilding of Chance and the start of putting her back the way she was originally build in 1948.
This trip we were able to take back the last of the loose items to restore in the workshop between trips. There are a few items still to come out, however these are not necessary need removing at the moment and we still need a bearer or two put temporary floorboards. Also the first job next time will be the cleaning of the bilges so that when we start working on the rib and planking repairs we will drop anything in the bilges we can see where anything is when it ends up in the bilges.
As many as it takes, however, 2000 man hours and counting, it depending on how much work Chance needs to get her back in the water and how much new items are going to be found to replace the items that a past owner will not give me which he still has. got an beef with me.
The propeller shafts out & The Water and Fuel tanks out as well
At last all the major tasks are completed on Chance and the reconstruction can start on our next trip to Woodplumpton
This was the condition of the top of both fuel tanks when we got them clear from under the cockpit side decks. The top completely rusted away and with large holes in them.
Mine you after 74 years of service they were going to be changed as a matter of course and new stainless steel tanks made to replace these tanks to the same design as these original tanks.
While my brother John and I were removing the tanks with the help of a local crane owner , he was removing the old face fittings from the hull, So that when they are all removed they can be serviced and refitted and used for another 70 + years, as they are all original Blake's seacocks which just need palling in with a bit of grinding paste and re-greasing then re-fitting in the hull to be used again
Our was enjoying this work so much he asked are there any more.