Skipper 14 - a few small issues

electricmonk

New Member
Joined
8 Oct 2016
Messages
17
Visit site
Hi all,

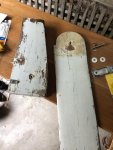
I recently picked up a Skipper 14 which seems OK overall. It's got some cracking in the plastic deck molding around the daggerboard case and a small hole in the deck in front of the case (about 1cm across) which seems to let a bit of water into the hull. Lazy me would like to fill the small hole with some kind of epoxy putty (waterweld?) and leave it at that, but I was also wondering if it was worth putting some fibreglass mat down over a) the hole, as that area might be a weak point and maybe b) around the daggerboard case.

9cKXLBp.jpg


There doesn't seem to be any drain hole for the buoyancy area, in the stern locker there is only the drain from the cockpit area. Should I add another drain hole to the locker? Bit nervous about the idea. It has two inspection hatches up the front but none at the back. I suppose the new drain hole would have to be quite low down.

I was also wondering how best to rejuvenate the faded plastic deck (basically for the sake of appearance). Can you polish it and/or wax it or something? Perhaps I should eventually repaint it, but that seems like a lot of work for an old dinghy.

The hull is pretty good for a cheap old thing, quite a few gouges and scratches but none of them seem too deep. The wooden transom reinforcement seems a bit soft as does the glued-on piece which the tiller bracket is attached to. That last one seems a bit fiddly to remove, not actually sure how I would go about it.

Thanks for your time! Maybe as I learn more I can look into doing a better job restoring this thing but for now I'm just keen to get out on the lakes and rivers and have a go.
 
Last edited:
1 cm is a bit much to bridge with unsupported putty. I'd sand the surrounding area with coarse grit paper to expose the underlying glass fibres, cut two or three discs about 2" diameter out of chopped strand mat, pre-impregnate these on a piece of plastic film (e.g. from packing) and press down over the hole, peel off plastic when cured.

The cracks round the cb case may only be in the gelcoat. I'd try sailing the boat first to see if they are a problem.

I wouldn't be cutting any more holes in the boat.

Don't wax the deck, you don't want to make it slippy. Just give it a good scrub with an abrasive cream cleaner like Cif or Tesco's etc.
 
Last edited:
There doesn't seem to be any drain hole for the buoyancy area, in the stern locker there is only the drain from the cockpit area. Should I add another drain hole to the locker?

It was a while ago now, but I seem to remember having to drill a hole through from the stern locker to allow water out from the 2 skins - I think this is is what you are suggesting? I can't exactly how it all worked - I think there was a drain from the bow area that led into the boat somewhere near the mast foot, but this did not allow water out from the inside.
 
If that is a buoyancy compartment, not an accessible locker, by making a hole in it, you will destroy its function of keeping you afloat! I don't know this dinghy, so just making an observation on what you posted?
 
Thanks for your advice guys. I'll wait until I get the chance to take it out before I decide whether to drill a hole to drain the buoyancy area. It's notorious for filling up with water as I've learnt from other Skipper 14 threads but this one might not leak too badly. Obviously I would install a plug to keep it water-tight.

JimC, do you think I use a cut and polish to polish out the cracks or will that have the same effect of making it too slippery? I'll take your advice and just use an abrasive cleaner.

Thought you might be amused to know that the DIY plywood gaff jaws were broken when I got it, and I've just bought a rather expensive block of Acetal plastic to mill into a stronger replacement part. I considered making it out of aluminium but figured it would then need lubrication - tape, wound poly rope or leather or something - and that sounded more fiddly than just making a nice new plastic part to replace the original plastic part which presumably broke years ago. Acetal isn't as slippy as some other plastics but the guy in the shop assured me it was the easiest to work with a CNC router.
 
Oh yeah also the rudder is a bit soft in one or two places but I was hoping to maybe deal with that after this sailing season - strip, gouge, epoxy and repaint it over winter perhaps. Is that reckless?
 
I can cheerfully report that it doesn't take on water. I siphoned out what water there was between the two skins and it wasn't replaced over a couple of hours of sailing. With a bit of spray it'll probably let some in around the wooden socket where the mast sits though.

The fibreglass flexes easily where the rudder clips onto the transom so I'm concerned that that reinforcing piece of wood on the other side is as soft as it looks. Not exactly sure how to go about replacing it, maybe I should just scrape it out piece by piece, sand and neaten up the inner surface and glue on a new piece of plywood...

Probably the best plan.... I bought a new (bermudan rigged) Skipper 14 with a trailer in around 1970 and the wood they used internally was junk when it was new. I made a few mods: toestraps, self-bailer and beefed up a few areas of over-flexy GRP and it was perfect for what I wanted at the time: towed it around with a tent on board and sailed in lots of different places. My bermudan rigged one (singlehanded) was genuinely fast offwind, planed easily and cleanly, but let down to windward by pretty rubbish factory sails. Only kept it about a year, as I bought a small cruiser instead.
 
Nice one, did you reinforce the fibreglass on the inside?

As I said I took the boat out the other day and it all went well, apart from the soft transom the biggest concern is the kick-up rudder doesn't really stay down very well. Can't really get it tight enough with the wing nut, it kicks up to a 45 degree angle when you move forwards. Still works but not as well as it should. I assume the wood is warped in there and it fits together funny.

I'm going to strip it repaint it but from there not sure what to do. I've got some larger washers (see photo). Would a spring washer help to get more clamping force? Was also considering making some large plastic spacer washers out of an ice cream container or something to go in between the rudder cheeks and the blade.

Can you get oversized wingnuts? Replacing the 5/16" bolt with a half inch bolt would give me a larger wing nut but that would be more effort and provide more scope for stuffing it up.
 

Attachments

  • IMG_5644.jpg
    IMG_5644.jpg
    94.6 KB · Views: 0
Last edited:
It's been a while, but I thought there was a line from the leading edge to a cam cleat on the cheek.

From memory the rudder had a typical dinghy-style line to a jam cleat on the tiller, certainly not a wing nut. And I did do some extra reinforcing/sealing GRP over the internal wood filler inside the stern locker compartment, on the grounds that even if the wood was best orange box if it was kept dry it would be OK. I had to cut a few holes for Holt circular hatches to get at internal areas for extra glass as well. Once modded it was a super boat, and still light enough to be easy to deal with singlehanded. If I'd kept it another year I'd have got better sails: the originals let the inherently quite fast hull down to windward.
 
Hmm, well it looks like I have a non-original rudder then. Searching Google images reveals that most Skippers have wedge-shaped rudders not particularly similar to this one.

This leaves me with the problem of either finding a way to tighten the wing nut sufficiently or perhaps even installing some sort of downhaul to keep the kick-up rudder firmly in the water as per the original rudder design.

On my Solo, the rudder had an uphaul and downhaul. The downhaul had a length of bungee in it to maintain the kick-up aspect. I think I remember replacing the plastic washers with four cut out of a milk container.
 
Thanks everyone, I tightened up the wing nut but it's too awkward to push the rudder back down by hand if and when it kicks up so I'll try and cobble together a downhaul.

Just re-sealed the hose which drains the forward well where it meets the hull near the waterline - I took the boat out in choppy conditions yesterday and at the end of the night the boat had dozens of litres of water between the skins. This had to be drained by scooping it up through the forward inspection hatch before getting the boat back on the trailer as it was too bloody heavy. It didn't take on any water on the previous trip so this is a bit confusing but hopefully I've fixed it.

I hope the centreboard case hasn't started to leak, the centreboard did bump into the bottom a few times on this trip and I found myself worrying that it might have cracked something or reopened an old wound. I'll check it out next time I get it off the trailer and find some people to help me flip it over. Pure conjecture though.
 
Top