Chunk taken out of wooden centerboard trailing edge

Mr Splat

New member
Joined
12 Oct 2021
Messages
6
Visit site
Hi guys,

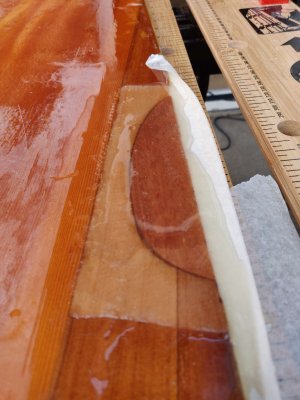
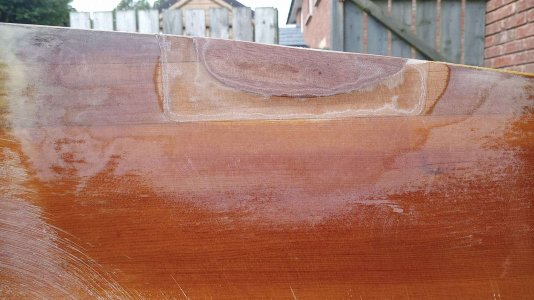
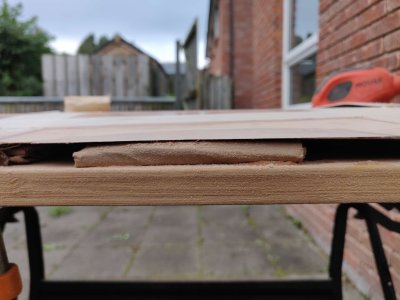
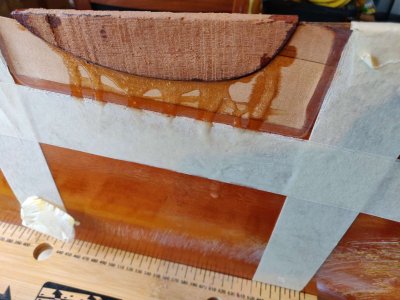
I was recently out in my Phantom dinghy in blustery conditions and in the process of a dry capsize it appears that I have stood on the trailing edge of my wooden centerboard and a piece has splintered off it

Compress_20230730_180923_3132.jpg

Compress_20230730_175840_0438.jpg

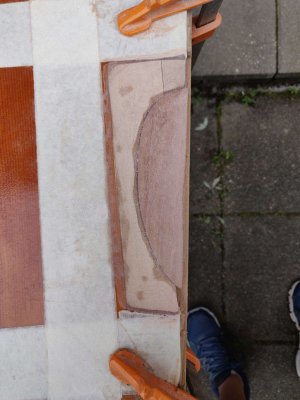
I have little knowledge of repairing foils but from asking around the accepted wisdom appears to be to grind out the highlighted section (which is where I can see signs of damage) and rebuild it using epoxy.

The trailing edge is very thin so I'm thinking it would be necessary to go quite far back into the wood so that the epoxy has something to bond to, I would also need something to keep the epoxy in place while it cures, maybe a pair of steel rules and some clamps, or maybe glass fibre tape?

Once cured I would have to sand the epoxy back and finish it and any of the affected wood which would probably require two pack varnish?

I'm having a little bit of trouble finding guides to doing such repairs, possibility approaching this as a novice, would anyone be able to provide some pointers to good guides or even just provide some pointers as to how they would approach such a repair?
 

justanothersailboat

Active member
Joined
2 Aug 2021
Messages
265
Visit site
I'm not sure I would rush to grinding followed by lots of epoxy on a wooden keel that is already made from multiple strips glued together. If you saw and chisel out the affected area you should be able to remove it neatly. Then cut a new bit of the same wood to a bit larger than required, making sure the grain aligns the same way and that there are suitable flat patches to clamp it down by when gluing (you can curve them later). Cut very slightly large and use a very sharp chisel to pare down any unevenness on either side so it is a perfect fit. Epoxy glue it in (lots of clamping), then chisel, plane and finally sand it down to the right profile. Then sand back a little of the existing varnish on the original part, give the whole area the same varnish treatment as the rest of the keel and you can hardly tell it was repaired. I've done this very successfully on a rather similar wooden centreboard, though not quite such a big bit of damage. It wasn't particularly difficult.
 

pmagowan

Well-known member
Joined
7 Sep 2009
Messages
11,700
Location
Northern Ireland
sites.google.com
Just cut it down one of the lines visible where two bits of wood are already glued together. That should be a good bit back from the trailing edge so you will have more thickness to work with. Get a plank large enough to replace the broken bit and a bit more. Use biscuits, dowels, or tongue and groove to joint them (whatever is easiest with the tools you have) with good waterproof glue and clamping overnight. Then, as wood is easy to work with, remove the excess until you have your desired shape. You can use the old bit to develop a jig for planing or sanding. Varnish and jobs a good un
 

Stemar

Well-known member
Joined
12 Sep 2001
Messages
22,759
Location
Home - Southampton, Boat - Gosport
Visit site
I think you've got the right idea of what to cut out with your red lines, but that foil looks to be solid timber, so I'd be inclined to repair it by scarfing in a new piece. Use thickened epoxy to glue everything, shape it then cover with a layer of fibreglass cloth.

Loads of videos on scarf joints on You Tube, and more than you'll ever want to know about working with GRP in a book you can download here
 

fisherman

Well-known member
Joined
2 Dec 2005
Messages
19,675
Location
Far S. Cornwall
Visit site
I have repaired laminated oar blade edges that are very thin. I wouldn't remove anything more than necessary.. Doesn't matter how thin, the glue should be as strong as the wood.
I suggest cut the damage out with two straight cuts, then bring in a piece of thicker wood and cut as good as you can, clamp in place not too tight and run a fine saw along the joins, repeat until you have a perfect fit. Glue, clamp, finish.
The new piece can be lots bigger than needed or you can screw it to a piece of gash or between two pieces so you can get a grip, and get clamped better. Cut the edge profile when fixed.

edit: sometimes your instinct is to get a thin piece of wood and try to clamp the thin edges together. I get a thick piece, and clamp like the top of a 'T'.
 
Last edited:

Mr Splat

New member
Joined
12 Oct 2021
Messages
6
Visit site
Ok, so if I was to consider epoxying in a new piece of wood I'm assuming I would need to furnish myself with the appropriate tools such as a set of woodworking chisels, clamps and varnish. I've had my eye on a Dremel for a while and this might be the time to give it more serious thought?

I would also need to source an appropriate chunk of wood to bond with the existing centerboard.

I should explain that I currently live in a small rented house (I'm trying to save for my own...) with little to no space for woodworking, and I'm no carpenter so I don't have more than a decent set of DIY tools to hand, if I were to calculate the price of getting all of the appropriate equipment here I might find myself getting uncomfortably close to the cost of a new centerboard.

I'll sit and have a think about what's been suggested here, I may see if there's a marine woodworker known at my club who could do the job.

Plenty to think about, thanks very much for the advice so far!
 

B27

Well-known member
Joined
26 Jul 2023
Messages
1,209
Visit site
Any decent sailing club will have people who will find a scrap of wood for you and probably help do the job.
Lots of people will have epoxy in their shed, you won't need a whole pack.
As Fisherman says, cut out the minimum.
Glue in a thicker piece of hardwood, using thickened WEST or SP epoxy.
When it's cured, plane or sand to shape and coat with epoxy.

You may be shocked at the price of a new board!

For a winter project, consider giving the whole board a covering of glass cloth and epoxy.
 

Mr Splat

New member
Joined
12 Oct 2021
Messages
6
Visit site
I'd do it for £25.......but I'm miles from everywhere.
Ha! Join the club, I'm across the Irish sea.

I think my first step is to follow B27's suggestion which is going to be asking around my club to see if anyone has any scrap hardwood.

My problem is in NI there's a lack of diversity in boats, there only seems to be lasers!

We (did?) have Duffin Marine over here, though I think Alastair packed it in a while back, I suspect he would have been the ideal person to ask for advice about repairing wooden foils
 

fisherman

Well-known member
Joined
2 Dec 2005
Messages
19,675
Location
Far S. Cornwall
Visit site
The grain looks a little like douglas fir to me, but, find a joinery/furniture workshop for an offcut of maranti or other bastard mahogany, it won't matter much what you use. I found a nice hardwood bedhead once, it's still at sea.
With a bit of ingenuity, a fine saw, even hacksaw, and decent glue, Marine - W.I. Polymers Ltd
then use string and spanish windlass to tighten the join The Spanish windlass - Fine Homebuilding

if it fails you won't lose more than the bit of wood.
 

Mr Splat

New member
Joined
12 Oct 2021
Messages
6
Visit site
The grain looks a little like douglas fir to me, but, find a joinery/furniture workshop for an offcut of maranti or other bastard mahogany, it won't matter much what you use. I found a nice hardwood bedhead once, it's still at sea.
With a bit of ingenuity, a fine saw, even hacksaw, and decent glue, Marine - W.I. Polymers Ltd
then use string and spanish windlass to tighten the join The Spanish windlass - Fine Homebuilding

if it fails you won't lose more than the bit of wood.
Going by the Milanes technical section it might be

Dependant on the specification of the foil, we choose wood cores from a variety of species: Yellow and Western Cedar, Columbian Pine, Ash and Balsa or a combination of these to achieve the required flex/weight ratio.

Though the centreboard is roughly 20 years old so the above might have changed, it is interesting that all of the listed woods are softwoods when I'm pretty sure I'm supposed to use a hardwood (i.e. mahogany) for the repair
 

Hacker

Well-known member
Joined
4 Nov 2015
Messages
1,068
Location
Falmouth
Visit site
If your centreboard doesn’t spend all its life in the water then using softwood is perfectly reasonable (after all the rest is softwood). I’d be looking for an off cut of cedar or sitka spruce (or similar without any knots). Ideally you would attach it with either scarf or flush joints supported with pegs/domino type reinforcement. However modern glues are stronger than the wood they connect. So you could cut the existing damage away to flat surfaces and cut new wood to match. Glue and cramp (with clamps, string or whatever) and then shape the foil to match. Sand everything and finish with your choice of poison.
 

oldbloke

Active member
Joined
24 Jun 2018
Messages
274
Visit site
While I agree with the previous posters, and that is how I would do it. If you have insurance through a racing dinghy specialist such as Noble or Craftinsure etc etc it will be all risks and new for old. As you don't have a workshop I would discuss it with them, they can point you at a repairer and you will get a professional repair and you might well get a new board out of it.
 

pmagowan

Well-known member
Joined
7 Sep 2009
Messages
11,700
Location
Northern Ireland
sites.google.com
If just the tools you have in a standard home toolkit then I would just use a hand saw to remove the damage and keep to as simple a shape as possible (1 straight line is easiest but more complex cuts are doable). Get any scrap bit of wood but avoid oak or knotty wood. Softwood will be a simpler choice. Cut it to match roughly. Glue as previously described. Clamp with tape, string, or heavy objects, whatever you have, doesn't have to be very hard as epoxy filler will take up some gap. Use some cling film to protect stuff from sticking to the epoxy. Then stick some protection over the old bit of centreboard (some plastic waste or loads of tape etc)and use the teeth of your saw to 'rough-out' the shape. Then sand to smooth.

Items needed: saw, sand paper, some tape (optional), some epoxy/glue, a scrap bit of wood, various stuff from the recycling bin.

I repaired a table leg this way which had some geometric design when I only had a rough saw. You can use it almost like a cheese grater!
 

B27

Well-known member
Joined
26 Jul 2023
Messages
1,209
Visit site
I think people like Milanes will use a light wood, because the vast majority of the foild they've made for a very long time will have a sheath of glass cloth at least.
I would not be too fussy about the wood.
I've used bits of hardwood from junk furniture.
Fine-grained hardwood is easy to work with and can be pared down thin.

Youcould do thw whole repair with filler of epoxy filled with chopped glass.
Not so pretty, but dinghies are for racing (mostly).
 

justanothersailboat

Active member
Joined
2 Aug 2021
Messages
265
Visit site
You definitely don't need a lot of stuff. Skip my suggestion of using a plane if you don't have one. Saw, one sharp chisel, glue. Not much use for a Dremel here that I can see. You can do a lot with a few grades of sandpaper, a sanding block and patience and it is cheap. But definitely a good idea to find someone with woodwork confidence if unsure
For the suggestion of glass clothing over the whole lot... will it actually fit the slot after? Some might, some won't. And it's a lot more work, though it might prevent future damage.
The wood looks like it might well be a fine grained softwood. In my view that is an odd choice for thin edges like on a centreboard. However, there is much to be said for using a similar wood to avoid different expansion/contraction and different rigidity.
 

Tranona

Well-known member
Joined
10 Nov 2007
Messages
40,933
Visit site
Pretty certain that is Douglas Fir which is readily available at timber merchants. Rather than do it in one solid lump maybe laminate 20mm thick strips . Have them machined the width of the widest part you cut back to - looks like the timber is sound after the second strip. Epoxy the strips on one at a time using temporary pan head screws and washers into the existing wood. Remove the screws then glue on the next strip usin the same method until you get to the edge. Shape to the existing profile and fill the screw holes in the last strip with epoxy and maybe a timber plug.

This method avoids having to clamp across the width of the board.
 

Mr Splat

New member
Joined
12 Oct 2021
Messages
6
Visit site
For the suggestion of glass clothing over the whole lot... will it actually fit the slot after? Some might, some won't. And it's a lot more work, though it might prevent future damage.
That would be one of my concerns, I imagine if I were to sheathe it I would only be able to use a single layer of glass.

That being said I do remember there being a decent bit of slack between the centreboard and the slot, though I might need to replace the gasket.

I also went back to the Milanes technical page and found the following:

BUDGET FOILS
A budget range of foils is also available for which Columbian-pine /Western cedar cores are used and these are epoxy coated and taken to 600 grit before final polishing.
These might be interesting to the production boatbuilder who wants to improve the quality and performance of his craft.

I wouldn't be surprised if mine was an example of one of these looking at the finish and the lack of branding (I can't see any traces of glass weave, but I'm not 100% sure if that would always be evident)
 

Mr Splat

New member
Joined
12 Oct 2021
Messages
6
Visit site
I wound up able to have a word with Alastair Duffin who was kind enough to provide some tips, plus a scrap piece of wood from his workshop!

Had a go at repairing the damage myself in preparation for the nationals after picking up a mouse sander, some general purpose sand paper (+ block), a fibreglass repair kit and some epoxy.

I wound up cutting out the damage with a coping saw.

Think it's went ok for a first attempt.
 

Attachments

  • Compress_20230903_175048_8063.jpg
    Compress_20230903_175048_8063.jpg
    238.8 KB · Views: 11
  • Compress_20230903_175050_0024.jpg
    Compress_20230903_175050_0024.jpg
    248.1 KB · Views: 11
  • Compress_20230903_175050_0677.jpg
    Compress_20230903_175050_0677.jpg
    187.2 KB · Views: 10
  • Compress_20230903_175051_1905.jpg
    Compress_20230903_175051_1905.jpg
    416.9 KB · Views: 10
  • Compress_20230903_175053_3876.jpg
    Compress_20230903_175053_3876.jpg
    213.4 KB · Views: 9
  • Compress_20230903_175055_5152.jpg
    Compress_20230903_175055_5152.jpg
    259.8 KB · Views: 9
  • Compress_20230903_175055_5943.jpg
    Compress_20230903_175055_5943.jpg
    296.7 KB · Views: 10
  • Compress_20230903_175048_8745.jpg
    Compress_20230903_175048_8745.jpg
    223.9 KB · Views: 16
Top