Antares 760 thread

Pleinmont

Active member
Joined
16 Aug 2019
Messages
340
Visit site
Yeah it makes no sense to have the filler caps there. Not just rain water either, those walkways are an inch deep in seawater from over the bow when out in rough weather.
Touch wood I've not had any contamination yet - will renew the O rings to keep it that way though (thanks for the dimensions Plum).

Aside from that I wonder what the odds are of my 760 also being named Capella too ? :D
 

Jamie Dundee

Well-known member
Joined
24 Jul 2019
Messages
1,545
Visit site
Yeah it makes no sense to have the filler caps there. Not just rain water either, those walkways are an inch deep in seawater from over the bow when out in rough weather.
Touch wood I've not had any contamination yet - will renew the O rings to keep it that way though (thanks for the dimensions Plum).

Aside from that I wonder what the odds are of my 760 also being named Capella too ? :D
Spooky :eek: Was the show name of my last horse over 30 years ago. Also fitted very nicely into the gap left when I removed the previous name.
 

Jamie Dundee

Well-known member
Joined
24 Jul 2019
Messages
1,545
Visit site
Just in case you have the wrong size O-ring in the filler cap, the fuel and water filler cap O-rings are 40mm ID and 5.3mm diameter section.

Www.solocoastalsailing.co.uk
I buy my O rings from Simply Bearings, they don’t have that exact size, max profile is 5mm. The seals seem in good condition but the thread on the fillers is always gritty when I open them, despite being cleaned each time. I’m gradually replacing many of the original fittings so this winter new fillers, without the daft winch handle mechanism.
 

Pleinmont

Active member
Joined
16 Aug 2019
Messages
340
Visit site
Spooky :eek: Was the show name of my last horse over 30 years ago. Also fitted very nicely into the gap left when I removed the previous name.

Nice, ours was called Capella when we bought it ?
I hope you followed a suitably long superstitious process when name changing the boat to ward off bad luck ?‍♂️
 

Pleinmont

Active member
Joined
16 Aug 2019
Messages
340
Visit site
I buy my O rings from Simply Bearings, they don’t have that exact size, max profile is 5mm. The seals seem in good condition but the thread on the fillers is always gritty when I open them, despite being cleaned each time. I’m gradually replacing many of the original fittings so this winter new fillers, without the daft winch handle mechanism.

Agreed. Don't know where that grit comes from as I clean the threads each fuel up.
And I usually pick up the water handle when I want the diesel one.
You getting the tool-less flip up caps?
They look easier to use but presume can't tighten them as much.
 

Jamie Dundee

Well-known member
Joined
24 Jul 2019
Messages
1,545
Visit site
I hope you followed a suitably long superstitious process when name changing the boat to ward off bad luck ?‍♂️

If you mean the one which involves a nice bottle of malt and a sore head next day then yes (y)?

Haven't yet decided on fillers, I had some good ones on my last yacht with the flip up handles, watertight, secure and easy to use. Previous owner put a sticker on the water handle so I know which is which.
 

Pleinmont

Active member
Joined
16 Aug 2019
Messages
340
Visit site
If you mean the one which involves a nice bottle of malt and a sore head next day then yes (y)?

Haven't yet decided on fillers, I had some good ones on my last yacht with the flip up handles, watertight, secure and easy to use. Previous owner put a sticker on the water handle so I know which is which.

I wondered if it was possible to just replace the caps and leave the threaded mounting in place (if there was a cap compatible with that mounting).
Although as it's a boat I bet it's not and you would need to remove and replace the whole fitting.
 

Jamie Dundee

Well-known member
Joined
24 Jul 2019
Messages
1,545
Visit site
I wondered if it was possible to just replace the caps and leave the threaded mounting in place (if there was a cap compatible with that mounting).
Although as it's a boat I bet it's not and you would need to remove and replace the whole fitting.
I’d rather change the whole thing to be honest. A flip up handle quarter turn stainless fitting will look and wok much better.
 

Jamie Dundee

Well-known member
Joined
24 Jul 2019
Messages
1,545
Visit site
Just a quick note, had my valve clearances checked yesterday (TAMD41P), unknown when or if they were last done. All within spec although 2 were adjusted to put them in line with the others. Good result ?
 

Plum

Well-known member
Joined
6 Jun 2001
Messages
4,430
Location
UK East Coast
Visit site
Just a quick note, had my valve clearances checked yesterday (TAMD41P), unknown when or if they were last done. All within spec although 2 were adjusted to put them in line with the others. Good result ?
Yes, it's good to know they are set correctly. I've done mine twice so far and due again next summer.
 

Pleinmont

Active member
Joined
16 Aug 2019
Messages
340
Visit site
Good job, something else on the list the next time the engine is serviced.
My engine runs well but like you I'm not aware the valves have been done recently (not since I have owned it).
I think the KAD versions of that block need regular checking but the original TAMDs are much more forgiving.
 

Jamie Dundee

Well-known member
Joined
24 Jul 2019
Messages
1,545
Visit site
I’d rather change the whole thing to be honest. A flip up handle quarter turn stainless fitting will look and wok much better.
Finally got the old deck filler off and have ordered one of these to replace it Quick Close Deck Filler - Float Your Boat
Absolute pig of a job to remove the old filler ? Three screws, only two came out, the other just spins. Ended up hammering a crowbar under the lip and finally split the plastic around the remaining screw head. I expected to be able to pull the filler up through the deck to detach the hose - no. The jubilee clips prevent it from coming through the hole so I ended up squeezed under the deck through the lazarette (I’m the wrong age, shape and size for these contortions!) where I managed to get a spanner on the jubilee clips and loosen them. The filler still wouldn’t come off so back to work with the crow bar until eventually it popped off. The reason for the ‘stuck’ third screw then became apparent, an earth cable was attached to the screw under the deck rendering it impossible to remove?? Old filler now replaced to fill the hole until the new one arrives, if anyone else is daft enough to attempt this note that the hose is 50mm id, not the more common 38mm.
 

Pleinmont

Active member
Joined
16 Aug 2019
Messages
340
Visit site
Finally got the old deck filler off and have ordered one of these to replace it Quick Close Deck Filler - Float Your Boat
Absolute pig of a job to remove the old filler ? Three screws, only two came out, the other just spins. Ended up hammering a crowbar under the lip and finally split the plastic around the remaining screw head. I expected to be able to pull the filler up through the deck to detach the hose - no. The jubilee clips prevent it from coming through the hole so I ended up squeezed under the deck through the lazarette (I’m the wrong age, shape and size for these contortions!) where I managed to get a spanner on the jubilee clips and loosen them. The filler still wouldn’t come off so back to work with the crow bar until eventually it popped off. The reason for the ‘stuck’ third screw then became apparent, an earth cable was attached to the screw under the deck rendering it impossible to remove?? Old filler now replaced to fill the hole until the new one arrives, if anyone else is daft enough to attempt this note that the hose is 50mm id, not the more common 38mm.

Sounds like you've picked a few fun jobs recently! Maybe relax with a bit of antifouling?
 

Jamie Dundee

Well-known member
Joined
24 Jul 2019
Messages
1,545
Visit site
Sounds like you've picked a few fun jobs recently! Maybe relax with a bit of antifouling?
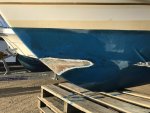
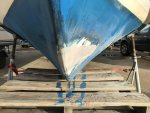
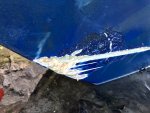
I’m lifting the height of the antifoul by about 4” this year so took the opportunity to remove all the old knackered striping from hull and wheelhouse and renew, lovely job getting the old stuff off ? Also repaired some minor hull damage from where Mrs JD managed to run over a rock, lovely stuff epoxy resin… Have explained at some length how the transducer at the back of the boat measures depth….at the back of the boat. Mark 1 eyeball checks for obstructions at the pointy end of the boat:geek: Still to drill a big hole in the tank to fit an inspection hatch and new fuel level sender, should be about done by Xmas and have Jan/Feb off(y)
 

Pleinmont

Active member
Joined
16 Aug 2019
Messages
340
Visit site
Ouch... Hope not too much damage from the scrape. Forwardscan transducer for next summer?

Re striping, Ive used a Whizzy Wheel (tm) on a drill get decals and stickers off before, worked really well. Like a large eraser and doesn't mark the gelcoat at all.

I painted the antifoul a bit higher last year but it came off a lot faster than the area that normally gets painted so looked ragged within a few months which was annoying.
Maybe should have done a couple more coats - are you priming or prepping the white hull to take the paint?

To be honest, my boat was specced with the standard Beneteau list to starbd so prob just needs a couple 25kg sacks of sand on the port side to level it off. I wouldn't get the scum line on the starboard side then.
 

Jamie Dundee

Well-known member
Joined
24 Jul 2019
Messages
1,545
Visit site
Ouch... Hope not too much damage from the scrape. Forwardscan transducer for next summer?
A nasty gash at the bow and a few more minor scrapes along the bottom, not too serious. Forward scan not needed, Mrs JD doesn’t now helm within a couple of cables of the coast… Not the first, nor the last, to be caught out in that spot, two underwater pinnacles where the depth goes from 60’ to a few inches in a matter of a yard or so.

Re striping, Ive used a Whizzy Wheel (tm) on a drill get decals and stickers off before, worked really well. Like a large eraser and doesn't mark the gelcoat at all.
I just used the standard heat gun and scraper, trouble was a lot of it was so old it kept snapping rather than peeling. Don’t plan on doing it again :cautious:
I painted the antifoul a bit higher last year but it came off a lot faster than the area that normally gets painted so looked ragged within a few months which was annoying.
Maybe should have done a couple more coats - are you priming or prepping the white hull to take the paint?
I’m giving the surface a good sanding and treating with oxalic acid to remove any film or remaining wax. No list on mine but the choppy water around the swinging mooring encourages slime to grow above the water line

81997E9B-EA01-4335-818A-D1EC70438C6D.jpegBC7C7739-3584-47A6-A4BD-A3D0030B73D4.jpeg98A524F8-D498-4E3C-90B0-C83005F07C80.jpeg
 

Pleinmont

Active member
Joined
16 Aug 2019
Messages
340
Visit site
Nice repair job, looks good ? these things happen from time to time ? occupational hazard.
I'd be tempted to paint on some shark teeth like the old fighter planes :cool: make a feature of it!

Yes maybe some sanding and wax removal could have improved my paint adhesion
 

Plum

Well-known member
Joined
6 Jun 2001
Messages
4,430
Location
UK East Coast
Visit site
To be honest, my boat was specced with the standard Beneteau list to starbd so prob just needs a couple 25kg sacks of sand on the port side to level it off. I wouldn't get the scum line on the starboard side then.
Mine is perfectly level when the fresh water tank is full. When it is empty there is a 30mm list to stbd.
 
Top