MiToS re-built/fit- versilcraft Mystery43

vas

Well-known member
Joined
21 Jun 2011
Messages
7,915
Location
Volos-Athens
Visit site
Any updates Vas?

er, well, a few Paul :D
realised that I've been updating spin off threads of the rebuilt but haven't kept track of what's going on overall.
Due to Coronavirus, Uni is closed for two weeks, gives me some more time to work on MiToS and report ...
So, starting where I left the thread back in summer of 2018 with fitting the stabs.
Basically other than sorting out the stabs and replacing the dead mase gen control panel with a custom 800X600pixel touch screen for operating the stabs and generator, in 2018 I only did some light maintenance work.
stabfin_design40.jpg


Following is a video on the day I was returning back to port mid September, boat half full in fuel/water, 5ppl onboard, stabs off, almost WOT showed 20.6kn with trim tabs not working properly and lightly fouled hull. Was just a test to see if it would plane with stabs on (remember was a discussion on that in the Fins thread) and check how it fared at the back with the 250kg jetrib onboard. Pretty sure it would do much better without it hanging at the back, but np.

Replaced for the first time (ok, lasted 3-4yrs) the el. float switch of the 16lt whale grey water tank which died (as in not turning on and water flooding in the bilges, nice! So used one of my "stock" (had bought on ebay 4 WaterWitch el. float switches, now down to 2), tie wrapped on the lid assembly where the original float lived (and can be seen in the next pic):
whale_grey_floatswitch-replacement.jpg

BTW, last month ago, thing died again but now stuck constantly on. Will open up tomorrow and check/clean - hopefully wont have to replace again!

A new job was fitting someway to hold/hang toothbrushes/toothpaste/etc on the main head where there's still no space for such things, sink is tiny. Got these from IKEA and I stupidly bought two soap dispensers, one "cup" for all the bits and bobs and just 2 supports. Rationale was I wasn't too sure it will work OK (designwise) and I could keep the second dispenser as spare. Thing is they work v.well, highly recommend them and on my last visit to IKEA tried to get hold of another holder thing only to find out that they have discontinued the model :( if anyone has for some odd reason any unused, I'd be interested-long shot I know.
IKEA_soapdispenser.jpg


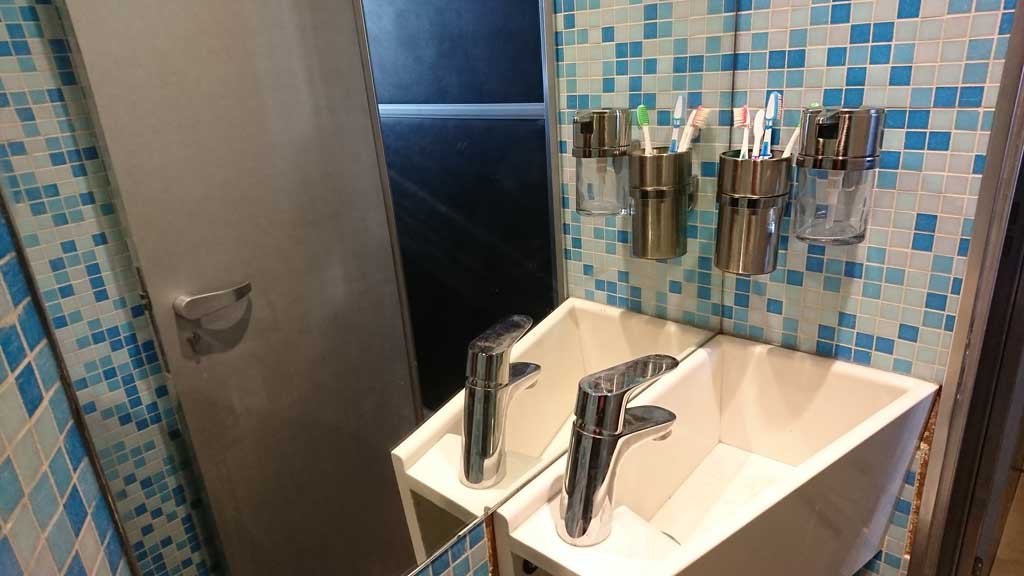
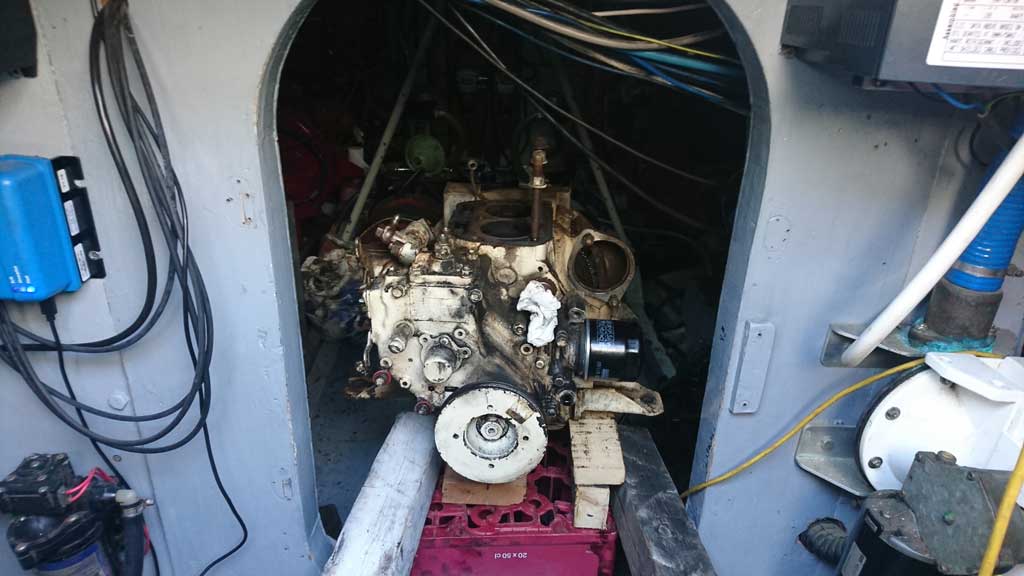
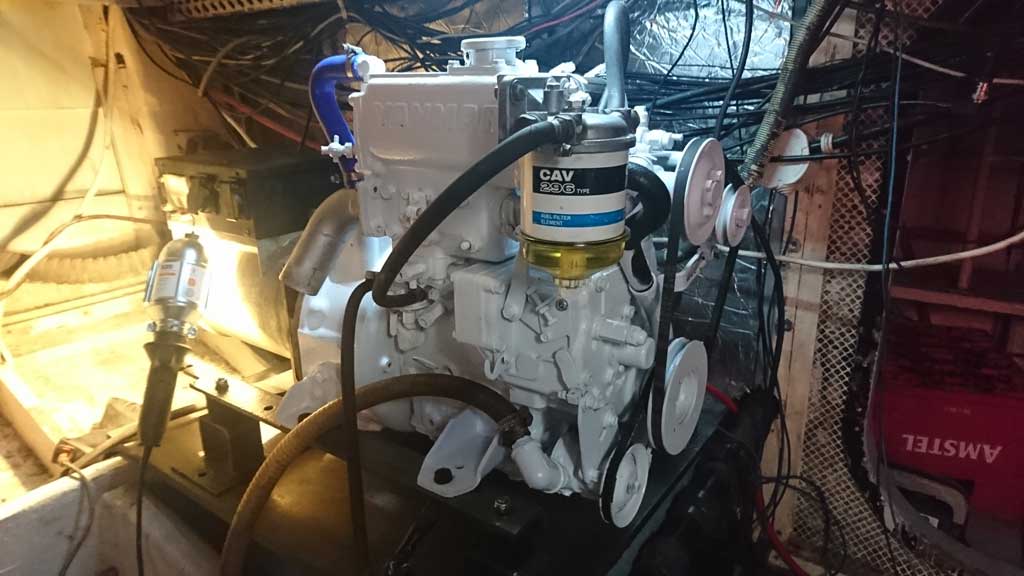
With the start of 2019, I decided to tackle the Mase generator Yanmar 2GMF motor:
Turned out that it was lightly worn probably not really (IMHO) enough to justify a full rebuilt. Anyway, on putting it back together the mechanic realised that I also had issues with the el. fuel stopvalve (bolts on top of the high pressure pump). Starting from that, I decided to make a custom NMEA2000 control box picking up all sensor input from the various bits that I've fitted (originally only had a low oil pressure switch and a high temp switch!) and as part of the process add a linear actuator to up and lower rpm and kill the engine, so scrapped the stop valve.
Ever since, generator works fine but I still have problems with air in fuel lines somewhere around the CAV filter which I bought to replace the crappy yanmar one and which I'm planning to remove and revert to the yanmar :(
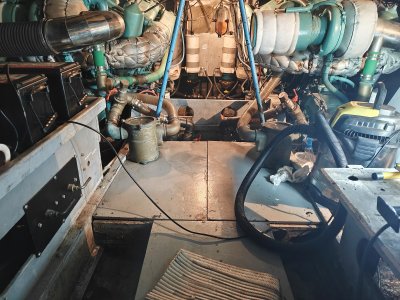
Trying to source a cheap and cheerful (AND NOT LEAKING!) filter maybe get a third Separ 2000/5 so that I can interchange with the main engine one if needed, we shall see. The whole process of unmounting the yanmar from the Mare(iirc) generator, shifting/lifting/sliding/lifting/sliding again the 2cyl engine out to the dock (boat was in the water) was interesting and needed lots of planning to avoid having the manually lift that by hand. All worked fine and I've got a deep score in the already damaged and in need of replacement thin ply-teak cover of the passerelle...

yanmar_removal.jpg


Since it was out, I got the opportunity to clear up the mess under there (didn't have decent access to do that as part of the rebuilt), so I started ripping things off, cleaning the plywood hull and using my trusty heatgun to remove coats of paint out if it. Although not easily accessible, ply was in v.good condition, all solid, so a few coats of my favourite paint and it was ready:
generator_hull_1.jpg


generator_hull_2.jpg


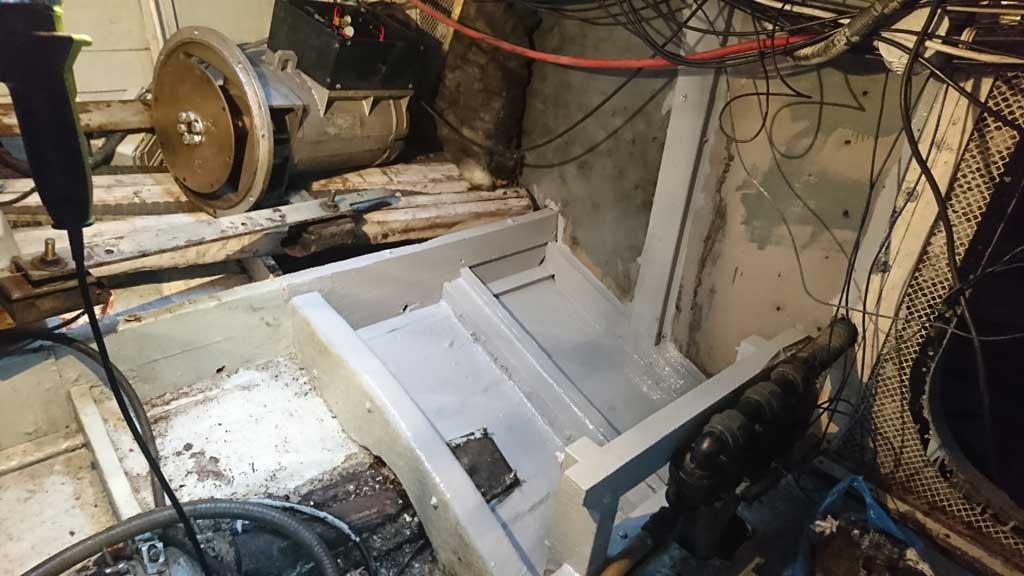
As part of the process, I replaced the oil soaked ply where the geny rested with a new piece of 20mm ply painted on both sides with the same grey paint I used to coat the cleaned Mase subframe.
Note the v.expensive sound barrier I installed around the e/r. Haven't finished, used it on the e/r to lazarette bulkhead as well as half the salon ceiling.
generator_hull_3.jpg


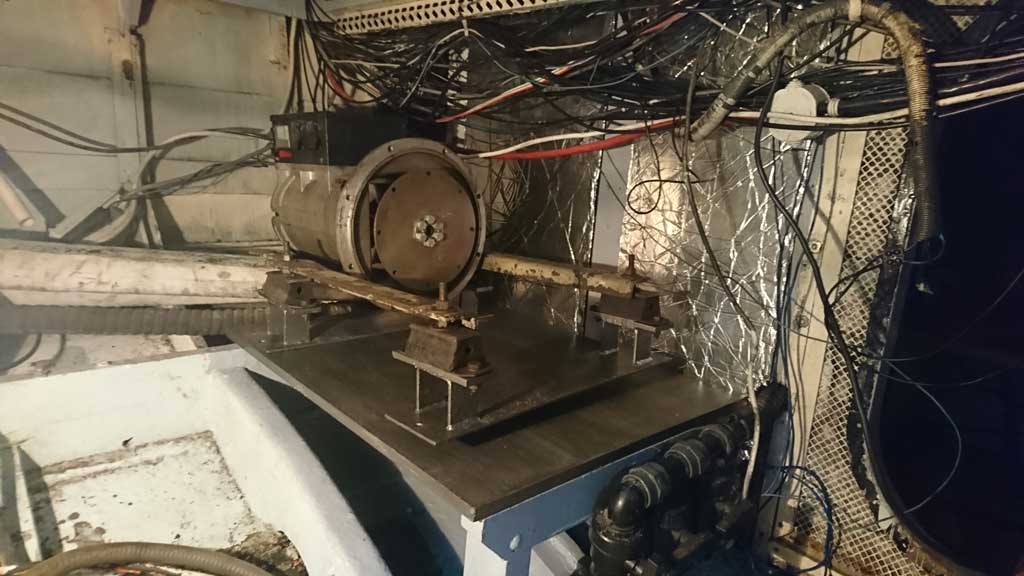
Subframe is solidly bolted to engine and generator and was mounted on 4 elastic mounts half of them not fit for purpose anymore. Especially the one that had some diesel spills on it over the years was badly affected, easy to spot on the following pic:
generator_mounts.jpg


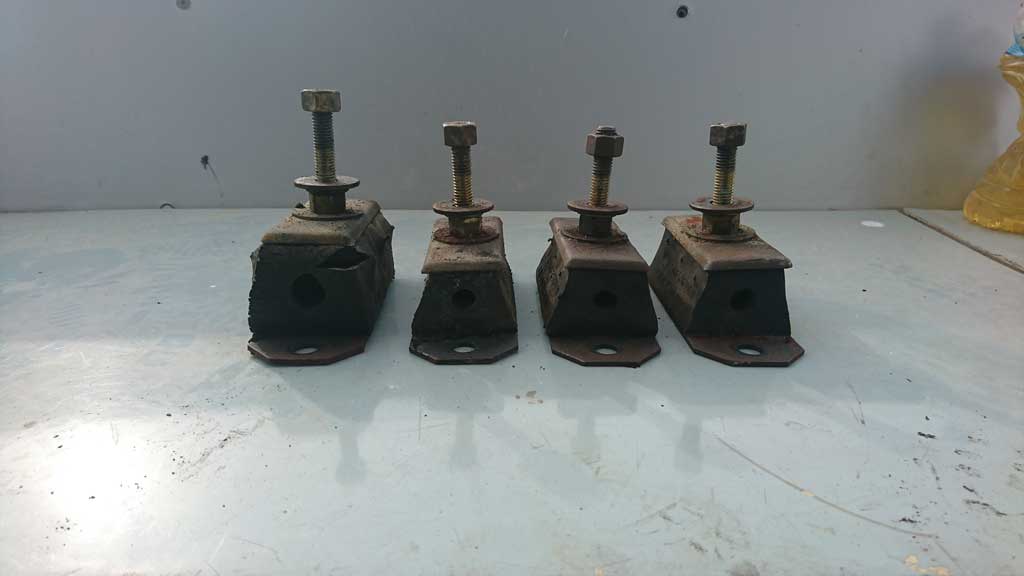
Ended up grinding off some pieces they at some point slapped on the subframe in order to fit these mounts. Got some new and v.cheap 60kg per mount rated ones from a shop in Athens, round single bolt easy to align and fit. Actually geny is now more silent and there's less vibrations but that could also be due to the full engine rebuilt.
generator_subframe.jpg


Generator back on in place, nicely painted white in order
generator_backon.jpg


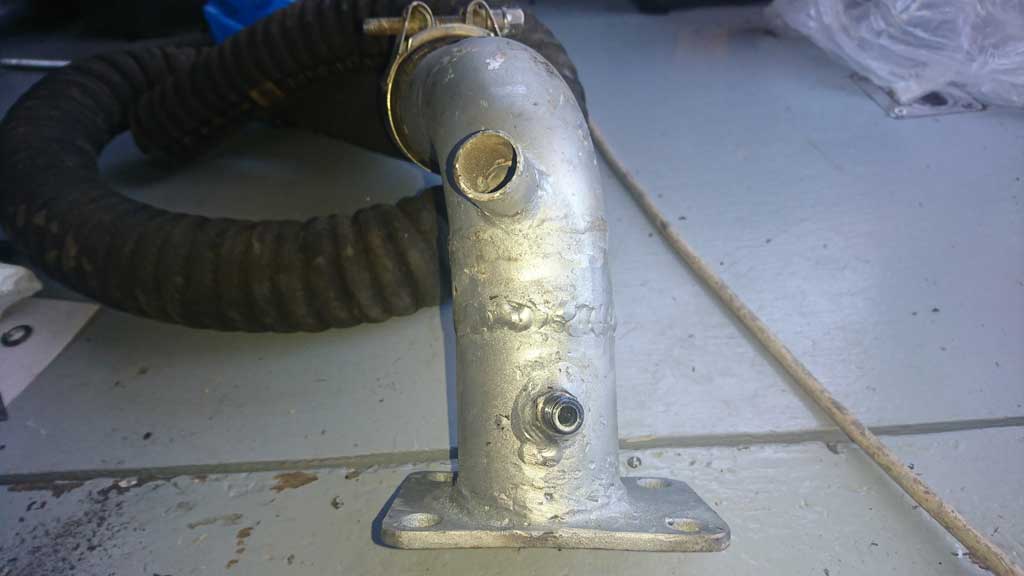
Custom NMEA2000 box has an input for a EGT probe (costed peanuts, had the code ready from the main engines no reason not to do it here as well...) but exhaust elbow was double walled there so needed a ugly looking mod to extend it by 40-50mm and weld the probe mount:
yanmar_exhaustelbowmod.jpg


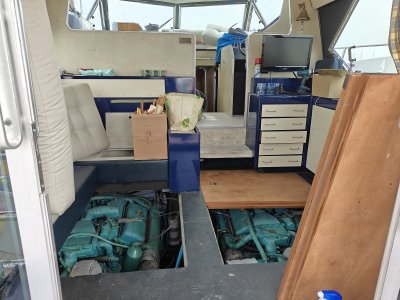
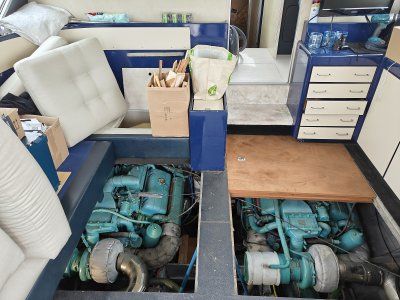
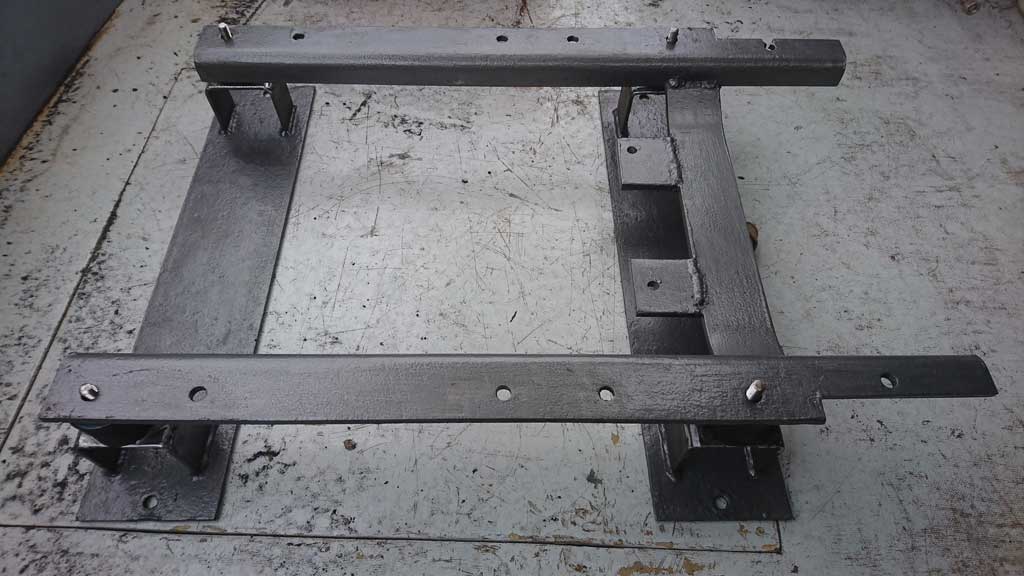
Another job I did during spring 2019 was service the engines. OK, so what, well, slapping things about, testing etc meant that the big 3phase el.motor running the hydraulic pump operating the stabs was in the way of accessing and removing the oil and coolant cooler/heat exchangers on port engine. With a bit of effort and a couple of days of work, I moved the heavy motor at it's final position on a custom "shelf" at the far front of the port side of the port engine space just next to the diesel tanks. Meant enough space to move and service engines:
vosperfin_3phasemotormounted.jpg


As part of the heat exchanger dismantle/acid clean/refit, I got the opportunity to add some access points for more sensors. The following pics are from the charge air cooler endcap (that's the first point seawater reaches after the impeller). See what's collected in three (or was it two) years since last visit:
iveco_endcap_1.jpg


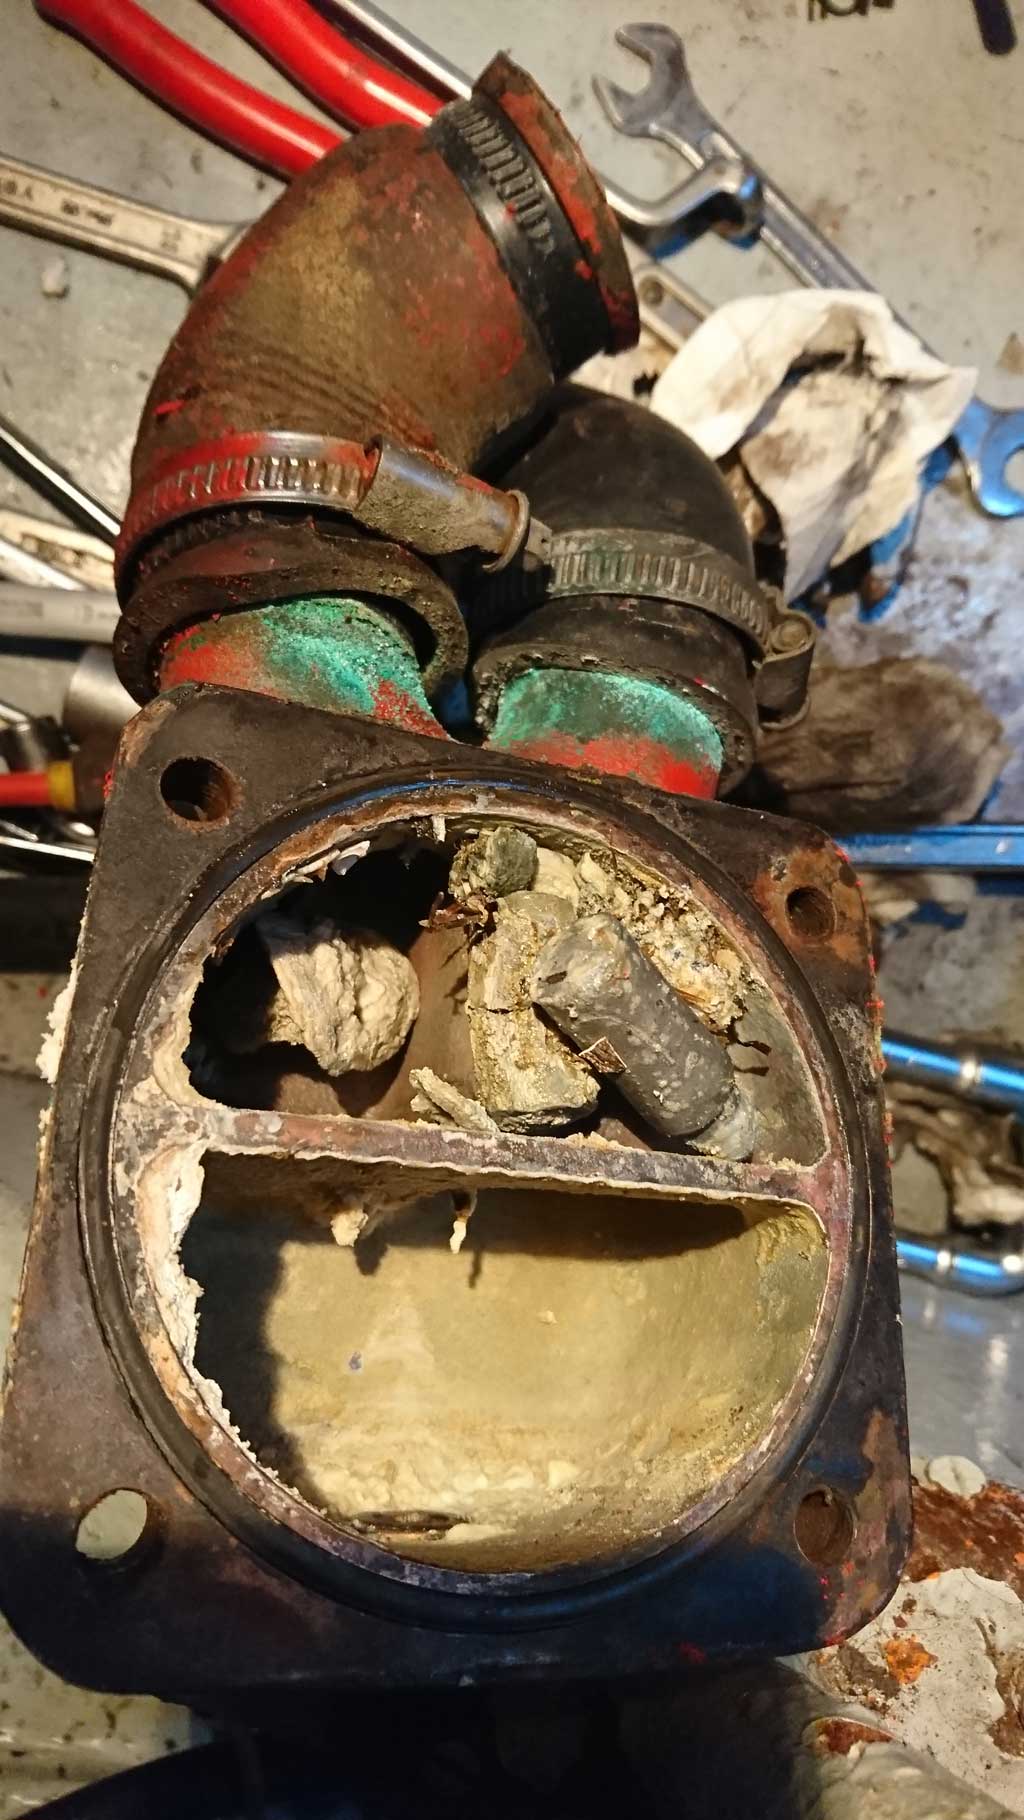
cleaned (v.roughly) and drilled:
iveco_endcap_2.jpg


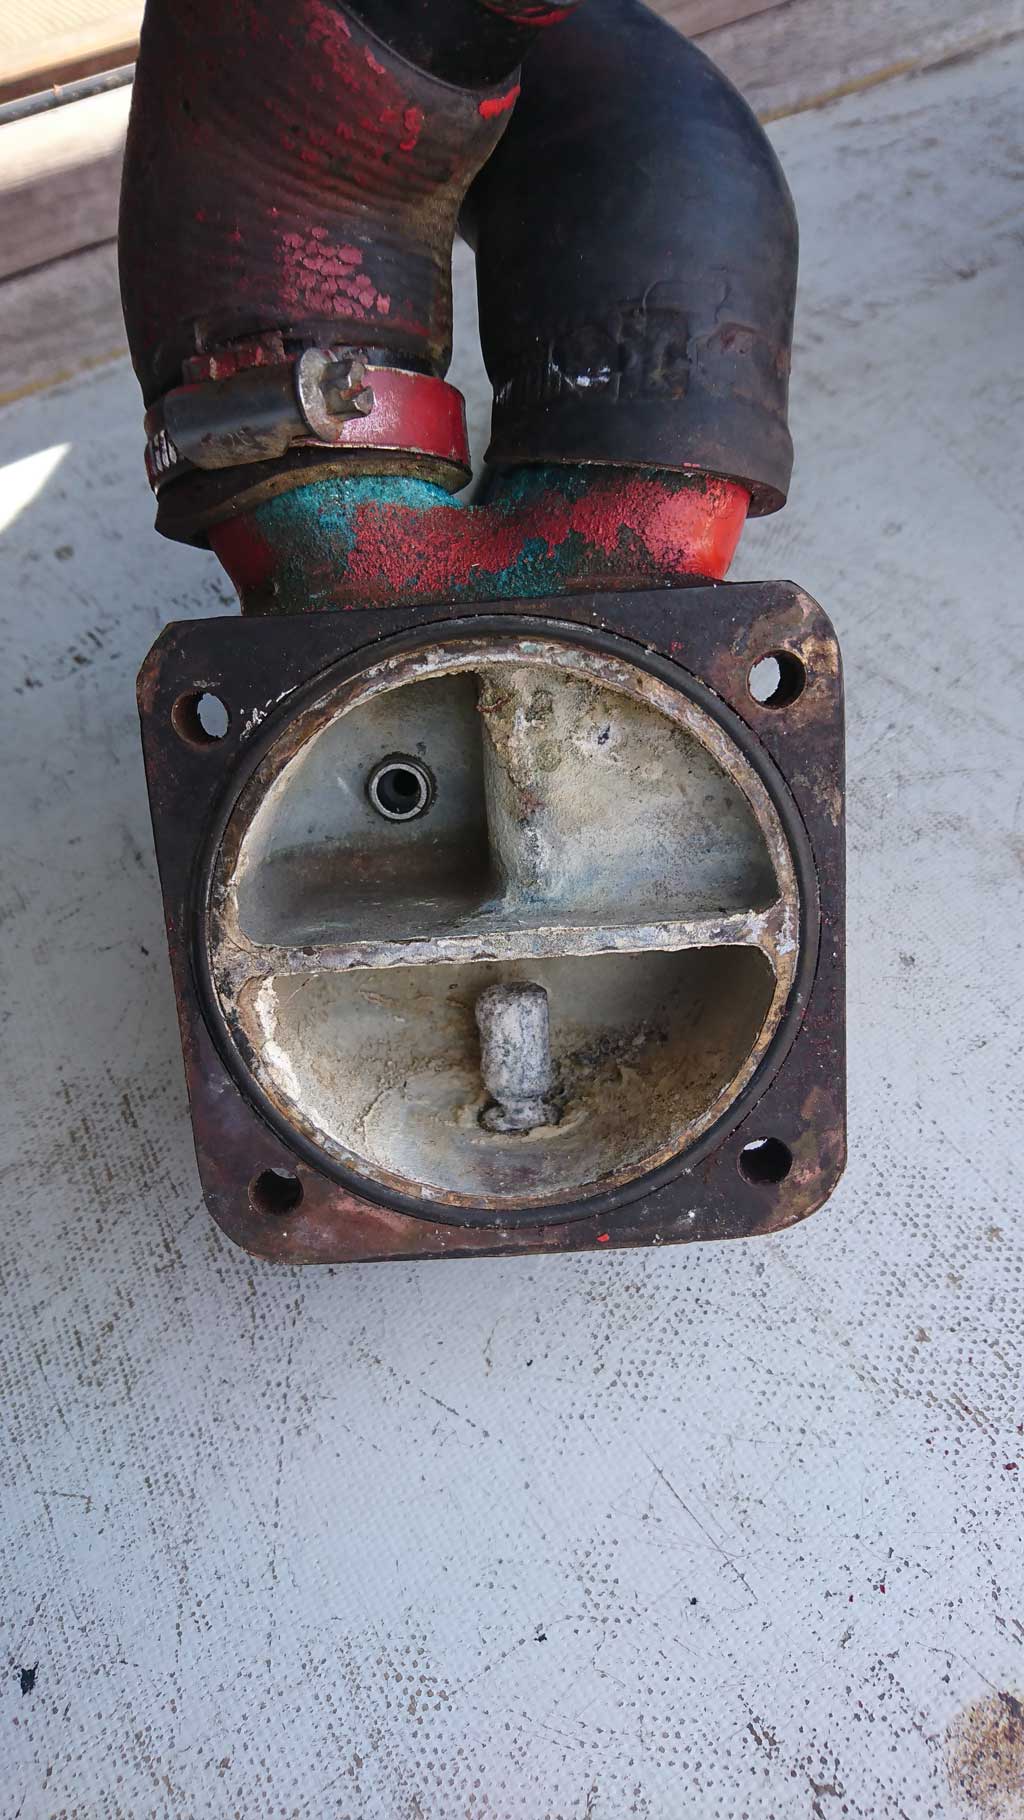
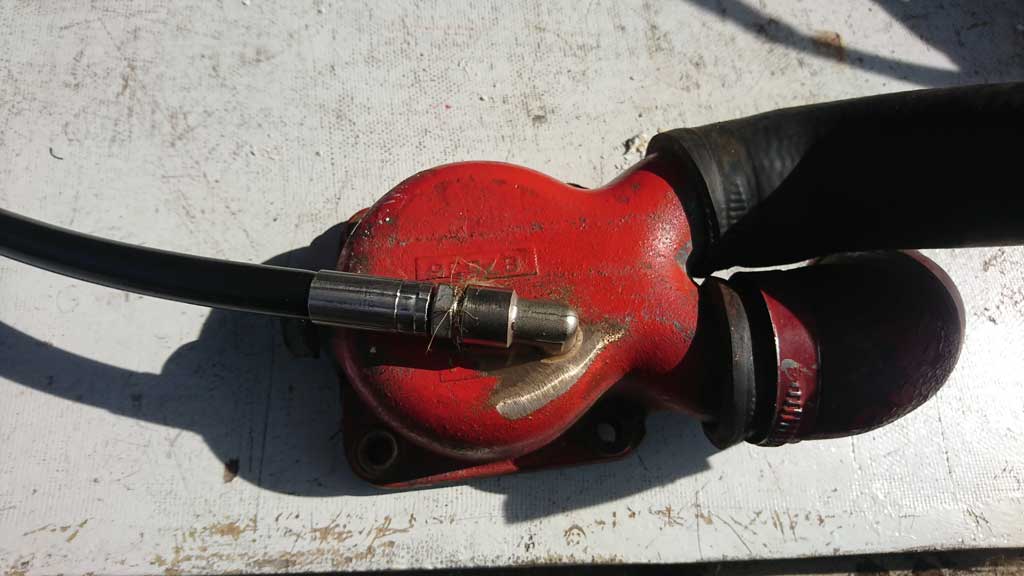
drilled and fitted with an elbow and hose where the 0-2.5bar seawater pressure sensor mounts:
iveco_endcap_3.jpg


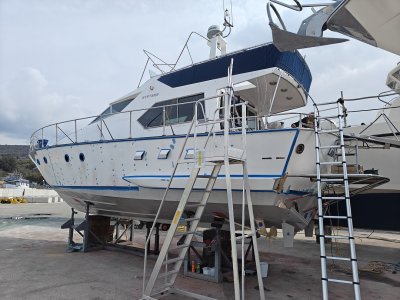
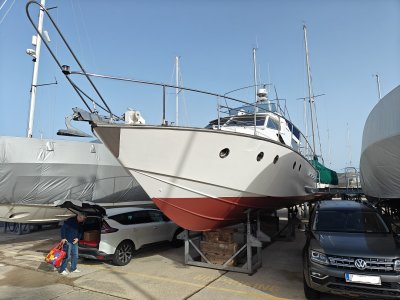
This update takes us up to spring 2019, before lifting out in order to do the underwater exhaust conversion. More on that in another post hopefully by the w/e or early next week.


cheers

V.
 

rafiki_

Well-known member
Joined
19 Jan 2009
Messages
11,959
Location
Stratford on Avon
Visit site
Brilliant. Many thanks for this Vas. With all the difficult news around, it is great to see something of substance. Uni’s not yet closed here Vas, although the really important things like football and rugby have been canned.
 

akq1995

New member
Joined
3 Sep 2020
Messages
1
Visit site
back home, time for updates... [and I fcking lost a full page of text during editing, so typing again a shorter version!]

First of all had a [planned] visit from RIN and swmbo yesterday! I think this is the first visit of a forum member to MiToS (may be another one next week)
They were seriously impressed on the amount of work carried out (and the work remaining!) and I was equally impressed by RIN's memory. I bet he studied the 90pages of the thread the night before flying to Greece :p
Pity they were in a hurry and we couldn't spent some more time together. Richard, I hope next time you're around, MiToS will be in the water (and complete!)

Started working on applying another 280gr/m2 mat and 4 coats of epoxy to the decks (top 3 with 20% white pigment in order to give UV protection to the epoxy and withstand the sun till I lay the teak next spring). Mat creates a sealed basin by going up on superstructure side and toe rail side by 40mm. Idea is to make sure water stays in and goes out from the designated areas and not where it feels like :rolleyes: (messing with my upholstery and cabin work in the process...)
Problem is the sun that's gone from mild to oh god that's hot in a matter of days. Had a slight sunstroke today (although I was wearing a hat!) and spent all evening in bed. It takes a month or less for the body to adapt and I can then happily work full day under the sun in July. Anyway to make it less taxing to the body, I started with the stbrd side as bow is pointing south so this side is in the shadow in the morning. Will do the port side tomorrow afternoon ;)


toerail+rubbingstrake_21.jpg


since I was epoxying with colour, I got a few coats on the aft deck main cabinet floor and back lining so that I can start assembling a few things and tidy up the space. Don't pay any attention to the exhaust hose, it's nice and soft in order to hold things without scraping them or laying pieces of ply to paint :rolleyes:

aftdeck_rebuilt_98.jpg


George prepared all the iroko pieces for the rubbing strake and I'll start test fitting and checking them tomorrow. The thin (10mm) strip that goes on the side will have to be test fitted, marked for the deck curvature, taken back to the workshop for smoothly cutting it to shape and then back to glue in place. Bit of a back and forth job but cannot be done else. The top pieces cleared out at 21mm, look nice and solid, well impressed!

Q: Is it OK to screw the 10mm thin strip with SS countersunk screws (got some v.nice ones with hex heads!) if I'm planning to keep the iroko just oiled??? I'll also use epoxy, but on test fitting it's going to be a major pain doing it with clamps... More specifically, will the ss screws stain the iroko, if all are simply visible? Got any other options? Don't want to screw it for the testing and then remove the screws after epoxying it in place, as the 3-4mm hole will be visible (me thinks at least!)

At home, I got a great shock opening the massive box of the Stanley searchlight that came through the post. I feel an 8inch search light is on the large side, but got the right place for it. What really annoyed me was the control box (it's remote controlled) which is really MASSIVE (note the CD next to it on the second pic below!). What were they thinking I wonder! so one of the winter jobs Is to open up this hideous thing extract the bits and reassemble it in an upholstered panel on the lower helm.

searchlight_1.jpg


searchlight_2.jpg


cheers

V.
Hello My friend

I hope you're fine

I want ask you do you still have this searchlight remote control ? because I interest to buy one same this beacon

Thank you very much

I will be waiting your answer
 

wodp

New member
Joined
15 Nov 2023
Messages
4
Visit site
Dear Vas, wow, i was amased on whole thread and restoration. So amased, that i also bought Mystere 43 :p ... Previous owner of my boat said to me that it has two 500 or 600 L tanks (he is not 100% sure). I have fuel leaking all over and would like to check and possibly replace this tanks (max DIY as possible). Have already checked rubber connection to them (under stairs), seems OK, but in boat under hallway deck and up to middle of front cabin, i find fuel. Do you know if they are accessible from 'kitchen floor' (probably need cutting out)? Do i need to remove whole kitchen? And if by any chance, you know aprox. dimensions of them? I have 77' version with 2x DD 6V53T's. Much appreciated for some advice 🤟
 

vas

Well-known member
Joined
21 Jun 2011
Messages
7,915
Location
Volos-Athens
Visit site
Dear Vas, wow, i was amased on whole thread and restoration. So amased, that i also bought Mystere 43 :p ... Previous owner of my boat said to me that it has two 500 or 600 L tanks (he is not 100% sure). I have fuel leaking all over and would like to check and possibly replace this tanks (max DIY as possible). Have already checked rubber connection to them (under stairs), seems OK, but in boat under hallway deck and up to middle of front cabin, i find fuel. Do you know if they are accessible from 'kitchen floor' (probably need cutting out)? Do i need to remove whole kitchen? And if by any chance, you know aprox. dimensions of them? I have 77' version with 2x DD 6V53T's. Much appreciated for some advice 🤟
hi there, if you read the thread and then went a bought one, I think you need your head examined :rolleyes:

we are talking about the plywood one right, not the JLC fiberglass one!
if so, originally there are 4 tanks across 1200lt in total and exactly under galley and lower helm but not going all the way up to the elevated floor there. If you lift the hatch (EDIT: between the step going up to the helm from salon and the steps going down to the cabins) you'll see a conduit with lots of cables. Everything is under that floor. I'd forget any idea of lifting them from there, it's a major operation as you have to:
  • remove galley furniture (not that difficult but rather inconvenient as it's not only the fridge cavity and the curved cabinet that will need removing but most likely the sink/hob as well),
  • remove (see butcher/cut) galley floor,
  • remove carefully the underlying bow-stern beams supporting the floor,
  • remove the underneath "locker" floor
  • remove the underlying bow-stern beams supporting said floor
then you arrive at the tanks hence imho it's not going to work...

Now, do post some pics here from the e/r facing towards the bow. Check if there is any insulation (not originally!) on the tanks.
Stock setup has 4 tanks one next to the other they are all approx 400mm wide (as in aft-front) and approx 600-700mm in the port-stbrd direction.
Tanks are joined on top for filling. Filler is in stbrd via a massive pipe behind the stbrd side salon cabinet, then goes down to the e/r.
tank breathing on port side.
Tanks are also joined on the bottom via circa 1in pipe and stopcocks on each of the four tanks.
Then fuel goes to a tiny barrel "day tank" and from there to the engines. Returns go to the top of the tanks respectively port and stbrd.

I had leaks WHEN filling the tanks as the connecting pipes on top had turned hard and brittle. Replaced one of them, retightened the other, now it's fine.
you may have leaks from the pipework at the bottom.

How much fuel is on your tanks now?
Is it leaking with boat/engines NOT in use?
when was the last time you filled the tanks?
is the sight gauge in place and working?

generally post lots of pics as I think the only realistic way of getting tanks out (once establishing they ARE leaking) is via the e/r: disconnect all pipework, slide one of the middle two tanks aft (if you have the 400mm distance to the DD that is, mine is re-engined!) then turn 90deg in plan and slide back and up through the engine salon hatches.

goodluck, you're going to need it!

V.
 
Last edited:

wodp

New member
Joined
15 Nov 2023
Messages
4
Visit site
Wow, so much useful info in your post dear vas. Much appreciated. About my Mystere 43 - it is indeed Versilcraft one, plywood version, twin Detroit diesel 6V53T, about 76/77 years boat and engines. Wood is in quite good condition, this year i used epoxy primer and 2k nautical colour, currently was working up until fence line. Boat has several issues still unresolved - leaking water from above (from flybridge to fence line) - which is gathering inside. I was on my knees more on this boat than before women... and second issue is fuel leaking. Rather than that, engines need some mechanic which knows 2-stroke diesels or at least is goood with diesels in general.

Your reply pointed me to check few more things regarding fuel line. Will do soon, when i am able to go to boat.

I enclose some photos; me and my father work on boat when we have time (and it is not a lot), also boat is in Croatia, about 2,5h drive from my home.
 

Attachments

  • work_in_progress.jpg
    work_in_progress.jpg
    379.9 KB · Views: 27
  • dry_marina.jpg
    dry_marina.jpg
    336.1 KB · Views: 27
  • into_water.jpg
    into_water.jpg
    288.2 KB · Views: 28
  • on_water.jpg
    on_water.jpg
    471.5 KB · Views: 29
  • cheers.jpg
    cheers.jpg
    278.3 KB · Views: 33

vas

Well-known member
Joined
21 Jun 2011
Messages
7,915
Location
Volos-Athens
Visit site
if woodwork is fine, it does look pretty good! well done!
now, water coming in from salon ceiling, you'll have to remove the side trim (where the salon speakers are!) WARNING massive heavy pieces! and then unslide all the salon ceiling slats.
THEN you access situation and see where the water comes in. My guess would be the radar arch and being curved, water appears at the ends where it can slide down easily.
fix that first as this can destroy plywood in the hull as well as salon ceiling!

need some engine room pics when you go there again to be able to be of a bit more help!

cheers

V.
 

wodp

New member
Joined
15 Nov 2023
Messages
4
Visit site
Currently i have one quite bad photo of engine compartment... will make better photos next time i am on boat.

Also i enclose photos of engine compartment viewed from saloon.
 

Attachments

  • engine_room_bad-foto.jpg
    engine_room_bad-foto.jpg
    1.2 MB · Views: 20
  • saloon_open_floor_1.jpg
    saloon_open_floor_1.jpg
    1.1 MB · Views: 19
  • saloon_open_floor_2.jpg
    saloon_open_floor_2.jpg
    1.2 MB · Views: 18

vas

Well-known member
Joined
21 Jun 2011
Messages
7,915
Location
Volos-Athens
Visit site
sound good tbh, Alf (@Divemaster1 ) should tell us what he thinks!

seems that there is a panel covering the tanks (engine room side), if you check pics from my restoration you can clearly see mine. Maybe see if you can carefully remove that and see what's behind?
maybe they have replaced them at some time? don't know!

V.
 
Top