Can't see a good boat put down. Eygthene 24 1/4 tonner

Hoist

Active member
Joined
28 Nov 2019
Messages
264
Visit site
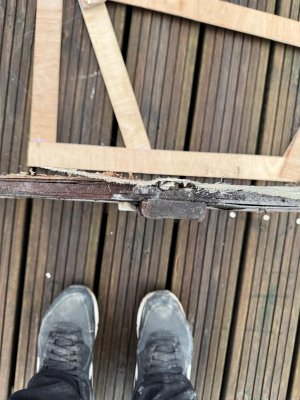
Attacked the Starboard Main bulkhead this afternoon. The jigsaw and grinder quickly relieved it!

IMG-20241206-WA0005.jpg

The water damage was the same on this side. The wood was able to come out whole but as you can see it was very close to failure also.

IMG-20241206-WA0006.jpgIMG-20241206-WA0009.jpgIMG-20241206-WA0007.jpgIMG-20241206-WA0011.jpg


Got the template all made up and so I'll be ready to cut out the new bulkhead tomorrow

IMG-20241206-WA0004.jpgIMG-20241206-WA0008.jpg

One thing I have noticed on this side is that the tabbing was a lot stronger. The access is much easier than the port side and they seem to have made a much better job of it on day 1. I did consider using the old piece of wood instead of templating, however by using the template I am able to get a much better fit and the resulting bulkhead will be much stronger than the original. Just for reference the original bulkhead had a gap where the tabbing was pushed in between of around 1" on the outside face. The only part that was butted up to the deck was the section directly under the deck
 

Attachments

  • IMG-20241206-WA0010.jpg
    IMG-20241206-WA0010.jpg
    210.6 KB · Views: 4
  • IMG-20241206-WA0012.jpg
    IMG-20241206-WA0012.jpg
    299.4 KB · Views: 6

Greenheart

Well-known member
Joined
29 Dec 2010
Messages
10,308
Visit site
It's a wonderful thing you're doing and great to read about and watch.

You're much more hands-on and bold in your investigation and restoration than I ever have been or likely will be, but seeing it here is as good as visiting a boatyard.

I might have, and I might still buy a yacht that needs work, though I have proven to myself that I barely get enough use even from a fully functional yacht, to get value from ownership...

...your descriptions of the process and your photos of a yacht's interior/structure that needs an investment of time and competent endeavour, may keep me from any imprudent purchases this winter! 👏
.
 

Bodach na mara

Well-known member
Joined
21 Aug 2002
Messages
2,717
Location
Western Scotland
Visit site
A marvellous tool for these removal jobs is a multitool and with Christmas coming up ----- ?
Something like this. 1733501371849.jpeg
Available from B&Q about 70 beer tokens. Other brands are available.

I wish that they had been invented when I was attacking a small patch of rot in the corner of the cockpit in my Commando motor-sailer that ended up with the removal of a large part of the cockpit seat along with most of the locker and bulkhead.
 

Hoist

Active member
Joined
28 Nov 2019
Messages
264
Visit site
By the way, how are you tying your new part of the bulkhead to the old bit ? All the stress from the rigging is going to be on that join.
That is a very good question, and one that I took a lot of time to consider. In my head I have it all worked out but I feel a diagram coming on.

The main force that the chainplate is exerting is in an upward direction. It is trying to pull the bit of wood through the hole in the deck.

So I am less worried about the join of the new and the old, but more the gap and fill between the top of the new section and the bottom of the deck.

The new and old will be structurally glued together using thickened epoxy and then receieve 7-10 layers of taping either side over the top.

The new pieces will hopefully have 10 layers of tabbing all the way around securing them in place

Hobo.png
 

Wansworth

Well-known member
Joined
8 May 2003
Messages
34,257
Location
SPAIN,Galicia
Visit site
A marvellous tool for these removal jobs is a multitool and with Christmas coming up ----- ?
Something like this. View attachment 186439
Available from B&Q about 70 beer tokens. Other brands are available.

I wish that they had been invented when I was attacking a small patch of rot in the corner of the cockpit in my Commando motor-sailer that ended up with the removal of a large part of the cockpit seat along with most of the locker and bulkhead.
I had dry rot in my commando motor sailer😂
 

Dellquay13

Well-known member
Joined
19 Feb 2021
Messages
1,070
Location
Boat at Milford Haven, Home in Chesterfield
Visit site
A marvellous tool for these removal jobs is a multitool and with Christmas coming up ----- ?
Something like this. View attachment 186439
Available from B&Q about 70 beer tokens. Other brands are available.

I wish that they had been invented when I was attacking a small patch of rot in the corner of the cockpit in my Commando motor-sailer that ended up with the removal of a large part of the cockpit seat along with most of the locker and bulkhead.
If you’re going to switch one of these on
1733504130235.png

Don’t forget some of these
1733504212990.jpeg
The noise from multitools is much more intense and damaging to your hearing than you would expect, especially in confined resonant spaces, the high frequency is misleading.
 

Hoist

Active member
Joined
28 Nov 2019
Messages
264
Visit site
Had an oscillating tool in the past of the ryobi flavour. It lasted 1 job and broke. I have never needed one really

The tool I find essential in this whole task is this

IMG_4234.jpeg

I would buy one again tomorrow if it broke. Bloody brilliant thing!

The second thing that has been super impressive are these for the grinder. Very scary at first but it’s still sharp and goes through anything non metal! You just have to be very careful and plan your cuts. If I ever needed to dispose of a boat I am confident that 1 of these would do the whole thing!

IMG_4235.jpeg
 

Greenheart

Well-known member
Joined
29 Dec 2010
Messages
10,308
Visit site
That disc looks like the sort of thing DIYers are periodically warned away from, like discs with a chain-saw edge! :oops:

Do the breaks in the outer edge prevent the disc scorching or burning any wood it touches?

When I had to scrap my big GRP dinghy, I had a cordless grinder but was warned against the clouds of dangerous dust...

...so I didn't grudge buying a circular saw which cuts much more cleanly. I still wore a respirator and all over disposable suit.

If you're cutting into glassfibre or even ply in the confines of the cabin, you need all the protection you can get.
.
 

Stemar

Well-known member
Joined
12 Sep 2001
Messages
24,213
Location
Home - Southampton, Boat - Gosport
Visit site
If you have to buy a multitool for boat work, I would suggest that a cordless one might be a good idea. Do get a decent one, though. I got a Draper one and it was a useless toy. I took it back and got a Bosch blue job, which is excellent. Also, unless you want to multiply chargers and batteries, you're going to be stuck with one type of battery as you build a cordless set, so that's worth thinking about.
 

Hoist

Active member
Joined
28 Nov 2019
Messages
264
Visit site
It's been really slow going with the project but I am so close to finally getting the tape supports done.

The boat keeps throwing stuff at me. One morning when I was extremely keen I came down the companionway only for the whole steps to give way beneath me.

Not my finest work as I did not have a long enough piece of ply left, but it's certainly strong now.

WhatsApp Image 2024-12-18 at 16.06.59_abb0610c.jpg WhatsApp Image 2024-12-18 at 16.07.07_df1913ef.jpg

I then glued in the new Starboard bulkhead. I possibly made it a little tight so it was a case of measure 20 times cut 100. You can see the acoustic testing equipement helped. I also used some scrap little blocks hot glued onto the hull as guides to get it in place.

WhatsApp Image 2024-12-18 at 16.07.20_04068253.jpg


When mixing this epoxy and using the colloidal filler I have found its really hard to put too much filler in. It seems to dissolve after a few minutes and back to runny which makes it very challenging when trying to use upside down!

IMG-20241231-WA0010.jpgIMG-20241231-WA0012.jpg

Next part to glue in was the wooden blocks which will take the chainplates. The old ones were hardwood but in very poor condition. 2 pieces of Iroko will replace them. I 3d printed a little workbench jig for my router which has been pretty useful for smaller jobs like this. The sharp eyed will notice that the edge of the bulkhead has been sanded to make a transition from the thinner original bulkhead. All of this area is going to be epoxied and taped to make it SUPER strong. This will be a vast improvement over what was there originally

d0ec4493815bb630f83285cc5b222eac.jpg IMG-20241231-WA0009.jpg IMG-20241231-WA0008.jpg IMG-20241231-WA0007.jpg

Once that was all set the final job I have carried out was something I had to seek advice on. The original taping went over EVERYTHING, even the chain plates. I have been advised to do the same and have it all glued properly. Also that the hardwood parts have quite a complex transition so I have made a filler transition piece for them using some scrap foam and thickened epoxy.

IMG-20241231-WA0014.jpg IMG-20241231-WA0013.jpg

Hopefully the weater dies down after new year. The last week has been awful and just walking to the boat perilous during the day.
 

Attachments

  • IMG-20241231-WA0011.jpg
    IMG-20241231-WA0011.jpg
    200.1 KB · Views: 3

DownWest

Well-known member
Joined
25 Dec 2007
Messages
14,077
Location
S.W. France
Visit site
Thats odd about the colloidal thickener. Been using a lot recently and not had the 'getting runny' problem. (Not West)

Bloke bought a Trapper 27 and the chainplate to ply bulkheads were getting towards yours but still in place. So I replaced the ply that was rotten, but with scarfed joints before taping. Also (belt & braces) extended the chain plates down by about 15cm.

Petter diesels were mostly used in refrigeration units on trucks. OK but usually binned after a certain life. Not rebuilt. I used to come across them as small house gensets and had quite a few hassles ('70s & '80's). But, to be fair, by the time I saw them, they had done quite a few hours with poor maintainance. Very old now...

Very nice job on a fun boat.
 

oldbloke

Well-known member
Joined
24 Jun 2018
Messages
565
Visit site
I'm no kind of expert but, I tend to use a filleting blend and colloidal silica mix. The silica seems to make the mix smoother whereas filleting blend on its own gets a bit rough if it is thick enough to use on a vertical surface.
I would also use tape to hold the goo in place and wouldn't worry if I had to go back and fill the gaps when the first lot had nearly set.
But then I am a bodger , not a craftsman
 

Hoist

Active member
Joined
28 Nov 2019
Messages
264
Visit site
100% bodger also. The real boatbuilder who gives me tips does everything to superyacht perfection, and always overbuilds. If I can do it to 50% of his level I will be happy!

Interesting that you use filleting blend. I've used the low density filler 407 before (the broon gear as it's known) and that was ok. Made a decent job of my dads rib transom.
 

Hoist

Active member
Joined
28 Nov 2019
Messages
264
Visit site
Another day and another attack on the 1/4 tonner.

Got the scary outboard bracket removed and glued in a new 18mm piece of ply as the transom stiffner.

Also replaced the spreader bracket and a few other bits and bobs.

Very close to putting the mast up. Just need to collect the forestay from the riggers
 

Hoist

Active member
Joined
28 Nov 2019
Messages
264
Visit site
Will take some more photos but the transom bracket is on. Was finally able to take the boat for a small yacht about the marina.

IMG-20250119-WA0006.jpgIMG-20250119-WA0008.jpgIMG-20250119-WA0002.jpg
 
Top