Seastoke
Well-Known Member
Be careful with heat ie fuel.
Be careful with heat ie fuel.
All the heat is inside the induction coil , much safer than a flame,Be careful with heat ie fuel.
Induction heater probably produces a more concentrated heat than the exhaust elbowMy exhaust elbow is bang under the rear big carburettor !! I don't think a good idea to put heat around there .
If I remember correctly, you posted a few weeks ago in regard to the lift motor not working, I think you were planning to arrange for someone to take a look at it! Did this happen? Did you get it working at that point in time or is the failure now the same failure?OK .... decided to have another look and go at the two smaller jobs ...
Prop shaft anode ... blimey that was a doddle ... lock prop - remove centre bolt ... unscrew cone boss revealing inner prop bearing and splined shaft ... slide off prop .. slide off bearing shield ... voila !!
Two hex bolts loose that should be tight securing the anode. One the head has been bashed about - but still tightened up fine ... decent Hex driver and she's tight again ... shield / prop / cone / bolt back and she's good.
Note to self - Check bolts at decent intervals. Maybe I will replace before I re-launch after other repairs. Before anyone suggests - I will not use Threadlock ... unless its Blue.
OK - drive lift not working ...
Took a can of Spray Cleaner and cleaned up all I could get to from exterior .... and bingo - I think I now know why ...
The lift motor bottom end of shaft has a large flat disc that pushes onto the release rod of the astern pawl clamp. When I want to raise the leg - the lift shaft by screw action extends down - presses on the release rod to disengage the locking pawl and continues pushing - making leg rise.
The lift motor is not extending the shaft at all ... the relay is clicking - but motor is not turning to wind the shaft down / up.
OK - when ahead is chosen on throttle - I assume the relay is engaged momentarily to just enough release the pawl to allow leg kickup when grounding ... but its not happening - the pawl is staying locked due to lift motor shaft not moving.
View attachment 194211
If I remember correctly, you posted a few weeks ago in regard to the lift motor not working, I think you were planning to arrange for someone to take a look at it! Did this happen? Did you get it working at that point in time or is the failure now the same failure?
Ok. So when the drive is fully down, the actuating rod within the lift mechanism will be at the top. Possibly stuck against the end of its travel. A couple of points - it would definitely be worth removing the drive motor from the mechanism to disassemble, clean the internals of the motor and check the brushes (replace ideally). The “bump” that you are applying to the drive maybe sufficient to nudge poor brush contact with the motor com. In times of need, it is possible to remove the mechanism drive motor and insert a flat bladed screwdriver and turn the mechanism by hand . The motor just has a plain output shaft with a drive pin at 90deg to its axial rotation which engages with the geared mechanism when inserted. Hope this helps.It was looked at and we got it working again .... but it had a quirk - at 50% lift - it would stall ... and a 'bump' of the outdrive would get it to lift the rest. But once up - it would not go down without a 'bump' again ..
So we were aware that something was not right still ... we suspect a hard or worn spot on the worm drive for that.
Now it appears that the lift worm drive is stuck at full down .. as operating the lift switch - nothing happens to the drive rod - except a click of the relay. It also appears to have driven itself to extreme end .... maybe that's why its locked up.
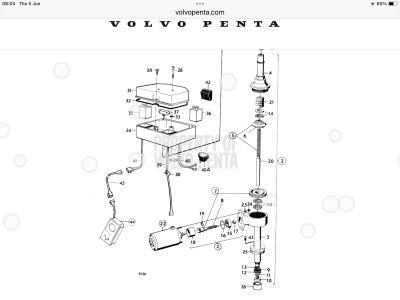
You can see the motor in the attached photo. Two thin long bolts go through the motor and attach to the gear headOk. So when the drive is fully down, the actuating rod within the lift mechanism will be at the top. Possibly stuck against the end of its travel. A couple of points - it would definitely be worth removing the drive motor from the mechanism to disassemble, clean the internals of the motor and check the brushes (replace ideally). The “bump” that you are applying to the drive maybe sufficient to nudge poor brush contact with the motor com. In times of need, it is possible to remove the mechanism drive motor and insert a flat bladed screwdriver and turn the mechanism by hand . The motor just has a plain output shaft with a drive pin at 90deg to its axial rotation which engages with the geared mechanism when inserted. Hope this helps.
Ok. So when the drive is fully down, the actuating rod within the lift mechanism will be at the top. Possibly stuck against the end of its travel. A couple of points - it would definitely be worth removing the drive motor from the mechanism to disassemble, clean the internals of the motor and check the brushes (replace ideally). The “bump” that you are applying to the drive maybe sufficient to nudge poor brush contact with the motor com. In times of need, it is possible to remove the mechanism drive motor and insert a flat bladed screwdriver and turn the mechanism by hand . The motor just has a plain output shaft with a drive pin at 90deg to its axial rotation which engages with the geared mechanism when inserted. Hope this helps.
just to get an idea, are we talking about something like that?Just bought a cheap Chinese induction heater for a old truck project, witchcraft!!!! 5/8" bolt & nut wouldn't move with long bar , air gun, etc even after soaking, 30 seconds with the heater and you could unscrew the nut with a small ratchet , total game changer for stuck fasteners , bearings etc.
only down side is the unit is about 16" long and 3" diameter, although there are multiple heating attachments in the kit which can be bent to access tight spaces, amazon prime , so just return if not suitable
Yes, that looks like the same sort of thing, I've used oxy/acetylene for years, but this is so much better, localised heat with no risk of damaging other things close by.just to get an idea, are we talking about something like that?
Yes, it’s not a complex unit overall. The main problem is its location on the transom shield and the difficulty in accessing it as you say. Removing the motor to service the motor is doable or at least it was on the Birchwood that I had many years ago. If you need to remove the whole assembly from the transom shield, I think it’s an engine out job! Good luck with it anywayHi ... yes - I considered the screwdriver trick other day - but the orientation of the setup is awkward .... better is to remove the lift motor assembly and try to service it ...
When you see teardown videos etc - you see that the whole assembly is not exactly 'rocket science' ...
Boat has now been towed thos morning to yard and they have the job of sorting it ...
Yes, it’s not a complex unit overall. The main problem is its location on the transom shield and the difficulty in accessing it as you say. Removing the motor to service the motor is doable or at least it was on the Birchwood that I had many years ago. If you need to remove the whole assembly from the transom shield, I think it’s an engine out job! Good luck with it anyway
Would it not be easier get engine out, do all the jobs properly then enjoy the boat.I think it will be removable without 'engine out' ...
I hope that’ll be the case for you. Depends on access to it on your boat and whether it’s seized into the transom shield!I think it will be removable without 'engine out' ...
Would it not be easier get engine out, do all the jobs properly then enjoy the boat.
 in the boat starts to exceed its value.
")