Removing lead and galvanising a Spade anchor

Neeves

Well-known member
Joined
20 Nov 2011
Messages
12,975
Location
Sydney, Australia.
Visit site
Some notes

I am arranging for the Spade anchor of some friends to be regalvanised. The anchor is an S60, galvanised steel, but has a simple plate shank - not the complex hollow fabricated shanks of the S80 and larger models.

I had to remove the lead.

I used a Japanese stove, used for Korean BBQ. They use those disposable gas cylinders. You could use any camping stove (Camping Gas comes to mind) but the Japanese stove is 'flat' and you can place the fluke directly on the 'hob' plate to heat the fluke (as you would a saucepan). Being flat it is more stable - I recall Camping Gaz stoves tended to be 'tall'. I arranged the anchor to sit 'toe up' so that the lead could flow by gravity out the rear of the ballast chamber. I cut up a tin can to make a chute to catch the molten lead so that it dropped onto a flat peice of metal (Like lava from a Spanish volcano). I supplemented the camping stove with a blow torch once the lead started to flow. Lead melts at about 375 deg C - it does not take long to get the lead melting and I used, roughly, one cylinder of gas, and some from the blow torch. When the lead was flowing, so the ballast chamber was upto heat - I could still tweak the 'lie' of the anchor using the shank and the leather gloves.

It was relatively straight forward.

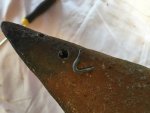
The one surprise - I started by melting lead in the toe - it melted quickly enough and flowed out as a vertical fountain from the toe - about 4cm high jet of molten lead. I thought that there must be a hole in the weld but it appears there are three holes in the toe - to ensure that the toe is completely filled when they pour molten lead in? (no air gaps).

Of the 10kg anchor 3.6kg is lead - which I found to be quite extraordinary (not a criticism - just an observation).

The anchor will be galvanised in the next fortnight by Armorgalv (an update on the Sherardizing process). The Armorgalv process incorporates grit blasting as part of the process, acid is not used - so they are quite happy to accept painted product.

Once galvanised I'll remelt the lead, all of which I collected, and pour back into the ballast chamber. I'm not sure how the molten lead will 'work' with the holes in the toe when I refill (will the lead simple flow out as fast as I pour out in......)

When working I wear a cotton boiler suit, heavy duty leather gloves, goggles and a wool hat (don't I look daft with a woollen hat when its 25 degrees and have a stove and blow torch blazing away?). The stove sits on a 2cm marble slab on top of a work bench. I ensure I have no interruptions. I have a large extractor fan over the work bench (apparently lead his decidedly unhealthy - though when you get to that age of maturity - does it matter!).

If the anchor were a larger model, say 20kg, it might be more difficult, or take longer, to get the lead upto temperature and would be more physically demanding to lug about.

If you have the space and 'privacy' its not a difficult task.

Take care, stay safe

Jonathan
 

sarabande

Well-known member
Joined
6 May 2005
Messages
36,024
Visit site
There's an old forum thread which contains some hints on safe lead melting.

(26) Melting Lead At Home And Casting - Any Tips | YBW Forum

Please note especially the warning about not pouring lead into a damp mould. Pre-heating anchor cavities is essential.

If you drop molten lead onto a marble slab it is very likely to break and that might result in the burner falling over. Just a passing thought.
 

Spirit (of Glenans)

Well-known member
Joined
28 Mar 2017
Messages
3,346
Location
Me; Nth County Dublin, Boat;Malahide
Visit site
I imagine you will need to progressively block the flow from the three holes in the toe once you have established that no cavity remains within. Perhaps it will stop flowing out as it solidifies.
You will probably have to start the refilling process with more lead than you removed, in order to compensate for the quantity that initially flows out of the holes in the toe.
 

rotrax

Well-known member
Joined
17 Dec 2010
Messages
15,764
Location
South Oxon and Littlehampton.
Visit site
One of my sponsors when I was motorbike racing was an engineer and inventor - his tour de force being pub optics - once he sold his Patent for these he never really had to work again.

Bill H did, however, like a challenge. Hence his choice of racing motorbike, a highly developed 1934 650cc Scott two stroke twin. Over a twenty year period he made it a fast and reliable race winner.

A vintage working canalboat owner had a very early Bollinders engine with a cast iron piston, a totally knackered cast iron piston. Cracked from gudgeon pin to breakfast time and with chunks missing from the reinforced skirt.

Bill made a mould box, got the special green sand and made a mould using a large paint tin as a pattern. I provided three Hillman Minx aluminium clutch bell housings for the casting material.

I recall that when the mould was broken open six spigots, half inch round spikes, protruded from the new casting. He had never cast anything as big before but had spoken to a Slough ironfounder and read up on the technique required.

The mould had been prepared so as to let molten metal flow while reducing air lock/bubble problems.

The sand had the holes positioned carefully and natural friction/cooling solidified the flowing metal as the mould filled.

A coke brazing hearth was used, its small blower turbine flat out and with extra air from the workshop compressor added at crucial times.

AFAIK, the canal motorboat, a 'Big Woolwich' class, is still using that piston.

We got the rings from a company that specialised in steam engine piston rings, the Cluppet Piston Ring Co.

Good luck - I feel sure it will go OK.
 

Neeves

Well-known member
Joined
20 Nov 2011
Messages
12,975
Location
Sydney, Australia.
Visit site
I imagine you will need to progressively block the flow from the three holes in the toe once you have established that no cavity remains within. Perhaps it will stop flowing out as it solidifies.
You will probably have to start the refilling process with more lead than you removed, in order to compensate for the quantity that initially flows out of the holes in the toe.

I've anticipated that - I have some roofing lead specially for the purpose. I've also weighed the original and empty anchor (and the lead removed)

Confess I'm not sure how to address the holes in the toe - they are really small - but offered a spectacular surprise. Molten lead has a surprisingly low viscosity. My immediate though was the lead will solidify - but only if I fill a small amount at a time, getting larger as the cavity fills. To decant 3.6kg of molten lead has a large thermal mass and it would take some time to solidly during which the molten lead will flow and then create a void - and then I have to melt the whole lot to fill the air gap. So my thought is to add a small amount, let it flow out, if it does, then add a bit more, etc. its as much an intellectual problem as a physical one - will the developing vacuum stop the molten lead flowing out?

I have wondered about dropping in solid lead and using a blow torch to melt it - in situ and then when it start to flow out remove the heat. Then add small batches - of increasing size.

The holes do seem designed to ensure no air gap as there are 3 holes, one dead centra and one on each side of the chamber but all 'right' at the toe. Only one offered the fountain. I was surprised they had not been filled, welded closed, as they seemed to offer a potential risk of internal corrosion - though none evident.

Will you be sealing the lead in place with epoxy resin as Spade now do on their new anchors?

Yes, once the anchor is galvanised and re-filled with lead I was going to add 5mm of epoxy - the ballast chamber had an, approx, 10mm void, or space at the 'top' (if the anchor is hanging vertically)- so plenty of room. I'll paint the epoxy in with a thin layer to start with the ensure I develop a good seal.
One of my sponsors when I was motorbike racing was an engineer and inventor - his tour de force being pub optics - once he sold his Patent for these he never really had to work again.

Bill H did, however, like a challenge. Hence his choice of racing motorbike, a highly developed 1934 650cc Scott two stroke twin. Over a twenty year period he made it a fast and reliable race winner.

A vintage working canalboat owner had a very early Bollinders engine with a cast iron piston, a totally knackered cast iron piston. Cracked from gudgeon pin to breakfast time and with chunks missing from the reinforced skirt.

Bill made a mould box, got the special green sand and made a mould using a large paint tin as a pattern. I provided three Hillman Minx aluminium clutch bell housings for the casting material.

I recall that when the mould was broken open six spigots, half inch round spikes, protruded from the new casting. He had never cast anything as big before but had spoken to a Slough ironfounder and read up on the technique required.

The mould had been prepared so as to let molten metal flow while reducing air lock/bubble problems.

The sand had the holes positioned carefully and natural friction/cooling solidified the flowing metal as the mould filled.

A coke brazing hearth was used, its small blower turbine flat out and with extra air from the workshop compressor added at crucial times.

AFAIK, the canal motorboat, a 'Big Woolwich' class, is still using that piston.

We got the rings from a company that specialised in steam engine piston rings, the Cluppet Piston Ring Co.

Good luck - I feel sure it will go OK.

What a lovely evocative story!


Thanks all,

I'll post once its all finished - but there may be delays - the galvanising timetable is outside my control.

Take care, stay safe

Jonathan

I was going to dispense with the yellow paint - I don't have any. For one small anchor buying a tin of yellow seems unnecessary - I do have some green - but that does not seem appropriate.

There's an old forum thread which contains some hints on safe lead melting.

(26) Melting Lead At Home And Casting - Any Tips | YBW Forum

Please note especially the warning about not pouring lead into a damp mould. Pre-heating anchor cavities is essential.

If you drop molten lead onto a marble slab it is very likely to break and that might result in the burner falling over. Just a passing thought.

I have thought that the marble slab would survive the thermal shock - unless I spilt all 3.6kg. The lead flowed out like water - but not very fast ( I should re-phrase that - quite fast but not very much at a time). The slabs are 1" thick (in new money 25mm) but they came from the National Australia Bank head office, refurbishments decades ago - so I guess measured in old money.

My background is the steel industry - dropping molten iron into torpedo ladles in 100t batches is just up my street! Though being an 'idle' observer and doing it (even if considerably cooler) are two different things.


To put this into context - the anchor is part of the same project as my 'marking anchor chain' thread. My thesis is that a rode should be an integrated and matching 'component' all the bits a pieces should fit and be of the appropriate strength and the owner should not need to faff about finding shackles that fit (and don't lock up) and are stronger than the chain etc etc. In the past I have managed the galvanising of the chain - this time I've got the anchor as well and will supply the shackles etc. (And no - its not a financial venture - I do it as I'm interested.)


Sorry the answers go a bit jumbled - but all there.

Again - thanks.
 

RobbieW

Well-known member
Joined
24 Jun 2007
Messages
4,928
Location
On land for now
Visit site
Some notes

I am arranging for the Spade anchor of some friends to be regalvanised. The anchor is an S60, galvanised steel, but has a simple plate shank - not the complex hollow fabricated shanks of the S80 and larger models.

I had to remove the lead.

I used a Japanese stove, used for Korean BBQ. They use those disposable gas cylinders. You could use any camping stove (Camping Gas comes to mind) but the Japanese stove is 'flat' and you can place the fluke directly on the 'hob' plate to heat the fluke (as you would a saucepan). Being flat it is more stable - I recall Camping Gaz stoves tended to be 'tall'. I arranged the anchor to sit 'toe up' so that the lead could flow by gravity out the rear of the ballast chamber. I cut up a tin can to make a chute to catch the molten lead so that it dropped onto a flat peice of metal (Like lava from a Spanish volcano). I supplemented the camping stove with a blow torch once the lead started to flow. Lead melts at about 375 deg C - it does not take long to get the lead melting and I used, roughly, one cylinder of gas, and some from the blow torch. When the lead was flowing, so the ballast chamber was upto heat - I could still tweak the 'lie' of the anchor using the shank and the leather gloves.

It was relatively straight forward.

The one surprise - I started by melting lead in the toe - it melted quickly enough and flowed out as a vertical fountain from the toe - about 4cm high jet of molten lead. I thought that there must be a hole in the weld but it appears there are three holes in the toe - to ensure that the toe is completely filled when they pour molten lead in? (no air gaps).

Of the 10kg anchor 3.6kg is lead - which I found to be quite extraordinary (not a criticism - just an observation).

The anchor will be galvanised in the next fortnight by Armorgalv (an update on the Sherardizing process). The Armorgalv process incorporates grit blasting as part of the process, acid is not used - so they are quite happy to accept painted product.

Once galvanised I'll remelt the lead, all of which I collected, and pour back into the ballast chamber. I'm not sure how the molten lead will 'work' with the holes in the toe when I refill (will the lead simple flow out as fast as I pour out in......)

When working I wear a cotton boiler suit, heavy duty leather gloves, goggles and a wool hat (don't I look daft with a woollen hat when its 25 degrees and have a stove and blow torch blazing away?). The stove sits on a 2cm marble slab on top of a work bench. I ensure I have no interruptions. I have a large extractor fan over the work bench (apparently lead his decidedly unhealthy - though when you get to that age of maturity - does it matter!).

If the anchor were a larger model, say 20kg, it might be more difficult, or take longer, to get the lead upto temperature and would be more physically demanding to lug about.

If you have the space and 'privacy' its not a difficult task.

Take care, stay safe

Jonathan
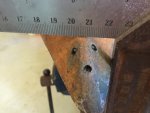
I had this done to my 20Kg Spade about 4 years ago. Used a friend who did a lot of machine shop stuff and had regular galvanising done. He had to drill a hole in the toe before pouring the lead back ensure it filled properly, iirc he closed the hole after the re-pour
 

Neeves

Well-known member
Joined
20 Nov 2011
Messages
12,975
Location
Sydney, Australia.
Visit site
I had this done to my 20Kg Spade about 4 years ago. Used a friend who did a lot of machine shop stuff and had regular galvanising done. He had to drill a hole in the toe before pouring the lead back ensure it filled properly, iirc he closed the hole after the re-pour

I looked at our 15kg Spade and could see no sign of holes nor a weld to cover the holes - but our steel Spade is stainless and it could be welded and then polished.

But the holes were a real surprise, or the lead fountain was - I assume the lead expands when molten and if you melt it in an enclosed space then it will flow out under pressure - hence the fountain.

I believe in America Spade cover regalvanising under their warranty - not of much use in Oz - no distributor and airfreight to anywhere would make it a non starter.

I tried to design the thread title so that if anyone used the search function the the replies might offer anyone else some answers.

Thanks

Jonathan
 

doug748

Well-known member
Joined
1 Oct 2002
Messages
13,192
Location
UK. South West.
Visit site
I am trying to imagine the holes in the toe, but I can't see that it is anything to do with trapping air in the melt. They may have found the lead became loose on cooling and a reservoir of melt, ahead of the toe helped prevent this. This would be quite tricky to replicate and it might be worth bunging the holes up, pouring from the top and see what happens.

If you seal with epoxy anyway, it would probably be fine. Heat the toe up well before you pour

.
 

geem

Well-known member
Joined
27 Apr 2006
Messages
8,043
Location
Caribbean
Visit site
I am trying to imagine the holes in the toe, but I can't see that it is anything to do with trapping air in the melt. They may have found the lead became loose on cooling and a reservoir of melt, ahead of the toe helped prevent this. This would be quite tricky to replicate and it might be worth bunging the holes up, pouring from the top and see what happens.

If you seal with epoxy anyway, it would probably be fine. Heat the toe up well before you pour

.
I would have thought the holes were there for the galvanising process. It's common to drill holes to let the zinc flow out. I once had a winch bumper galvanized but it didn't have any holes drilled in it. When it came back from galvanising I could hardly lift it. We drilled holes in it and sent it back for re-galvanising. It came back a fraction of the weight?
 

doug748

Well-known member
Joined
1 Oct 2002
Messages
13,192
Location
UK. South West.
Visit site
I would have thought the holes were there for the galvanising process. It's common to drill holes to let the zinc flow out. I once had a winch bumper galvanized but it didn't have any holes drilled in it. When it came back from galvanising I could hardly lift it. We drilled holes in it and sent it back for re-galvanising. It came back a fraction of the weight?


My thoughts were that they have to put access in closed sections to avoid problems with the zinc and to treat the internal areas........ but is the back of the toe is open?

On reflection I think you are spot on, it would avoid having to manhandle the anchor to run the zinc out (y) We have a Scottish member who is an expert with luck he may see this and comment.

.
 

Neeves

Well-known member
Joined
20 Nov 2011
Messages
12,975
Location
Sydney, Australia.
Visit site
The ballast chamber is a slightly complex pyramid. Its open at the rear or the base of the pyramid. The anchor has a hole in the shank and one at the rear of the fluke - if you were making hundreds of them you would design your galvanising rack such that the anchor could be suspended to allow the gal to flow in and out. If you hang the anchor vertically, for galvanising, you would need openings in the toe - otherwise the gal will never coat the internal of the chamber (and the holes would then allow air to escape and the gal to enter. The holes are tiny - 1mm

If the holes are not to ensure there is no air in the toe - why not galvanise, weld the holes closed and then pour in the lead - if the holes are still there the lead will, simply run out of the holes - until it freezes - and then you will need to clean up the lead that runs out and will dribble down the toe (on the S60 its only about 15mm from the actual toe).

I do accept that closed spaces are a no-no in galvanising as heat of a sealed compartment will inevitably lead to explosions - not something you would want in a bath of molten zinc (which is why there is no galvanised Ultra - its shank is hollow and sealed). If you check roll bar anchor the roll bar is commonly hollow and has holes.

Jonathan
 

AntarcticPilot

Well-known member
Joined
4 May 2007
Messages
10,432
Location
Cambridge, UK
www.cooperandyau.co.uk
Molten lead has a surprisingly low viscosity
It also has a very high surface tension; it acts a bit like mercury. So it can be very difficult to get it to "wet" surfaces. Haven't worked with molten lead for donkey's years, but I think you need to heat the anchor so as to ensure that the lead "wets" the surface, a bit like tinning a copper wire.
 

doug748

Well-known member
Joined
1 Oct 2002
Messages
13,192
Location
UK. South West.
Visit site
The ballast chamber is a slightly complex pyramid. Its open at the rear or the base of the pyramid. The anchor has a hole in the shank and one at the rear of the fluke - if you were making hundreds of them you would design your galvanising rack such that the anchor could be suspended to allow the gal to flow in and out. If you hang the anchor vertically, for galvanising, you would need openings in the toe - otherwise the gal will never coat the internal of the chamber (and the holes would then allow air to escape and the gal to enter. The holes are tiny - 1mm

If the holes are not to ensure there is no air in the toe - why not galvanise, weld the holes closed and then pour in the lead - if the holes are still there the lead will, simply run out of the holes - until it freezes - and then you will need to clean up the lead that runs out and will dribble down the toe (on the S60 its only about 15mm from the actual toe).

I do accept that closed spaces are a no-no in galvanising as heat of a sealed compartment will inevitably lead to explosions - not something you would want in a bath of molten zinc (which is why there is no galvanised Ultra - its shank is hollow and sealed). If you check roll bar anchor the roll bar is commonly hollow and has holes.

Jonathan


Yes, a good precis of what has already been revealed in previous posts.

There is no mechanism that I know of for trapping large inclusions of gas in a simple open mould, it would simply bubble through the melt.
Welding galvanized steel is difficult, dangerous and means locally compromising the zinc, so you are back to square one.

I have no idea how they sort out the difficultly, I suspect they may plug the holes with lead and poke the anchors into a bed of casting sand, doing ten at a time.

.
 

KAM

Well-known member
Joined
6 Jun 2005
Messages
1,279
Visit site
I did mine a few years ago. Just melted the lead out with a propane torch. Re melted the lead in a pan on a barbeque and just tipped it back in. Added a very small amount extra to allow for losses. It didn't seem to shrink and there have been no problems so far.
 

vyv_cox

Well-known member
Joined
16 May 2001
Messages
25,811
Location
France, sailing Aegean Sea.
coxeng.co.uk
Yes, a good precis of what has already been revealed in previous posts.

There is no mechanism that I know of for trapping large inclusions of gas in a simple open mould, it would simply bubble through the melt.
Welding galvanized steel is difficult, dangerous and means locally compromising the zinc, so you are back to square one.

I have no idea how they sort out the difficultly, I suspect they may plug the holes with lead and poke the anchors into a bed of casting sand, doing ten at a time.

.
When I visited BE Wedge some years ago they showed me a CQR clone, made by Mantus. It had exploded in the zinc bath, causing quite a lot of damage. There had been lead in the tip but presumably also water in a void.
 

Neeves

Well-known member
Joined
20 Nov 2011
Messages
12,975
Location
Sydney, Australia.
Visit site
This shows the 3 holes in the toe. I could not understand what was blocking the pair of holes, not the one in the bottom centre.

IMG_9366.jpeg

I prodded around a bit, thinking it was lead, and the item was dislodged. The item turned out to be a bit of wire - I assume to allow the anchor to be suspended
for galvanising (maybe suspended by the shackle hole and the wire in the toe). When completed they simply cut the wire off, leaving the loop of wire in the 2 holes.


IMG_9373.jpeg

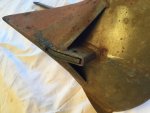
A query was made of the ballast chamber - this is the underside of the fluke. The ballast almost fills the chamber about upto the level of the front of the shank, the ballast is exposed but now (I've not seen it) they seal the ballast off with epoxy.

IMG_9361.jpeg
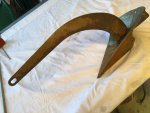
This is the anchor as currently, lead removed. The owner had found that the shank wobbled in the shank slot and had had it welded up in Tahiti but left the securing bolt in place (I removed it and will replace later - after galvanising). You can see the hole for the bolt in the preceding picture at the base of the shank slot. The welding was very average.

IMG_9368.jpeg

If the anchor has been galvanised by suspending from the toe or toe and shackle hole (in shank) then the other hole (of the three) in the toe would be needed to allow the gal to enter the inverted ballast chamber - to allow air out and gal in. So as suggested the hole is for the galvanising rather than the lead. There is no indication how the 'air' hole was blocked when they filled the ballast chamber with molten lead.

I have evolving ideas on the issue - currently I'm thinking to close the holes simply by jamming it with an appropriately sized bolts so that they just lock onto the steel but is not 'in' the chamber. I'd file them off so as to be flush with the exterior of the chamber. The Armorgalv process does not involve molten zinc but is a 'sintering' process (or as they describe it - solid state diffusion bit like ceramic or powder metallurgy production) so does not need air holes. When galvanised add some shavings of lead, very small pieces (they melt more easily) and pack the toe. Invert, toe at the bottom, and heat with a blow torch until the lead melts. Leave to freeze. Then add more molten lead to a preheated chamber, blow torch again - but not so hot to melt the lead added initially. Add more lead - maybe 1kg increments. The final 1kg I'd want to add with the ballast chamber, the remaining empty space, quite hot to ensure the lead fuses with the steel (and the lead previously added). The bolts used to close the holes will be sealed by the galvanising and the lead (on the inside).

I don't weld n or am I going to pay someone to weld the holes closed.

But could I using a welding stick and blow torch?

The plan might change :)

Jonathan
 

vyv_cox

Well-known member
Joined
16 May 2001
Messages
25,811
Location
France, sailing Aegean Sea.
coxeng.co.uk
A little information from the archives of my mind. As a young boy I built a cart using pram wheels. Later I added a square sail to it. With very limited engineering facilities, the mast step was two concentric tubes plus some L shaped straps, 'welded' in place by pouring molten lead between them. To block the end to prevènt lead from running through I used plasticine. Crazy though this sounds it worked quite well.
 

Kilo

Active member
Joined
12 Oct 2020
Messages
265
Visit site
[QUOTE="rotrax, post: 7823670,

A vintage working canalboat owner had a very early Bollinders engine with a cast iron piston,

Listening to a Bolinder tripping along, missing & picking up, especially when cold has to be one of the most evocative sounds.
There's a camping barge that comes down to Oxford occasionally - you can hear it coming from 1/4 of a mile at which point it's down tools & heads hanging out the window.
A bit like a steam engine, speaks to something deep within the limbic(? possibly?) system.
Bliss
 

Other threads that may be of interest

Top