Removing lead and galvanising a Spade anchor

Neeves

Well-known member
Joined
20 Nov 2011
Messages
12,975
Location
Sydney, Australia.
Visit site
Plasticine, mostly calcium sulphate, or gypsum, and (gypsum) is used in plaster boards). Plasticine is held together with 'vaseline'.

Sounds like a really imaginative choice (lateral thinking before De Bono invented it).

Presumably the plasticiser burns off leaving an inorganic structure - as one might find in a resin bonded foundry mould.

I like crazy - even those developed by a school boy.


The big question is - what was your mother thinking allowing you to melt lead (water pipe?) - I suspect she never knew.

Jonathan
 

vyv_cox

Well-known member
Joined
16 May 2001
Messages
25,811
Location
France, sailing Aegean Sea.
coxeng.co.uk
Plasticine, mostly calcium sulphate, or gypsum, and (gypsum) is used in plaster boards). Plasticine is held together with 'vaseline'.

Sounds like a really imaginative choice (lateral thinking before De Bono invented it).

Presumably the plasticiser burns off leaving an inorganic structure - as one might find in a resin bonded foundry mould.

I like crazy - even those developed by a school boy.


The big question is - what was your mother thinking allowing you to melt lead (water pipe?) - I suspect she never knew.

Jonathan
Different days, a long time ago. My Mum gave me one of her old saucepans and watched me melt the lead on her gas stove. I did the 'casting' in the kitchen with the mast foot on a bowl of sand.
 

ctva

Well-known member
Joined
8 Apr 2007
Messages
4,753
Visit site
Different days, a long time ago. My Mum gave me one of her old saucepans and watched me melt the lead on her gas stove. I did the 'casting' in the kitchen with the mast foot on a bowl of sand.
Happy days before H&S was invented. :giggle:
 

rotrax

Well-known member
Joined
17 Dec 2010
Messages
15,764
Location
South Oxon and Littlehampton.
Visit site
I was making fishing weights by melting lead as a 12 year old, in the kitchen at home. I used the gas stove and an old saucepan. The mould could cast six weights at a time, what are known as coffin leads. When Mum was out!

Biggest problem was drilling them lengthwise with a handrill.

Paternal Grandad made me a better mould for pear shaped weights that were easily drilled through the narrow bit. I still have that little bevel gear handrill, surely the first cordless drill.......................... ;)
 

Neeves

Well-known member
Joined
20 Nov 2011
Messages
12,975
Location
Sydney, Australia.
Visit site
Vyv and Rotrax,

Different times - ctva is right. When driving though our suburb and people have a pile of household refuse on the road side ready for a council clear up I marvel at all the wheels people throw out - in my time as a child wheels were worth their weight in gold and wasted a full 5 minutes if abandoned. Then we built buggy's for the nearest steep hill and wore through he toes of our shows as they were the only means of slowing down. Helmets?? we could not spell the word!

Today I suspect you could be arrested.

Its all very sad - but ...Hey - I get to re-live my childhood, senility is not so bad after all! (and I still have one of those cordless drills!)

Jonathan
 

Slowboat35

Well-known member
Joined
4 Apr 2020
Messages
2,597
Visit site
I'd consider using plaster of paris to block the holes rather than plasticene, once cured for 24hrs or more it's hard, dry and grips well. A few spoonfulls goobed over the holes will do the job.
I saw a video somewhere (on you tube?) of some guys casting a keel and the technique they used to prevent shrinkage was to repeatedly take a blowtorch to the surface to ensure the top stayed molten keeping a cover over it in the meantime. This ensured slow cooling from the bottom upwards allowing the metal to keep the mould full throughout.
If that's too much trouble then just pour epoxy over the surface to fill any gaps. Probably far easier.
 

KAM

Well-known member
Joined
6 Jun 2005
Messages
1,279
Visit site
I just checked mine. The lead solidified flush with the surface. It's such a small mass relative to the surrounding steel.
 

Attachments

  • 20211027_182927.jpg
    20211027_182927.jpg
    446.3 KB · Views: 12

noelex

Well-known member
Joined
2 Jul 2005
Messages
4,769
Visit site
Different days, a long time ago. My Mum gave me one of her old saucepans and watched me melt the lead on her gas stove. I did the 'casting' in the kitchen with the mast foot on a bowl of sand.
I did the same thing many years ago.

Unfortunately, my mum's old saucepan handle broke. The lead was much heavier than the normal food products it was designed for. The splattered molten lead destroyed the kitchen bench, but fortunately I escaped with no injuries.
 

noelex

Well-known member
Joined
2 Jul 2005
Messages
4,769
Visit site
I saw this steel spade several years ago. As you can see, the lead is completely absent. I am not sure how it ended up this way, but, the anchor would not work at all in this state.
Nwsifqy.jpg
 

Neeves

Well-known member
Joined
20 Nov 2011
Messages
12,975
Location
Sydney, Australia.
Visit site
I saw this steel spade several years ago. As you can see, the lead is completely absent. I am not sure how it ended up this way, but, the anchor would not work at all in this state.
Nwsifqy.jpg

Any advice on this exercise gracefully received - I've never done is before. I have melted lead but never refilled a ballast chamber.

When I had removed the lead the interior of the anchor was a bit like Noelex' photo. It had these 'flakes' on the interior surface that were obviously between lead and steel. They are very thin and don't melt nor burn but 'look' like a interface between lead and steel. They are not rust coloured - or at least not 100% rust - they are pale brown in colour - but I cannot work out what they are.

The holes in the toe would allow seawater ingress - if the lead did not bond with the steel and a space developed during cooling on casting. The top of the ballast chamber between lead and steel was well bonded.

I cannot work out what the flakes are.

There was talk that Spade coated the inside of the aluminium anchor to reduce or stop corrosion between aluminium and lead - I don't know how they did it but wondered if this was something similar. A thought was heavily glass filled epoxy and the flakes are the glass filler after the epoxy burns off.

The lead should not fall out - in fact its impossible. The ballast chamber is in 2 parts, left and right, separated by the reinforcing for the shank attachment. When the lead is cast its one lump in the toe that splits round the shank box. Even if the lead does not bond it cannot fall out. The only way to get it out is to intentionally melt it. Noelex photo looks as if the lead was meted out - but never replaced,

I do intend to fill the void (at the heel end of the chamber), that's in the S60 with epoxy. The S60 has a space at the heel end of about 10mm

I'm taking it for galvanising (Armorgalv) next week - subsequent to which I'll be re-melting the lead and back filling. I have yet to make a set of tongs, from re-bar, to allow me to pour the molten lead into the ballast chamber. I don't fancy getting too close to 3kg of molten lead, though I think I'll melt 1kg at a time. I'm filling the holes in the toe with thread rod cut from small bolts, tapped to take the rod. I'll then cast a small amount to fill the toe and further seal the threaded rods (the rods will have been inserted to the anchor and galvanised with the anchor). Belt and braces securement

As far as I know only the Manson plough and Spade (and stainless Ultra) use lead in the toe - all the other ballasted anchors cast the whole toe in solid steel and weld on the flanges at the rear, Kobra, Delta and I assume Epsilon (though the latter like the Rocna might be a one piece casting) or cast steel into the completed fluke (Excel).

Take care, stay safe

Jonathan
 

Neeves

Well-known member
Joined
20 Nov 2011
Messages
12,975
Location
Sydney, Australia.
Visit site
Completing the story

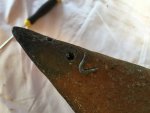
I was a bit puzzled by the holes in the toe and what those 'things' were in two of the holes.

IMG_9367.jpeg

It turned out that the 2 matching holes in the toe were for wire, presumably used to suspend the anchor in the galvanising bath. I'm left assuming the other hole is a hole to allow the air in the toe to escape during galvanising (if the wires suspend the anchor the toe will be 'up'.

IMG_9374.jpeg

I tapped the holes and filled them with the of appropriately sized bolts (with the heads cut off). I bolted right through to the opposite intenal plate in the toe and ground the cut ends flush.

I then had the anchor galvanised using the Armorgalv process, the same process I use for all my high tensile galvanising (including the new rode of 6mm G100 for the owners of the Spade anchor).

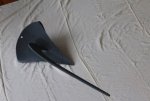
This is the end result - a matt galvanised coating. The coating is all alloy, there is no molten zinc used in the process. The coating is in excess of 100 microns, I checked it and is the same specification for their chain.

IMG_4964 2.jpeg


I then melted back the lead I had removed, easier than I thought, and added some lead for that I lost when I melted the lead out. Refilling was easier as I simply dropped in pieces of lead small enough to be fed into the ballast chamber and melted it in situ one at a time with a blow torch as a continuous process..

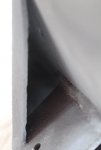
The ballast chamber is one 'receptacle' so if you melt in the lead it fills the lower half of the chamber but the upper part is 'split' by the reinforcing box that receives the removable shank. You can see the box in this image and also that the chamber itself is evenly coated, with zinc alloy.

IMG_4969.jpeg

Once I returned the ballast to the same weight as I removed I filled the top of the chamber with resin (once the lead had cooled :) ). The lead in the ballast chamber does not seem to adhere to the chamber - it seems 'dry' down the edges. I filled the chamber and let the resin 'drip' run down the inside to fill any voids.


IMG_5006.jpeg


The anchor looks a bit 'mottled' after the galvanising, everything processed is passivated, any porosity is filled. This used to be a chrome salt bath (and may still be a salt chrome bath) but its another industrial secret - like much of the process itself.

I have found that my chain after some use self polishes and now looks like 'black stainless' (which reduces towering in the locker) - I'm hoping the same thing happens with this anchor (and another I had galvanised at the same time.


This is a 10kg Spade anchor and has a very thin shank made from a plate of steel - and looks decidedly wimpy. But the anchor has served the owners well, they have sailed to Oz from France, via Atlantic and Pacific and unorthodoxly are looking to return home via the NW Passage - maybe.....

However they now have, or I have it, a new 6mm HT chain, replacing their 8mm chain and I need to fit shackles for both chain and anchor (but matching the strength of 8mm chain).

I'm toying with Omega links, standard, long or hammerlocks - I need to see what fits easily.

IMG_4999.jpegIMG_4995.jpeg

Take care, stay safe

Jonathan

In case the marketing police are watching - I make these rodes to support articles I write, I generate no income from supporting people who follow my ideas. (its enhancing my ego :) ). I think ground tackle is incorrectly sold, it is sold as a package of completely independent articles, chain, shackles, anchor, windlass, snubbers, boomerang, chain hook. I believe it should be sold (or bought) as an integrated package - everything matching for strength and everything fitting (without the need to use a drift to enlarge an end link) and without the need to buy shackles, that might not fit (by mail order), chain without certification etc - so with this belief I'm happy to ensure owners get a complete matching package. The owners of this new rode are converts and already use climbing rope as a snubber (8mm, its a small yacht) and as they have no windlass (hence the 6mm chain) they don't need a boomerang.

J.

For those with sharp eyes. The owner found the shank wobbled in the slot and had fluke and shank welded, not very well, together, Its only welded on the top and I filled the gap at the bottom of the box with resin - when I took the photos I had not replaced the secure bolt - since done.

And I've just found this photo of the yacht in question, beached in Tasmania.

Resizer_16316682173575.jpeg

You need to be keen to sail in a yacht this size across the Atlantic, Pacific and then plan to come back via the NW Passage
 
Last edited:

Kurrawong_Kid

Well-known member
Joined
7 Sep 2001
Messages
1,734
Visit site
Vyv and Rotrax,

Different times - ctva is right. When driving though our suburb and people have a pile of household refuse on the road side ready for a council clear up I marvel at all the wheels people throw out - in my time as a child wheels were worth their weight in gold and wasted a full 5 minutes if abandoned. Then we built buggy's for the nearest steep hill and wore through he toes of our shows as they were the only means of slowing down. Helmets?? we could not spell the word!

Today I suspect you could be arrested.

Its all very sad - but ...Hey - I get to re-live my childhood, senility is not so bad after all! (and I still have one of those cordless drills!)

Jonathan
and then went flying unbraked through a crowd of pensioners scattering in all directions!
 

rotrax

Well-known member
Joined
17 Dec 2010
Messages
15,764
Location
South Oxon and Littlehampton.
Visit site
and then went flying unbraked through a crowd of pensioners scattering in all directions!

Some of the fastest trollies round our way were made using large pensioned off ball races on the front wheels. Pram wheels - the bigger the better - on the back.

The noise from the hardened steel front tyres meant the collection of pensioners knew EXACTLY what was coming, and from what direction.

As the steering was a wooden axle pivoted in the middle, steered with a skipping rope stolen from your sister, or by feet on the axle, the steel slipped on the surface making the steering less effective by giving great understeer.

The sparks in the dark were pretty good too!
 

Neeves

Well-known member
Joined
20 Nov 2011
Messages
12,975
Location
Sydney, Australia.
Visit site
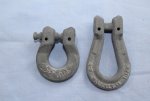
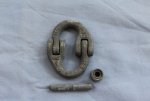
I mocked up the connectors and this seems the best options

The hammerlock has not had its pin sorted, as (as the name suggests) you need to hammer them in and then hammer them out.
IMG_9384.jpeg

This is described variously as a pear link or long Omega link.

IMG_9381.jpeg

We have used hammerlocks and they would be my preferred option

Jonathan
 

Other threads that may be of interest

Top