Removing broken screws from glass fibre

chriscallender

Active member
Joined
30 May 2001
Messages
611
Visit site
On my little leisure 17, the rubbing strake had been excellently attached by someone previously with mild steel screws. These have the benefit of being self releasing as well when the screw rusts away to nothing 🤣. I have removed the rubbing strakes which were also rotted. Actually the boat looks much better without the rubbing strake and next year at least I won’t put new wood on. I’m not too bothered about cosmetic things anyway, I’d rather spend my money on sailing.

But anyway, getting to the point, this has left about 50 screw remains which stick up a few mm proud of the hull and will rust as well as being sharp and nasty so I’d prefer to extract them or get them below the surface of the hull and cover them with filler. Most screws had already broken and the few that hadn’t certainly weren’t going to be unscrewed.

I’m wondering what the best way might be to deal with the old screws,.

Whatever I do, there are lots of screws so it can’t be too time consuming on each screw. Wonder if anyone has any good ideas. Thanks.

Chris
 

Poignard

Well-known member
Joined
23 Jul 2005
Messages
53,023
Location
South London
Visit site
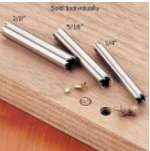
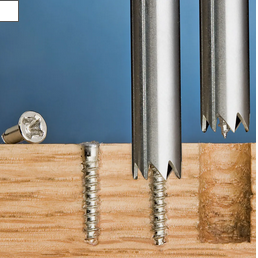
I would try using a hollow bit slightly larger then the screw diameter.

Something like this

1729415573634.png1729419043947.png

or a plug or dowel cutter.

Take it slowly and re-sharpen as required. (Which will probably be frequently!)

Or you may be able to buy something with hrdened teeth or a diamond edged cutter.

Make a guide from a piece of plywood to stop the bit from wandering.

Then plug the hole with thickened epoxy.
 
Last edited:

Neeves

Well-known member
Joined
20 Nov 2011
Messages
13,104
Location
Sydney, Australia.
Visit site
You omit to mention the size of the screws

You cannot leave the screws 'as is' - you say they corrode - this will not stop.

As mentioned - a hole saw or dowel cutter (as mentioned) with the centering bit of the hole saw removed (the old screws will keep the hole saw central. Ideally you want to know the length of the screws so that you don't over drill. You may be able to hole saw/drill part way and then use the mole grip idea (post 3)

Jonathan
 

Freebee

Well-known member
Joined
21 Oct 2001
Messages
2,236
Location
Alton, hants
Visit site
definetly the slightly oversize tube, file teeth on the end of the tube like a holesaw, it will cut the screws out in no time leaving a hole to fill
 

andsarkit

Well-known member
Joined
27 Aug 2015
Messages
1,258
Location
Dartmouth
Visit site
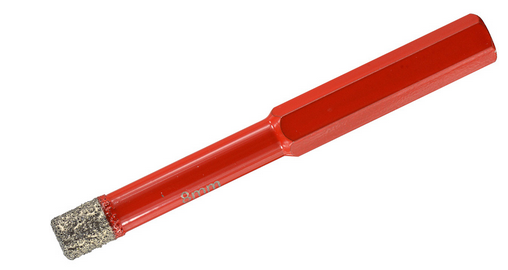
As mentioned above one of these will work. Choose a size a little bigger than the screw.
holesaw
1729417762496.png
You could also try tapping the screws alternately sideways with a small cold chisel and this may loosen them enough to turn them with Mole grips.
 

Snowgoose-1

Well-known member
Joined
2 Jun 2015
Messages
1,064
Visit site
I would try using a hollow bit slightly larger then the screw diameter.

Something like this

View attachment 184456View attachment 184465

or a plug or dowel cutter.

Take it slowly and re-sharpen as required. (Which will probably be frequently!)

Or you may be able to buy something with hrdened teeth or a diamond edged cutter.

Make a guide from a piece of plywood to stop the bit from wandering.

Then plug the hole with thickened epoxy.
Brilliant.
Had no idea that they existed.
 

lustyd

Well-known member
Joined
27 Jul 2010
Messages
12,407
Visit site
Out of interest, are the “screws” actually through bolts for the hull deck join as on most boats of this vintage? If so you may be able to bang them through, but will definitely want to reseal the hull deck joint to avoid water ingress.
 

chriscallender

Active member
Joined
30 May 2001
Messages
611
Visit site
Thanks everyone, I took a look at one of the top parts of the screws, it’s only about 3mm and definitely a very corroded mild steel self tapper/wood screw rather than a threaded bolt. No idea how long they are until I get one out. I don’t think they go through the hull/deck joint, at least you can’t see anything on the inside. So I think the hole saw is the way to go.

I found some 4mm diamond cutters online. and those look like they’d work nicely. Once I figure out how far I need to go I’ll put some tape on the bit so that I don’t drill too deep. I don’t think they are very substantial actually, and I hope it won’t take too long (famous last words).

Chris
 

Poignard

Well-known member
Joined
23 Jul 2005
Messages
53,023
Location
South London
Visit site
I have no personal experience with them (although Bouba does) but I wonder if an induction heater would do the job, and much faster than drilling.

Heat up the screw so it softens the GRP around it, then pull it out with pincers.
 
Last edited:

Snowgoose-1

Well-known member
Joined
2 Jun 2015
Messages
1,064
Visit site
For a one of job, you can knock one up using a bit of copper tube or other tube of the right diameter. The teeth don't have to be V shaped, castellated using a hacksaw will do.
Sounds good. 👍
I have used larger hole saws, but didn't realise they were available in much smaller sizes.
Diy looks like fun.
 

Graham376

Well-known member
Joined
15 Apr 2018
Messages
7,774
Location
Boat on Mooring off Faro, Home near Abergele
Visit site

Neeves

Well-known member
Joined
20 Nov 2011
Messages
13,104
Location
Sydney, Australia.
Visit site
Much cheaper from China via ebay, various sizes available - Pardon our interruption...
I have a set, made up of sizes I needed - so sort of random - from 10mm to 40mm diam of tungsten tipped hole saws. I use them on HT steel. I sourced mine from Aliexpress. But to source from Aliexpress you need time as much of their stuff comes by sea. Temu is quicker, as they either have stock in Oz or the stuff comes by airmail, but is more expensive. These hole saws will only drill 15mm plate or you can extend to 30mm if you drill from both sides.

I'm not into Xenophobia and accept that China is now the world's machine shop, garment factory and car supplier. Worried about China ruling the world .... 'We' sold them the MG brand - 'We' allowed them to profit from that name - how can we be critical - we shot ourselves in the foot.

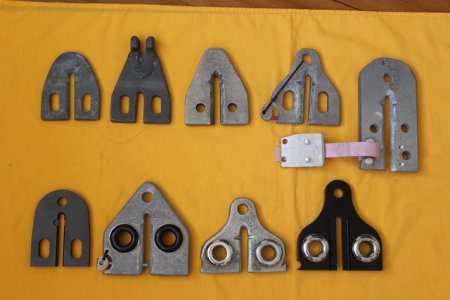
I used the drill bits for holes on my bridle plates which I machined (fancy term for an angle grinder) from Bis 80, Duplex stainless (a G60) and 7072 aluminium. The 2 part threaded LFRs, black aluminium and silver is 316, I had custom made by the same people who make LFRs for Ronstan (and who made for me the black bridle plate on the bottom left). The black plate on the bottom right is made from Duplex stainless (and illustrating the problems) was painted black as I had sent them a picture of the black (anodised) plate on the bottom left and they assumed I wanted the painted finish.

Most of the stuff I buy, we also buy from Tao Bao, from China are of excellent quality and about 20% of the price of a similar product bought in Australia. They will make, or sell, almost anything - but they tend to be geared up to large numbers (they want to sell hundreds or thousands of units) and you might lose any copyright or original ideas. If you want something exotic (I wanted something made from an especially hard steel (commonly used for armour plating) - I have drawn a blank.

To protect design drift (it has not happened to me, yet, if I have a multi component product I have each part made by a different fabricator - so no-one in China sees the whole device. If I were making an anchor I'd have the fluke made in one location, the shank in another and maybe weld the 2 parts together in Oz (not that I'm making anchors.... yet :). But that's what I have done with the bridle plate (not that I'm so arrogant I think anyone will copy what I do - I'm just aware of the issues).

Jonathan

IMG_0046.jpeg
 

IanCC

Active member
Joined
14 Oct 2019
Messages
569
Visit site
Then plug the hole with thickened epoxy.

If you have cored right through to remove screw, like i will have to do with my windows, surely you will need to do more than plug hole with thickened epoxy because replacement screws will land in the same place.
 

Poignard

Well-known member
Joined
23 Jul 2005
Messages
53,023
Location
South London
Visit site
If you have cored right through to remove screw, like i will have to do with my windows, surely you will need to do more than plug hole with thickened epoxy because replacement screws will land in the same place.
Unless I misunderstood the OP, he doesn't want to replace the screws.
 

chriscallender

Active member
Joined
30 May 2001
Messages
611
Visit site
Today I got all but 14 of the screws out… and there were a lot more thuan the 50 I guessed at 😬. In some places there were pairs of screws about 1cm apart and all the locations were just random.

Eventually the diamond holesaw got too blunt to work well and it got too dark as well, but the rest will come out on Sunday or Monday.

The screws were rather long about 30mm below the surface and there was no chance at all to grab/tur.n them with pliers even with heat. So it was a bit of a pain, but the holesaw worked well and I got a big quantity out in about 4 hours . Next there will be the joy of filling but that is more satisfying then making holes.

So thanks everyone for the help.
 
Top