Corroded Saildrive Seacock

Clyde Coastin'

New member
Joined
12 Feb 2022
Messages
14
Visit site
Hey folks,

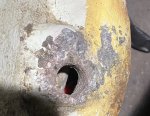
Having an issue with my Volvo Penta 110s saildrive. I am doing routine maintenance, new diaphragm, shaft seals etc. I am also replacing the old clamping ring with a new unit. During the tear down I noticed that the old brass T style seacock had a good bit of salt deposit around it suggesting a weep / leak (also explaining the corroded clamping ring!)

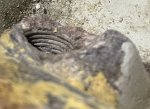
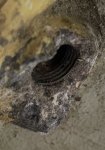
I removed the old valve with the intention of replacing with a DZR ball valve and to my horror when I cleaned up the tapped hole there isn'y an awful lot of thread left. The top side has 4-5 and the bottom 6-7 as shown in the photos.

My question is what do I do?

Option 1
Use tapered 3/8" DZR 90 degree elbow ->DZR ball valve-> DZR bayonet hose fitting (and lots of thread sealant) torque RFT and pray it seals.

Option 2.
Try and have hole repaired? Not sure whether the upper S-drive is aluminium

Option 3.
New upper S-drive unit (this would really suck as my gearbox is in really good shape mechanically)

Any and all suggestions are welcome
 

Attachments

  • IMG_8093 - Copy.JPG
    IMG_8093 - Copy.JPG
    580.5 KB · Views: 75
  • IMG_8094 - Copy.JPG
    IMG_8094 - Copy.JPG
    438.8 KB · Views: 77
  • IMG_8095 - Copy.JPG
    IMG_8095 - Copy.JPG
    583.8 KB · Views: 75

Clyde Coastin'

New member
Joined
12 Feb 2022
Messages
14
Visit site
There is an option 4 which if done well involves no prayer or PTFE tape/sealant and is much cheaper than a new saildrive.

Plug the damaged hole in the saildrive and cut a new through hull hole for a new DZR or plastic seacock.

I did think about this also, but my main issue is surely the heartache of trying to plug / seal the damaged hole is very similar to trying to seal it with new valve hardware?
 

Graham376

Well-known member
Joined
15 Apr 2018
Messages
7,570
Location
Boat on Mooring off Faro, Home near Abergele
Visit site
I did think about this also, but my main issue is surely the heartache of trying to plug / seal the damaged hole is very similar to trying to seal it with new valve hardware?

Not the same. A sealed plug isn't subject to any loads, whereas a seacock + tail + hose imposes a load on the threads and more likely to fail.
 

VicS

Well-known member
Joined
13 Jul 2002
Messages
48,317
Visit site
I did think about this also, but my main issue is surely the heartache of trying to plug / seal the damaged hole is very similar to trying to seal it with new valve hardware?
Not the same. A sealed plug isn't subject to any loads, whereas a seacock + tail + hose imposes a load on the threads and more likely to fail.
+1 for plugging the existing hole and fitting a hull mounted seacock/ ballvalve .... You can then also fit a decent strainer.

I' d not plug the hole with brass or bronze, which might cause accelerated (galvanic) corrosion. Plastic would be good.
 

vyv_cox

Well-known member
Joined
16 May 2001
Messages
25,511
Location
France, sailing Aegean Sea.
coxeng.co.uk
+1 for plugging the existing hole and fitting a hull mounted seacock/ ballvalve .... You can then also fit a decent strainer.

I' d not plug the hole with brass or bronze, which might cause accelerated (galvanic) corrosion. Plastic would be good.
Yes, that would be my choice too. Many users have abandoned the saildrive seacock that is continually blocked by fouling and cannot be cleaned on the water.
 

Yngmar

Well-known member
Joined
6 Dec 2012
Messages
3,075
Location
Gone cruising
Visit site
We've had this issue during the early pandemic. Noticed it before much damage was done, but all the boatyards were shut, so ended up having to change the thing in the water, very exciting job. At the next haulout I fitted a plastic TruDesign seacock to avoid any further corrosion.

I thought about putting another intake next to the saildrive instead, but there wasn't a great spot for it and it would lack the water depth and sometimes draw air when riding bigger waves. Depends on your hull shape, but often saildrive boats have fairly flat bottoms with not much draft.

The upper housing with the gearbox is aluminium, but welding around in that difficult spot with already rotten metal would likely be quite tricky and probably make it worse. I would be tempted to do it with epoxy instead, which sticks well to aluminium once cleaned up. To make it easy, screw in the threaded fitting first, preferably made of reinforced plastic. Trudesign makes some that are suitable for glassing in (cut off one of their long through-hulls). Add some woven glass cloth around it and it will be stronger than new. If you paint it, it'll even look good! Screw the seacock onto that and done.

Unless I remember very wrongly, I think on our Saildrive 120 it was a 1/2" BSP thread by the way.
 

PabloPicasso

Well-known member
Joined
12 Feb 2010
Messages
2,230
Visit site
+1 for plugging the existing hole and fitting a hull mounted seacock/ ballvalve .... You can then also fit a decent strainer.

I' d not plug the hole with brass or bronze, which might cause accelerated (galvanic) corrosion. Plastic would be good.
The sea cock doesn't seem to be a very satisfactory arrangement. I found the inlet holes and tube block up with marine rotters and block the flow to the engine. I havd plugged mine and have a through hull for cooling water. If that blocks up I can just rod it through with the boat in the water.

My vote for plugging it permanently.
There are permanent sealants, and dzr plugs available for this purpose.

Try ASAP supplies
 

Margaux

New member
Joined
7 Jul 2023
Messages
2
Visit site
We've had this issue during the early pandemic. Noticed it before much damage was done, but all the boatyards were shut, so ended up having to change the thing in the water, very exciting job. At the next haulout I fitted a plastic TruDesign seacock to avoid any further corrosion.

I thought about putting another intake next to the saildrive instead, but there wasn't a great spot for it and it would lack the water depth and sometimes draw air when riding bigger waves. Depends on your hull shape, but often saildrive boats have fairly flat bottoms with not much draft.

The upper housing with the gearbox is aluminium, but welding around in that difficult spot with already rotten metal would likely be quite tricky and probably make it worse. I would be tempted to do it with epoxy instead, which sticks well to aluminium once cleaned up. To make it easy, screw in the threaded fitting first, preferably made of reinforced plastic. Trudesign makes some that are suitable for glassing in (cut off one of their long through-hulls). Add some woven glass cloth around it and it will be stronger than new. If you paint it, it'll even look good! Screw the seacock onto that and done.

Unless I remember very wrongly, I think on our Saildrive 120 it was a 1/2" BSP thread by the way.
@Yngmar, I have been thinking about doing this exactly (as I have fitted TruDesign every else on the boat), but I am having trouple finding the nipple to fit into the threads in the upper part of the saildrive - how did you go about this?
 

Yngmar

Well-known member
Joined
6 Dec 2012
Messages
3,075
Location
Gone cruising
Visit site
@Yngmar, I have been thinking about doing this exactly (as I have fitted TruDesign every else on the boat), but I am having trouple finding the nipple to fit into the threads in the upper part of the saildrive - how did you go about this?

I bought a Tru-Design threaded hull fitting and cut off the flange. Leaves you with a hollow threaded rod (same as a nipple, minus the hexagonal part). Screw one end into the saildrive (with PU adhesive sealant) and your new Tru-Design ball valve (handle temporarily removed so it fits) on the other end. We've since sold the boat, the surveyor liked my solution. No more dissimilar metals full of seawater!

Tip: Cover the diaphragm when you do the job so you don't smear adhesive sealant on it and have to explain this later :p
 

Margaux

New member
Joined
7 Jul 2023
Messages
2
Visit site
I bought a Tru-Design threaded hull fitting and cut off the flange. Leaves you with a hollow threaded rod (same as a nipple, minus the hexagonal part). Screw one end into the saildrive (with PU adhesive sealant) and your new Tru-Design ball valve (handle temporarily removed so it fits) on the other end. We've since sold the boat, the surveyor liked my solution. No more dissimilar metals full of seawater!

Tip: Cover the diaphragm when you do the job so you don't smear adhesive sealant on it and have to explain this later :p
Of course that is the solution, thank you Yngmar! How long time did you sail with it before selling the boat?
 
Top