MattS
Active member
This year's winter maintenance "can of worms" is my P-bracket! I'm looking for a bit of advice on how to ensure the worms stay in the can! Boat is a Moody 336.
My question in short is: Can I simply re-seal around the P-bracket by pumping Sika 291 into the hollow in the middle until it fills the void between bracket and hull?
The additional context is below!
I decided to remove the various layers of primer and antifoul and take the P-bracket back to the bronze, so that I could re-prime it with some Primocon and then paint with International Hard Antifouling.

It taking off the various layers of old paint, I inevitably exposed some of the sealant around the perimeter of the bracket. Since taking the boat out of the water over 2 weeks ago, there has been water seeping out of the sealant at the aft end of the bracket. This indicated to that the sealant must be letting water in for it to be pooled inside.
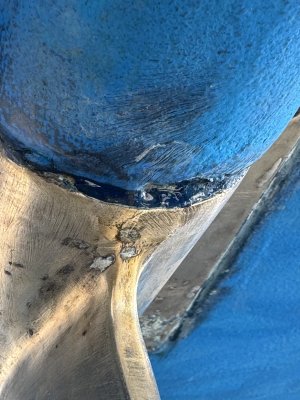
I wasn't overly comfortable putting her back in, knowing that the seal was compromised - so I decided to dig it all out, clean it up, and put some new Sikaflex in at the same time as fitting my new transducer.
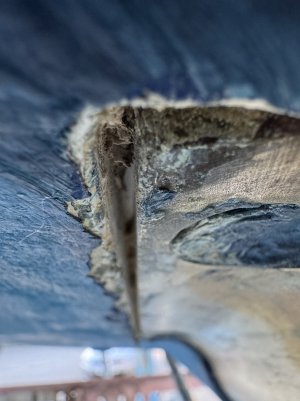
The assumption I made was that there would just be a shallow groove containing sealant around the whole P-bracket assumbly. This is the case along the longitudinal edges as shown in this photo - there is a shallow groove lined with gelcoat which seems easy enough to fill:
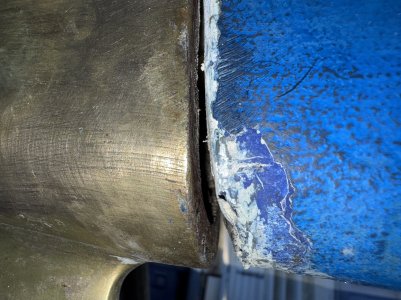
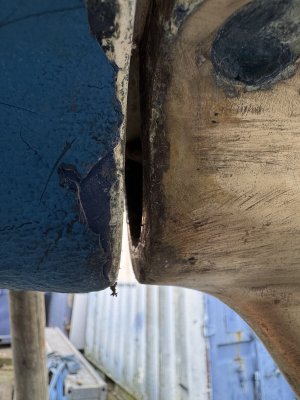
However along the lateral edges, I was expecting two flate faces to seal between. In fact, the bracket actually has a hollow within the curved shape - it is not constructed to be flat against the underside mounting surface of the hull. In removing the soggy old sealant from both the fore and aft ends, I seemed to pull out a load of also soggy sealant from the hollow in the bracket.
You can see the hollow shape of the P-bracket if you look closely in these photos:
I did find a previous report from a 336 owner about re-sealing the P-bracket, but the P-bracket design seems completely different to mine, which as far as I can tell is attached to the hull with four bolts (as opposed to being a design that penetrates through the hull itself).
This is the internal mounting of my P-bracket under the aft bunk which leads me to believe it is held on with the four bolts through the hull only
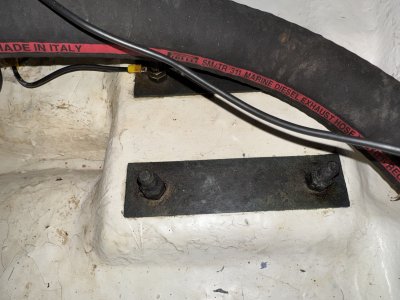
Is re-sealing this bracket as simple as pumping Sika 291 into the hollow bracket shape until it backfills enough out to completely fill the voids between bracket and hull?
Or have I now compromised the seal to the extent that I have no choice but to completely remove and re-bed the bracket itself?
My question in short is: Can I simply re-seal around the P-bracket by pumping Sika 291 into the hollow in the middle until it fills the void between bracket and hull?
The additional context is below!
I decided to remove the various layers of primer and antifoul and take the P-bracket back to the bronze, so that I could re-prime it with some Primocon and then paint with International Hard Antifouling.

It taking off the various layers of old paint, I inevitably exposed some of the sealant around the perimeter of the bracket. Since taking the boat out of the water over 2 weeks ago, there has been water seeping out of the sealant at the aft end of the bracket. This indicated to that the sealant must be letting water in for it to be pooled inside.

I wasn't overly comfortable putting her back in, knowing that the seal was compromised - so I decided to dig it all out, clean it up, and put some new Sikaflex in at the same time as fitting my new transducer.
The assumption I made was that there would just be a shallow groove containing sealant around the whole P-bracket assumbly. This is the case along the longitudinal edges as shown in this photo - there is a shallow groove lined with gelcoat which seems easy enough to fill:

However along the lateral edges, I was expecting two flate faces to seal between. In fact, the bracket actually has a hollow within the curved shape - it is not constructed to be flat against the underside mounting surface of the hull. In removing the soggy old sealant from both the fore and aft ends, I seemed to pull out a load of also soggy sealant from the hollow in the bracket.
You can see the hollow shape of the P-bracket if you look closely in these photos:


I did find a previous report from a 336 owner about re-sealing the P-bracket, but the P-bracket design seems completely different to mine, which as far as I can tell is attached to the hull with four bolts (as opposed to being a design that penetrates through the hull itself).
This is the internal mounting of my P-bracket under the aft bunk which leads me to believe it is held on with the four bolts through the hull only

Is re-sealing this bracket as simple as pumping Sika 291 into the hollow bracket shape until it backfills enough out to completely fill the voids between bracket and hull?
Or have I now compromised the seal to the extent that I have no choice but to completely remove and re-bed the bracket itself?
Last edited:
