Joe_Pineapples
New Member
Hey, found this thread useful in fixing mine so registered to post some more info because although others have posted the same problem no one had identified this repair.
Symptom: unit runs for 3 minutes then goes into "cool down" mode with a solid red light.
You'll probably also notice that the unit doesn't actually emit warmer air for the 3 minutes it runs. I think the red light is it going into temperature protect mode, which is actually true if you read the manual, but is usually.listed as a bad temp sensor elsewhere. In this case all the sensors were fine.
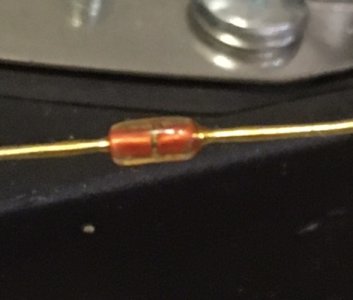
In my case this was caused by a faulty heater element fan motor - clearly the water had gotten into the motor bearing as it had become stiff to turn when I removed it. I presume it's then going into protect mode and not heating up anymore.
To repair you have to open the Dehumidifier to get to it, so top off (6 screws hidden under plastic sticker), sides off (4 screws in sump area) then pull apart with pressure applied to middle of blue strip either side.
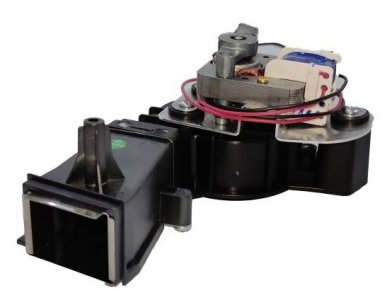
You'll need open the PCB cover (2 screws) to snip some of the cable ties on the wiring but once this has been done you can manoeuvre all the bits around so you can see the back of the main fan and dessicant wheel. You may as well disconnect the little 2 wire red plug from the PCB now as that's the heater fan you'll be removing. It may make it easier to remove the button panel (big white connector, use a small screwdriver on the latch)
Once this is done the heater fan comes off with a few screws, can't remember how many. think you have to loosen the main fan cowling woth one or two screws as well maybe. All the screws are the same size so you don't need to worry about that You'll need to remove the metal shroud and inlet pipe from the heater fan. You'll know if it's the heater fan because it's like a much smaller version of the main one.
Once you're here if the heater fan is a bit stiff to turn then that's your problem. A little WD40 or penetrating oil with the little straw applicator to loosen the fan, clean out any dust woth a pick and then I used bike chain lube on the spindle at all the bearing points and let that sink in each way up after giving it a little bit of time on each part each way up. A syringe is helpful here and dint just use WD40 as that'll dry pretty quickly so use a thicker oil, as I say chain lube should be good, I would have used some Teflon lube if I had any.
It's an AC 240v fan so you can test it from mains if you're brave but once it's moving freely and spinning for a few seconds by hand after a quick turn then it should be good to go back together - mine ran perfectly after reassembly.
At this point I'd say also take some time to clean out the condenser unit on the other side (big white plastic thing) and also the black drain piece that is removable too, as mine was full of dust and blocked, which also fixed the unit leaking around the side of the water carrier!
Anyway it's been running for an hour since I fixed it, better than it has for about a year. Mine is approaching 5 years now and is used daily, for reference.
Hope this helps someone as this thread helped me!
All told, I reckon no more than an hour if you're competent, if it's ypur first time and you're being careful, a couple.of hours.
Cheers :^)
Oh and thanks to @Lomax for originally suggesting this could be the problem on Page 7 of this thread!Hey, found this thread useful in fixing mine so registered to post some more info because although others have posted the same problem no one had identified this repair.
Symptom: unit runs for 3 minutes then goes into "cool down" mode with a solid red light.
You'll probably also notice that the unit doesn't actually emit warmer air for the 3 minutes it runs. I think the red light is it going into temperature protect mode, which is actually true if you read the manual, but is usually.listed as a bad temp sensor elsewhere. In this case all the sensors were fine.
In my case this was caused by a faulty heater element fan motor - clearly the water had gotten into the motor bearing as it had become stiff to turn when I removed it. I presume it's then going into protect mode and not heating up anymore.
To repair you have to open the Dehumidifier to get to it, so top off (6 screws hidden under plastic sticker), sides off (4 screws in sump area) then pull apart with pressure applied to middle of blue strip either side.
You'll need open the PCB cover (2 screws) to snip some of the cable ties on the wiring but once this has been done you can manoeuvre all the bits around so you can see the back of the main fan and dessicant wheel. You may as well disconnect the little 2 wire red plug from the PCB now as that's the heater fan you'll be removing. It may make it easier to remove the button panel (big white connector, use a small screwdriver on the latch)
Once this is done the heater fan comes off with a few screws, can't remember how many. think you have to loosen the main fan cowling woth one or two screws as well maybe. All the screws are the same size so you don't need to worry about that You'll need to remove the metal shroud and inlet pipe from the heater fan. You'll know if it's the heater fan because it's like a much smaller version of the main one.
Once you're here if the heater fan is a bit stiff to turn then that's your problem. A little WD40 or penetrating oil with the little straw applicator to loosen the fan, clean out any dust woth a pick and then I used bike chain lube on the spindle at all the bearing points and let that sink in each way up after giving it a little bit of time on each part each way up. A syringe is helpful here and dint just use WD40 as that'll dry pretty quickly so use a thicker oil, as I say chain lube should be good, I would have used some Teflon lube if I had any.
It's an AC 240v fan so you can test it from mains if you're brave but once it's moving freely and spinning for a few seconds by hand after a quick turn then it should be good to go back together - mine ran perfectly after reassembly.
At this point I'd say also take some time to clean out the condenser unit on the other side (big white plastic thing) and also the black drain piece that is removable too, as mine was full of dust and blocked, which also fixed the unit leaking around the side of the water carrier!
Anyway it's been running for an hour since I fixed it, better than it has for about a year. Mine is approaching 5 years now and is used daily, for reference.
Hope this helps someone as this thread helped me!
All told, I reckon no more than an hour if you're competent, if it's ypur first time and you're being careful, a couple.of hours.
Cheers :^)