What paint or coating for a corroded aluminium windlass base?

West Coast

Well-known member
Joined
23 Aug 2009
Messages
1,198
Location
Clyde
Visit site
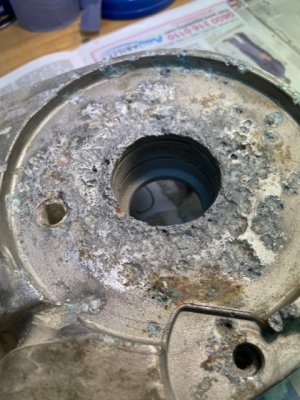
Hi all, I have a Quick Aleph vertical windlass as common on many AWBs. It has a aluminium upper base which has corroded with some pitting - see photos. I have stripped the windlass down, and will fit new seals and bearings to the aluminium base. Where the vertical shaft comes through the base, there is a lower and upper lip seal, with a ball bearing race in between. The gearbox and motor are in good condition.

There is still sufficient material in the aluminium base to be structurally sound, and i think there is sufficient material to allow the upper lip seal to make good seal contact with the aluminium base. So with new seals and bearings it should still have some further useful life. I am aware I can buy a replacement base but likely this is not cheap.

Question - I want to put some form of coating over the corroded aluminium areas before re-assembling to give it some additional protection - can the panel recommend what could be best for this? Aesthetics are not an issue, as all these surfaces are hidden. Checking on line, I see some dichromate type paints, is this the right thing?

Thanks all!

IMG_7258.jpeg

IMG_7260.jpeg
 

penfold

Well-known member
Joined
25 Aug 2003
Messages
7,729
Location
On the Clyde
Visit site
Epoxy primer, although given the pitting I'd consider pickling to reduce the danger of residual corrosion lifting paint and then after priming filling the pits to prevent pooling of water.
 

West Coast

Well-known member
Joined
23 Aug 2009
Messages
1,198
Location
Clyde
Visit site
Epoxy primer, although given the pitting I'd consider pickling to reduce the danger of residual corrosion lifting paint and then after priming filling the pits to prevent pooling of water.
Thanks, can I do the pickling myself - how is this done?
 

Neeves

Well-known member
Joined
20 Nov 2011
Messages
13,186
Location
Sydney, Australia.
Visit site
I cannot comment on the primer recommended - except that it is recommended by many. Its not easy to source here, Sydney, and I'd simply use an aluminium based (aluminium powder or flake) primer from a reputable source here.


I like vigorous and I'd use a stainless steel brush on an angle grinder (and goggles and decent gloves). I suggest the wire brush on the angle grinder as it removes the products of corrosion and prides the ideal key for the primer. The white powder, I think, is AlOH3 and will dissolves in most acids (but you are going to remove most, or all, of the white powder with the angle grinder). I would use HCl or H2SO4 if you can source either, brush it on (wear gloves). I suspect vinegar will not be strong enough - it costs nothing to give it a try. You should be aiming to remove all of the white powder and expose clean aluminium with the angle grinder the acid is 'belt and braces'. You should be easily able to see if you have any white powder left. I'd then rinse off, clean with alcohol to remove any grease, wash in water, dry and paint - in one continuous process. The key is patience - don't rush and don't touch the aluminium with your fingers, they will have grease on them.

Because the damage is hidden I would not bother with a filler. I think the pitting is 'underneath' ? so there should be no pooling. But windlass are meant to be serviced annually (but few are, hence the corrosion). When you next service, that's next autumn :), I would check the Hammerite for integrity and repair as needed (hopefully not needed). In the interim - when you wash the deck give the windlass a hose down (its built to operate in a wet environment) keeping the water fresh, not salt, reduces corrosion - and the concept is applicable to your chain. https://www.sailmagazine.com/diy/know-how-ground-tackle

A slight drift of the thread. Windlass failures are commonly a lack of oil in the gear box and no grease on the shaft. If you check both (and clean and grease the shaft) you are well ahead of the game.

You have the windlass in pieces - go for it!

Jonathan
 
Last edited:

Refueler

Well-known member
Joined
13 Sep 2008
Messages
20,876
Location
Far away from hooray henrys
Visit site
First I would use a 'Float coat' of epoxy to fill the pits and dings after severe wire brushing to remove any semi corrosion ... the epoxy should level itself .. you only need a very small amount to fill the pits.
Once set - then I would use a decent metals primer / paint to finish off ... as OP says - its hidden once assembled. The main factor for me would be to sort out the pitting and corrosion and create a barrier ...
 

vyv_cox

Well-known member
Joined
16 May 2001
Messages
25,899
Location
France, sailing Aegean Sea.
coxeng.co.uk
It seems to me that the problem is caused by water entering the raised circumferential lip, where it causes corrosion. Sealing the whole base to include the raised lip will preserve the base indefinitely. I would apply plenty of Sikaflex/Puraflex, then bolt down so that it extrudes out all around. Wipe off ensuring no gaps in the sealant.
 

rogerthebodger

Well-known member
Joined
3 Nov 2001
Messages
13,698
Visit site
When I repaired my aluminum windlass I had the casing grit blasted to remove all the corrosion then painted it with Hammarite and it has now lasted over 10 years.
 

West Coast

Well-known member
Joined
23 Aug 2009
Messages
1,198
Location
Clyde
Visit site
So the winch repair is now completed - a few photos for those interested in how the repairs progressed

Having removed the shaft, with the old seals and bearings, i used a wire brush on a drill to clean the surface as best as possible.

Cleaned.jpeg

I cut away a lot of the raised lip to allow water to better drain away, for this I used an angle grinder with cutting disc. I then pickled it in the brick cleaner solution as suggested, left it overnight. In hindsight, I should only have pickled it perhaps for an hour or so. The pitting in the photo looks bad, but on closer inspection, there was stiil enough material in the base to be structurally OK.


Pickled.jpeg

I used an epoxy 2 part filler to fill the holes and create a faired surface. Photo below shows the first pass of filling before the first fairing. My 4" circular sander was perfect tool to fair back the filler. I used a largish piece of wood dowel to plug the shaft recess, so I could build up material here.


Filler.jpeg

After fairing, I painted with 2 coats of acid-etch primer, then 2 coats of 2 pack epoxy paint.

Faired painted.jpeg

Last photo shows the shaft reinstalled with new seals and bearing.

Bdearings in.jpeg

So repairs can be done to these bases, but will be interesting to see how long this lasts. The winch is now 13 seasons old; i had last stripped it down 3 years ago, and then it was in relatively good condition. I was amazed how it had deteriorated in the 3 seasons since then.

Costs? Epoxy filler, primer and top coat circa £40, new bearings and seals £15 or so.
 
Last edited:

Plum

Well-known member
Joined
6 Jun 2001
Messages
4,559
Location
UK East Coast
Visit site
So the winch repair is now completed - a few photos for those interested in how the repairs progressed

Having removed the shaft, with the old seals and bearings, i used a wire brush on a drill to clean the surface as best as possible.

View attachment 169641

I cut away a lot of the raised lip to allow water to better drain away, for this I used an angle grinder with cutting disc. I then pickled it in the brick cleaner solution as suggested, left it overnight. In hindsight, I should only have pickled it perhaps for an hour or so. The pitting in the photo looks bad, but on closer inspection, there was stiil enough material in the base to be structurally OK.


View attachment 169642

I used an epoxy 2 part filler to fill the holes and create a faired surface. Photo below shows the first pass of filling before the first fairing. My 4" circular sander was perfect tool to fair back the filler. I used a largish piece of wood dowel to plug the shaft recess, so I could build up material here.


View attachment 169643

After fairing, I painted with 2 coats of acid-etch primer, then 2 coats of 2 pack epoxy paint.

View attachment 169644

Last photo shows the shaft reinstalled with new seals and bearing.

View attachment 169645

So repairs can be done to these bases, but will be interesting to see how long this lasts. The winch is now 13 seasons old; i had last stripped it down 3 years ago, and then it was in relatively good condition. I was amazed how it had deteriorated in the 3 seasons since then.

Costs? Epoxy filler, primer and top coat circa £40, new bearings and seals £15 or so.
It is so nice to hear what you did after all the debate and advice. Thanks. Looks amazing. You may want to consider a fabric cover when not in use to keet the UV off the epoxy paint which has poor UV resistance.
 

West Coast

Well-known member
Joined
23 Aug 2009
Messages
1,198
Location
Clyde
Visit site
It is so nice to hear what you did after all the debate and advice. Thanks. Looks amazing. You may want to consider a fabric cover when not in use to keet the UV off the epoxy paint which has poor UV resistance.

Thanks, the UV concern is not an issue as the anchor locker lid also covers this anchor winch :)
 

Halo

Well-known member
Joined
10 Nov 2009
Messages
1,978
Location
Wetherby
Visit site
Not sure about acid on aluminium which is corroding.
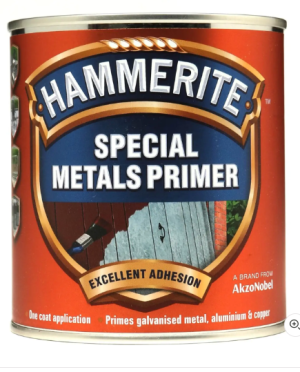
I would do what Vyv says but paint with hammerite spec metals first
 

West Coast

Well-known member
Joined
23 Aug 2009
Messages
1,198
Location
Clyde
Visit site
Not sure about acid on aluminium which is corroding.
I would do what Vyv says but paint with hammerite spec metals first

The acid was extremely effective in removing all the corroded aluminium, to leave a well prepared exposed surface for painting. My only mistake was perhaps to leave it too long (24 hours or so), did the acid remove some good material? Hard to know.

With this original lip, water and debris becomes trapped under the gypsy which only encourages corrosion. By removing much of the original lip in the casting, water and debris should drain much better. The additional photo below shows the gypsy re-mounted on the shaft, and how the lip is cut away and so will allow water to drain.

Indeed, not sure why the lip was there in the first place, perhaps aesthetics or safety reasons? But should make no difference to the operation of the windlass.

The underside of the windlass base was not at all corroded as it was bedded in silicon/sikaflex of some kind and so was sealed. I intend to rebed the winch in the same way when re-installing.


4E8BF17C-31C8-428E-AB0C-DC77E958AEB0.jpeg
 

Members online

No members online now.
Top