Stern tube wiggle

YOYA

New member
Joined
26 Apr 2015
Messages
23
Visit site
Hi
In the process of replacing engine mounts and repacking stuffing box I have disconnected the shaft coupling from the gear.
now that the shaft is disconnected I can see the shaft tube with the attached stuffing box have a slight wiggle of few mm when moved by hand.
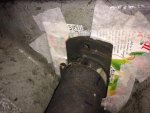
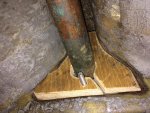
the stern tube ends at a small sort of bulkhead or stinger made of wood and covered with glass and mat. forward of it is the stuffing box which has a flange with two bolts going through that bulkhead. the material around the bolts disintegrated. the sealant between the flange and the bulkhed is also loose.
I want to refill this lost material, redrill the holes for the stuffing box flange bolts and reseal or cment the flange to the bulkhead (there are no leaks from the flange / stern tube, just from the stuffing box which needs a new packing)
1) is the flange part of the stern tube or can it and the stuffing box moved forward on the shaft so I can rebuild that bulkhead? I tried to move it but no go so far.
2) how to rebuild the damaged area - use epoxy and mat? epoxy putty? this area is maybe 5x5 cm.
3) this being a vertical area, how do I keep the epoxy in place until it dries? should I create some kind of mold so the epoxy is not going to run down.?
4) the slight movement of the whole assemply - stuffing box, flange, stern tube and shaft - is this normal desired flexibility?
5) I want to do that before I align the engine to the shaft coupling. Should I also repack the stuffing box before alignment?
with a running engine and in gear a slight vibration movement is visible in the flange/stuffing box. no serious woobling in shaft or noticable vibrations in the boat. The engine mounts were due to be replaced.
Westerly Conway 36 1979 currently on the dry
many thanks for your input
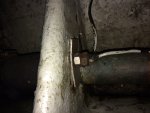
top view of stuffing box
IMG_0852.jpg
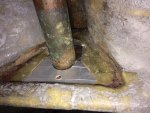
aft area of bulkhead
IMG_0851.JPG
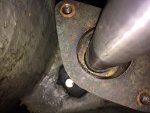
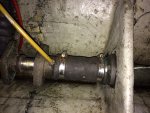
shaft + empty stuffing box
IMG_0816.jpg
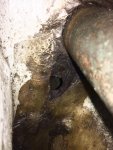
rotten area in bulkhead under stuffing box flange with bolts removed
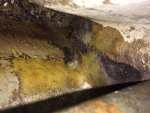
IMG_0853.jpg
 

fisherman

Well-known member
Joined
2 Dec 2005
Messages
19,675
Location
Far S. Cornwall
Visit site
No it should not move. The ply has degraded inside the GRP. Really you should remove the small bulkhead and replace it, not so daunting as you might think. However, it might be possible to make a GRP clad ply reinforcement to bolt on the aft side, so you can fix the stern tube to it, and fix it to the hull, or the sound ply next to the hull.

If it were me, I would pull the shaft, take the stuffing box off the tube. remove the small bulkhead, grind back the inside of the hull where it was attached. Make a new one, GRP clad ply. Align and fix the engine and shaft and stuffing box, bolt it to the new bulkhead with plenty of Sikaflex and good backing pads, then GRP the bulkhead to the hull. Try to seal the ply so it doesn't happen again.
 

YOYA

New member
Joined
26 Apr 2015
Messages
23
Visit site
Thanks fisherman
Is it possible to move the stuffing box flange with its rubber hose and stuffing box forward on the shaft so I can work in that area, or is the flange part of the Stern tube?
I'm reluctant to remove the shaft. Your suggestion to add a new glassed ply to the aft of the bulkhead sounds more doable.
Also wondering about the order I should proceed. First fill that rotten bulkhead area, then fix the flange to the bulkhead, then repack the gland, then align the shaft to the engine?
 

bristoljim

Active member
Joined
12 Dec 2008
Messages
313
Visit site
The 2 bolt flange should unscrew off the sterntube.Proper job is as Fisherman describes.An alternative is to lay up a solid bulkhead say 12mm thick GRP then either cut out all of old bulkhead or only the front skin & bond to hull & bulkhead skin if retained.No need for epoxy with correct preparation ( aggressive use of grinder)
 

YOYA

New member
Joined
26 Apr 2015
Messages
23
Visit site
The 2 bolt flange should unscrew off the sterntube.Proper job is as Fisherman describes.An alternative is to lay up a solid bulkhead say 12mm thick GRP then either cut out all of old bulkhead or only the front skin & bond to hull & bulkhead skin if retained.No need for epoxy with correct preparation ( aggressive use of grinder)
I'm not sure I understand the alternative.
Do you mean 12mm marine ply to be added aft of the current bulkhead, glassed and tabbed to the hull?
If I then remove the old bulkhead, as the new one will be positioned aft and the whole assembly, flange, rubber hose, stuffing box, will need to move back on the shaft to meet the new ply and bolt the flange to it.
 

fisherman

Well-known member
Joined
2 Dec 2005
Messages
19,675
Location
Far S. Cornwall
Visit site
If you don't remove the shaft then you can't feed the hole in the new B/H down over it. You could if the inside end flange is off. However, you could make one B/H with an upward slot, and one with a downward slot, (or left and right, depends where the bolts go through) fit both together over the stern tube. Refit the cutouts to fill the gaps, GRP overall. If you had time you could lay up a GRP B/H, but it has to be no more then 3 x 200gm csm at a time, otherwise it gets hot and brittle.

Many boats were filled in with gash leftover resin or concrete all round the stern tube, i don't like it in case repairs to the aft end are needed, but it would be sound to fill round the tube with sand to the B/H top, then grp a thin ply lid on it. Should not be needed really.
 

fisherman

Well-known member
Joined
2 Dec 2005
Messages
19,675
Location
Far S. Cornwall
Visit site
I'm not sure I understand the alternative.
Do you mean 12mm marine ply to be added aft of the current bulkhead, glassed and tabbed to the hull?
If I then remove the old bulkhead, as the new one will be positioned aft and the whole assembly, flange, rubber hose, stuffing box, will need to move back on the shaft to meet the new ply and bolt the flange to it.

No that would leave the B/H in place, just provide a better landing for the bolts, but a bit of a bodge TBH.
 

fisherman

Well-known member
Joined
2 Dec 2005
Messages
19,675
Location
Far S. Cornwall
Visit site
Bristoljim means leave the front grp skin in place but take all the grp and ply from aft of that, then bring new B/H up to the saved forward grp skin. Slots needed to go round the tube.
 

Tranona

Well-known member
Joined
10 Nov 2007
Messages
43,112
Visit site
Suggest you ask the Westerly Owners Association as almost certainly somebody else has had this problem and done the repair.
 

fisherman

Well-known member
Joined
2 Dec 2005
Messages
19,675
Location
Far S. Cornwall
Visit site
Suggest you ask the Westerly Owners Association as almost certainly somebody else has had this problem and done the repair.

I would hope not, badly sealed/fitted GRp and ply work like this should not happen. Certainly hasn't in any of my work as far as I know, going back to 1983. However, it may be due to vibration from external causes like a rope in the prop. Even so, should be built strong enough even for that.
 

YOYA

New member
Joined
26 Apr 2015
Messages
23
Visit site
If you don't remove the shaft then you can't feed the hole in the new B/H down over it. You could if the inside end flange is off. However, you could make one B/H with an upward slot, and one with a downward slot, (or left and right, depends where the bolts go through) fit both together over the stern tube. Refit the cutouts to fill the gaps, GRP overall. If you had time you could lay up a GRP B/H, but it has to be no more then 3 x 200gm csm at a time, otherwise it gets hot and brittle.

Many boats were filled in with gash leftover resin or concrete all round the stern tube, i don't like it in case repairs to the aft end are needed, but it would be sound to fill round the tube with sand to the B/H top, then grp a thin ply lid on it. Should not be needed really.

Thank you
There's indeed a bit of glass over the edges of the flange. I believe the deterioration of that bulkhead is due to leaky old packing rope, old mounts that introduced slight vibration, and lots of stuffing box grease and water over the bulkhead. The wood, as I now started gouging it, is soaked with grease around where the flange bolts were. They are vertically installed.
Should I use epoxy and chopped mat to fill the old gouged bulkhead up to its fw skin?
would the condition of the wood inhibit hardening?
Any materials that would work best in this condition?
Should I use mat and epoxy over the new aft split bulkhead as well?
As I cannot remove the flange, I will not be able to apply a new sealantbetween it's aft end and the old bulkhead fw skin. There never was any leak from behind the flange, although the existing sealant is no longer effective as the whole thing is no longer connected to the flange
 

fisherman

Well-known member
Joined
2 Dec 2005
Messages
19,675
Location
Far S. Cornwall
Visit site
You have a flexibly mounted stuffing box, this should take out any vibration. The deterioration of the B/H is well established, an attempt at repair has been made with the S/S plate on the back, but it has crushed into the B/H as there is no solid material left. As the stern tube has been moving about you may need to check the integrity of the outside bearing fixings. I don't think what you suggest is going to create a sound mounting for the stern tube, you are basically nailing into jelly. You can't re-solidify the B/H. Dig out all the rotten material, ie all the ply. Then you can clean the GRP from the stern tube bearing flange and hull, make a new start. There would not have been any leaks from the flange, it is screwed onto the stern tube. Once you demolish the B/H you will be able to unscrew it, but it may not be necessary to do so if you apply a new B/H to the back of it. Suggestion: make the B/H in two pieces, cut horizontally. get it in place behind the flange, but away from it, fix it together with another ply on the back, cut vertically, while you GRP the front face. This needs to be properly done. Polyester is fine, it's what I'm used to, others may say epoxy. Then push the GRP-clad B/H against the back of the flange (shaft connected, all aligned) while you grp the back of the B/H. Then bolt the flange to the B/H, and grp the B/H to the hull. The B/H must be sealed round the tube so the edge of the ply in the hole is protected, I suspect there are much better products for this than when the boat was built.
 

fisherman

Well-known member
Joined
2 Dec 2005
Messages
19,675
Location
Far S. Cornwall
Visit site
Another thought that might help. You could make a new B/H a few inches behind the flange, and use GRP to locate the tube in it, lay up GRP on the B/H and tube fore and aft. It will not bond to the tube, but it will sure as hell locate it securely. If the tube were scratched up sufficiently there would be some bonding. A grinder would be needed for any future removal. The flange bolts left as they are, would then be largely cosmetic, but would still be needed to stop the inner end unscrewing. (There are GRP tubes available now which are only bonded in).
 

YOYA

New member
Joined
26 Apr 2015
Messages
23
Visit site
Thank you for these suggestions Fisherman. I'm not sure I understood everything:
remove as much rotten ply as possible, working from aft to Fw, and leave the fw bulkhead GRP existing skin in place. This is where the flange aft face is laid against the BH skin.
Prepare and fIll the now more or less hollowed old BH with epoxy & woven mat. This will recreate the BH.
The flange bolts will be in place when the epoxy is applied to rebuid the BH which means they will be glassed in. Not sure how can I epoxy around the bolts with mat etc.
Cut marine ply in two horizontal sections, with a cut out for the stern tube.
Epoxy in the ply pieces in place, aft and touching of the rebuilt bulkhead.
bolt the newly glassed ply through the old bulkhead, use backing plates

Really appreciate your input on this, this seems to be a rather chalenging project at a critical boat system, especially with the limited access and the fact I have not done a similar thing before
 

fisherman

Well-known member
Joined
2 Dec 2005
Messages
19,675
Location
Far S. Cornwall
Visit site
This may be OK. The bolt holes are over enlarged, they need rectifying. Remember the bolts are from the front because you are able to remove them in order to unscrew the bearing if needed. better to rebuild the B/H and re drill the holes.
I don't know if you can recreate the B/H as you suggest, suck it and see.

To expand your idea: if the front skin of GRP remains, clean the back, (acetone) remove the bolts, and remake (in my case with polyester resin and 200 gsm (grams/sq metre) csm (chopped strand mat), because that's what I understand, having not used epoxy much) the B/H by building with resin and mat, bonded to the hull. Max 3x 200 gsm mat per go. It is better to lay up the (3 layers) mat and wet it out on a plastic covered board, then lift it with brush and roller onto the work. When thick enough, I would guess 10mm minimum, drill and refit the bolts. You then essentially have a new B/H entirely GRP with no ply to go rotten.
 

YOYA

New member
Joined
26 Apr 2015
Messages
23
Visit site
I need to somehow keep the flange in place throughout the process. And keep the existing top top bolt hole. getting a drill under there could be difficult as well as manipulating wet mat under and below a shaft tube.
Maybe place a leader tube and rebuilt mat around it. When dried, pass the flange bolts fate with stainless plate and nuts. Not sure if that's possible with epoxy
Rot below bottom flange bolt hole
IMG_0867.jpg
 

YOYA

New member
Joined
26 Apr 2015
Messages
23
Visit site
IMG_0945.jpg
IMG_0946.jpg
The rotten plywood removed to the front skin or what is left of it, new marine grade ply formed in two pieces, the bottom one narrowed to allow insertion and turning below the Stern tube. Holes for stuffing box flange drilled in new ply. Retaining wall created on front skin to rebuild it. The flange will be vaselined as well as the retaining wall to keep them free from resin

I'm still not sure if to use epoxy or polyester as I wish to use csm and I believe it is wetted out better using polyester, however this area is usually wet and greasy and I need good water protection for the plywood, which will be available with epoxy better.

How do I get the air out of the wide gap to port of the lower ply?

Should I first wet the CSM and place it inner most, flush with the front skin, then resin the ply and place it on top of the csm, then add more wet CSM, then more polyester?

Any tips?

ThanksIMG_0947.jpg
 
Last edited:

fisherman

Well-known member
Joined
2 Dec 2005
Messages
19,675
Location
Far S. Cornwall
Visit site
Grind back to clean the hull where the GRP is going to bond to it. Resin proof tape to the front bearing carrier and threads. Use filler made with catalysed resin and filler powder ( from your GRP supplier) to fill the corners and make them rounded, use the back of a spoon or some such, rounded spatula or gloved finger, also round the tube, and to fill the slots. Round off the top edge corners of the ply. Paint the ply with catalysed resin first, so the resin doesn't migrate from the csm. Wet out small areas of 3x200gm csm at a time on a board or plastic, then lift and push it into place with gloves, brush and roller. Bring it over the top of the ply, and also onto the tube for a couple of inches, try to keep applying more before the last lot has gone hard, push it onto the job and dab with the brush and small roller into the corners. The thicker it is, the quicker it goes off, you will find the extra layers need minimal catalyst, especially if you use the same container for mixing. You can keep on applying wetted csm in small pieces, easier to handle. If you get enough GRP onto the job the B/H is almost redundant and the ply won't matter too much. Yes, GRP the front face of the ply first. In fact, if you could totally encapsulate the ply before it goes in you will protect it completely. You can GRP the front face to the hull as well, every little helps.
 
Top