Rewiring Boat

Wandering Star

Well-known member
Joined
8 Feb 2009
Messages
5,252
Location
Dorset
Visit site
I’ve decided to defer launching my boat until March so might as well retire the 12volt electrics which I’d planned to do next winter..

Recommendations needed for a book which is easy to read and understand and which won’t bewilder my small brain with non essential stuff.

Also a recommendation for a supplier of a prewired switch panel with about 18 fused switches.
 

Tranona

Well-known member
Joined
10 Nov 2007
Messages
42,322
Visit site
Can't help with the book because I picked up enough from previous jobs and magazine articles plus various threads on here. One thing is certain - there is no one "right" way of doing it, nor a clear best choice of components.

For panels, I bought from here axoncontrol.co.uk mine is 16 way because it fitted the space, but plenty of choice. Almost everything else was bought from here 12voltplanet.co.uk

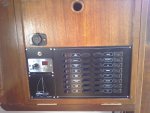
This is the panel. The switch on the top left is on a blank panel that Axon made for me to balance the main panel and the mimic.

IMG_20220426_144042.jpg

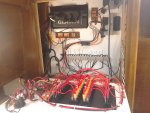
The inside of the drop down panel

IMG_20220426_144226.jpg

The cables from the battery bank come in from the bottom right and most of the circuits run down the starboard side of the boat either forward or aft.

Hope this helps
 

Beneteau381

Well-known member
Joined
19 Nov 2019
Messages
2,085
Visit site
Can't help with the book because I picked up enough from previous jobs and magazine articles plus various threads on here. One thing is certain - there is no one "right" way of doing it, nor a clear best choice of components.

For panels, I bought from here axoncontrol.co.uk mine is 16 way because it fitted the space, but plenty of choice. Almost everything else was bought from here 12voltplanet.co.uk

This is the panel. The switch on the top left is on a blank panel that Axon made for me to balance the main panel and the mimic.

View attachment 144638

The inside of the drop down panel

View attachment 144639

The cables from the battery bank come in from the bottom right and most of the circuits run down the starboard side of the boat either forward or aft.

Hope this helps
Neat!
 

CliveF

Active member
Joined
15 Jan 2017
Messages
135
Visit site
Before and after schematic. showing the anticipated amps + contingency. This allows the correct gauge of wire to be selected.
Good quality wire, the best crimping pliers you can afford ( not halfords sheet metal auto pliers ) ,
A good legible PERMANENT system for identifying the cables / circuits.
Patience.
A neat and methodical work regime.
Do one circuit at a time, don't rip it all out at the start and get lost.
Avoid joints in damp places.

Crack on !
 

lustyd

Well-known member
Joined
27 Jul 2010
Messages
12,397
Visit site
Do one circuit at a time, don't rip it all out at the start and get lost
It's funny, I would recommend almost the opposite. It's much easier to pull several cables through empty conduit than one at a time adding to existing wiring. There's nothing complex on a boat so actually starting from scratch isn't all that bad. I did one at a time and regretted it.

If upgrading electronics, do the NMEA 2k and Ethernet as early as possible, they reduce overall cabling and make the project seem far simpler once complete.
 

Gixer

Well-known member
Joined
29 Nov 2015
Messages
944
Visit site
It's funny, I would recommend almost the opposite.

My plan was to do my rewire in stages but it after drawing a plan it turned out easier and quicker to rip the whole lot out and start again in one go. Amazing how you look at things differently when you've got a 'blank canvas'.
 

Tranona

Well-known member
Joined
10 Nov 2007
Messages
42,322
Visit site
There are various different types such as numbered tags, adhesive labels or colour coding the wire. I opted for red and black and labeled all the negatives with legends using Dymo and the positives have labels on the switch panel. Relatively easy for me as the panel was deliberately mounted so that it was easily accessible and visible.
 

CliveF

Active member
Joined
15 Jan 2017
Messages
135
Visit site
As Tranona has said. Although I was thinking of the clip on type as used in control panels on industrial machinery.

Mind you a full proper name is not the idea there , you need to create a crib sheet i.e. BP1 = Bilge pump no 1 RD 0 = radar etc
 

lustyd

Well-known member
Joined
27 Jul 2010
Messages
12,397
Visit site
adhesive labels ... Dymo
I generally recommend against anything that needs to stick as in the longer term they always come unstuck and have the potential to block bilge pumps etc. If they must be used (and they are nice!) cover in something like transparent heat shrink tube.

Working in tech I once saw a very well organised network cabinet turn from pristine to confetti covered chaos in 6 months due to the dry heat in a server room.
 

lustyd

Well-known member
Joined
27 Jul 2010
Messages
12,397
Visit site
Also, when labelling the panel, use a sharpie to write the label first, then stick your Dymo over that. It saves a lot of time later if they fall off :)
 

lustyd

Well-known member
Joined
27 Jul 2010
Messages
12,397
Visit site
Interested to hear the pros and cons of screw -ve separate terminal blocks rather than a bus bar.
If you're crimping terminals on the wires it makes very little difference aside from ease of use and installation. And neatness of course, there are some very neat looking bus bar/fuse boxes out there.
 

Wandering Star

Well-known member
Joined
8 Feb 2009
Messages
5,252
Location
Dorset
Visit site
Thanks for all the suggestions and advice, your switch panel is pretty much what I was looking for Tranona and I’m going to order one from Axom. On balance I’m tending to lean toward ripping out all the old wiring and re wire from scratch, mainly because there’s too much redundant wire all neatly cable clipped together and tracing and removing individual wires will be a nightmare - easier to chop it all out and start afresh.
 

Ceirwan

Well-known member
Joined
26 Jul 2007
Messages
1,080
Visit site
I probably went overkill.
Unfortunately its a slippery slope & now my OCD has though of a hundred ways to improve this already.

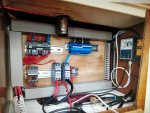
1666115323994.jpeg

In my case the best mod was to remove the deck tank filler above that MG Yachts thoughtfully routed through the electrical cabinet.
 

simonfraser

Well-known member
Joined
13 Mar 2004
Messages
7,489
Visit site
I probably went overkill.
Unfortunately its a slippery slope & now my OCD has though of a hundred ways to improve this already.

View attachment 144653

In my case the best mod was to remove the deck tank filler above that MG Yachts thoughtfully routed through the electrical cabinet.

what's that yellow / blue / white wire mess in the lower part of the image ? :ROFLMAO:
 

Tranona

Well-known member
Joined
10 Nov 2007
Messages
42,322
Visit site
I generally recommend against anything that needs to stick as in the longer term they always come unstuck and have the potential to block bilge pumps etc. If they must be used (and they are nice!) cover in something like transparent heat shrink tube.

Working in tech I once saw a very well organised network cabinet turn from pristine to confetti covered chaos in 6 months due to the dry heat in a server room.
Fortunately those labels are in the warm and dry nowhere near the bilge. However have used the same for the bus bars in the engine compartment so will keep an eye on them, although in reality all the connections there are pretty obvious so labels were a refinement.
 

Ceirwan

Well-known member
Joined
26 Jul 2007
Messages
1,080
Visit site
what's that yellow / blue / white wire mess in the lower part of the image ? :ROFLMAO:

Its since been cleaned up :D
I think it was when I was setting up the NMEA 2K / NMEA183 gateway for the AIS I used quick connect blocks to make sure my wiring was good.
 

vic008

Active member
Joined
18 Aug 2007
Messages
488
Location
CHCH. NZ
Visit site
Saw the Sw panel prices here and bought from AliExp, about 25 quid. Latest plan is , instead of 4 of twin flex running to the mast base and up, will have only 1 of heavy twinflex go to mast base and have the Sw panel there
 
Top