Rebated cut for access trap in sole

matt1

Well-known member
Joined
11 Feb 2005
Messages
1,233
Location
Hamble, UK
Visit site
Hi - does anyone know somewhere on the central south coast that would be able to do this kind of cut on some laminated sole boards? I’m after making a similar access trap on an adjacent board. I wonder if the factory used a separate piece of wood for the infill as I can’t imagine how they did this cut otherwise.

I’m after a very professional result so don’t want to use a jigsaw myself
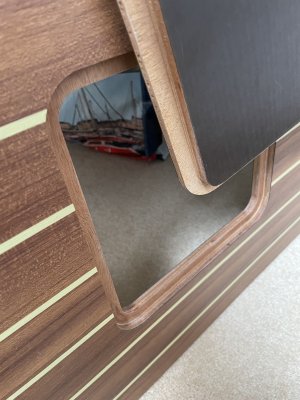
IMG_2464.jpeg
 

rogerthebodger

Well-known member
Joined
3 Nov 2001
Messages
13,445
Visit site
I have put rebates in a Perspex hatch with a power router so the top fitted flush with the hatch frame.

The trick IMHO id to make a template / guide to control the router.

I would not use a jigsaw as not so easy to control with a template
 

Bodach na mara

Well-known member
Joined
21 Aug 2002
Messages
2,641
Location
Western Scotland
Visit site
Yes, if you think that the filling piece is one piece of wood then it will need to be cut from a separate piece. The jigsaw is used to cut out the inner hole which will leave you with a bit paneling too small and probably with circular holes at the corners. A router is used to cut the rebates in the edges of the hole and on the edges of the new panel. And the best of luck, especially if you have never used a router. Better start with a pile of scrap to practise on.

However the job (as far as I can gather from several of boats I have owned) is better done as follows. First apply wide masking tape to the area of the intended cuts, then mark out the outline of the larger hole. Find something that has the same radius as the corners of the hole you intend to cut and use it to mark the corner outlines. Then use a multitool with a fine blade to cut the straight bits of the incision. Now you use a keyhole saw or jigsaw* to cut the curved bits. As each curve is cut cover with gaffer tape to hold the panel in place. (*You probably find that there is no room to get the jigsaw round at least one of the corners.) Now find some scrap material to glue on as backing for the rebate in the hole an make a filler piece for the back of the panel that you have cut out.

Hope you are good at woodworking.
 

rogerthebodger

Well-known member
Joined
3 Nov 2001
Messages
13,445
Visit site
Another way to do the job is to cut the hole the size you need using a fine down stroke jig saw glue strips under the hole edges to support the hatch you have cut out.

I have done this several times with doors in cupboards

Any pattern of veneer will then match
 

Tranona

Well-known member
Joined
10 Nov 2007
Messages
42,209
Visit site
I think you will find that the rebate is cut at the factory on a CNC. The blank that is removed is then used to make a smaller panel for use elsewhere and your panel is cut from another board. They use a computer programme to make the maximum use of their boards (which are much larger than the normal 8*4). In laying out the panels the programme takes into account the spacing of the stripes so the panel fits perfectly into the main board. I noticed very small variations in the colouring on the access panels on my Bavaria which shows they were out of a different part of the board.

Difficult to reproduce this in an existing panel without framing the hatch
 

matt1

Well-known member
Joined
11 Feb 2005
Messages
1,233
Location
Hamble, UK
Visit site
I think you will find that the rebate is cut at the factory on a CNC. The blank that is removed is then used to make a smaller panel for use elsewhere and your panel is cut from another board. They use a computer programme to make the maximum use of their boards (which are much larger than the normal 8*4). In laying out the panels the programme takes into account the spacing of the stripes so the panel fits perfectly into the main board. I noticed very small variations in the colouring on the access panels on my Bavaria which shows they were out of a different part of the board.

Difficult to reproduce this in an existing panel without framing the hatch
Thx, that’s helpful and explains it
 

pandos

Well-known member
Joined
15 Oct 2004
Messages
2,985
Location
Ireland, (Crosshaven)
Visit site
No matter how well it is cut, unless you use the piece you cut out as the hatch you will see it as looking off due to the veneer and grains etc.

As is said above you can get a very good cut with a good jigsaw and down cutting blade.

Start the cuts and do the straight parts with a plunge cutter in a multi tool, keep the rounding in the corners as small as possible, to keep the jigsaw work to a minimum...but be sure the radius is not too tight for the jigsaw blade.

The sole in the photo looks like to was cut before the top sheet of ply and the lower sheet were glued together.
 

Neeves

Well-known member
Joined
20 Nov 2011
Messages
13,014
Location
Sydney, Australia.
Visit site
Hi - does anyone know somewhere on the central south coast that would be able to do this kind of cut on some laminated sole boards? I’m after making a similar access trap on an adjacent board. I wonder if the factory used a separate piece of wood for the infill as I can’t imagine how they did this cut otherwise.

I’m after a very professional result so don’t want to use a jigsaw myself

View attachment 184468
You may find that the cabin sole is available as a, say, 4' x 8' off the shelf board. If you are lucky it is sold in smaller pieces, like floor board for a house - glorified tiles. Go to your local carpet/DIY outlet and see if they have anything that matches, ask the importer of the yacht in question where you can get a piece of the cabin sole - as you destroyed a piece of yours by....??? Do a google search....'Nautical floor board finishes' etc etc.

Our cabin sole looked 'like' yours, but a pale wood - was totally synthetic and sold under the Da Vinci brand. It looked just like 'real' wood. The cabin sole, the decorative, synthetic part, was glued to a ply base (as is described above)

If you find a source follow the appropriate advice on this thread. The skill is in cutting the curve of the corners - the rest is easy,

I did what you intend and cut the 'hole' using a hole saw in each corner. If you have measured correctly a hole saw will give you perfect corners. You can use any size of hole saw but one as close to the size of your other hatches will give a better finish. You need a hefty drill to drill large holes. I then made the hatch 'oversized' and sanded, abraded the corners to match. You need to measure carefully. I used a jig saw with guides for each straight line cut. I simply glued supports for the infill, I have a Bosch router but found a jig saw adequate for straight line cuts.

Its a actually not difficult, if you are handy and patient. You simply need to be brave to start.

Jonathan
 
Top