Brabs
Member
Does anyone have any idea of the cost to re-wire a 33ft westerly, is this something i could tackle myself???
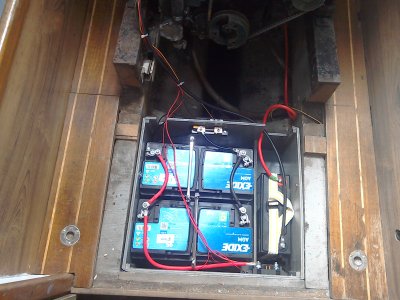
Hi TranonaHow long is a piece of string? I have just done a fairly basic 31' Golden Hind with a 16 way DC distribution panel, simple shorepower with 2 sockets and battery charger, split charging system with engine start battery and 2 AGM house batteries, new mast cabling, but not lighting circuits. Material costs roughly £2.5k using best components and cabling. chargers (mains and B2B for bow battery another £500) Hours and hours of work. Photos give some idea. Battery shot before fully wired - just enough to fire up the new engine.
Best to rip out and start again on an old boat - I only kept the lighting circuits. Draw up a schematic of what you think you require and where you are going to locate the major bits of kit. Plenty of books covering the basics,
I agree, but don't pull out the old wire until you've got new stuff in place - some of those wires will be hard to feed without the old stuff to pull it through!Best to rip out and start again on an old boat
Hi B27Cable is not cheap.
Thick cable to carry higher currents is quite expensive.
Re-wiring is quite time consuming, so paying a pro will cost a fair amount.
Personally, I have a 30 year old boat and I've changed the switch panel for a couple of £15 ebay ones and replaced a load of old choc-blocks with an 8-way blade fuse box with built in bus-bars.
I have pretty much mostly tidied up existing, not run much new wire.
I could do with putting in thicker wire as the volt drop to my fridge is more than I would like.
I bought a selection of crimps and a ratchet crimp tool.
Probably spent £100 on parts and tools so far.
Next thing is to replace deck sockets to nav lights and add a proper socket to plug in solar panels, plus a proper solar regulator.
I would suggest writing up a spec of exactly what you want from it.
Mine is simple
Fridge - portable 3A draw from cig type socket
nav lights
cabin lights
sailing instruments depth sound, log and wind, not networked
engine stuff on 1/both/2 switch
socket for tillerpilot
a few amps of solar charging
chinese diesel fired heater
VHF radio
USB charger points
I might add some other minor things, but I don't need shorepower, inverters, anchor windlasses or bow thrusters
Isn't that what winters are forRipping it all out and starting again is OK if your hobby is boat restoration more than sailing.
Doing everything in one go is a big slice of time, whereas I have broken the job down into sections which can each be done between opportunities to go sailing.
If the majority of the actual cabling around the boat is sound, then replacing the parts which are actually failing is a much smaller job.
The 12V system on a boat is mostly not complex or sopthisticated, it's mainly a lot of simple circuits, usually tangled together behind a switch panel that's too small.
People underestimate how much space wiring and connectors take up, and it gets worse when wires are upgraded to thicker copper.

Stuff breaks when you use it...Isn't that what winters are for
Add a multi-meter to the list of tools to buyHi B27
Many thanks for you advice, i have shortlisted a number of things, i do seem to have a lot of redundant wires behind my main panel, i really don't want to start pulling wires about if there live

Agree. Important to try and trace what you have and label it when you cut it off particularly if the consumer is being retained. I often use this phot of "before" as an indication of where it is better to just forget trying to work out what does what. When I bought the boat, the surveyor reported that everything works - but don't aks me how - or why!I agree, but don't pull out the old wire until you've got new stuff in place - some of those wires will be hard to feed without the old stuff to pull it through!
Disconnect the batteries before you start stripping everything and it cant be live.i do seem to have a lot of redundant wires behind my main panel, i really don't want to start pulling wires about if there live
Last year on my Fulmar I fitted a new switch panel as I did not have enough circuits and wanted to change from fuse to circuit breakers. Everything else is working, so I saw no need to replace all the cabling. Most of the time slight corrosion after 40 years is what causes problems with the electrics.Does anyone have any idea of the cost to re-wire a 33ft westerly, is this something i could tackle myself???


Last year on my Fulmar I fitted a new switch panel as I did not have enough circuits and wanted to change from fuse to circuit breakers. Everything else is working, so I saw no need to replace all the cabling. Most of the time slight corrosion after 40 years is what causes problems with the electrics.
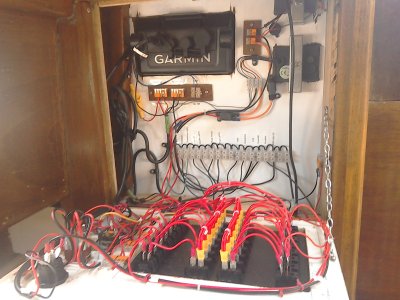
The cables behind the electric panel are a mess as these photos show. The thought of rewiring is a dauting and expensive task, so I have to ask why you want a full rewire? If you have a problem with a circuit, then trace the cables using cable tracer like this. CABLE FINDER TONE GENERATOR PROBE TRACKER WIRE NETWORK TESTER TRACER KIT 5051259025035 | eBay
It would be nice having my boat rewired, but it will not make any difference to the value when it finally comes for me to sell. Personally I would do the minimum to keep it working and spend you money on new standing rigging/running rigging/sails/headlining/electronics/engine as these are what buyers always look for.
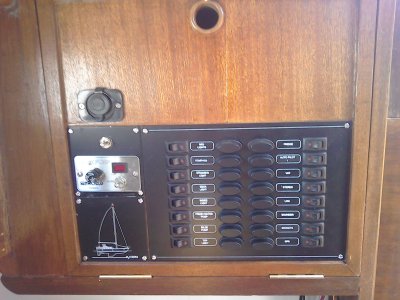
View attachment 163192
The new switch panel from ASAP
View attachment 163193
The view behind the panel with all cables labeled.
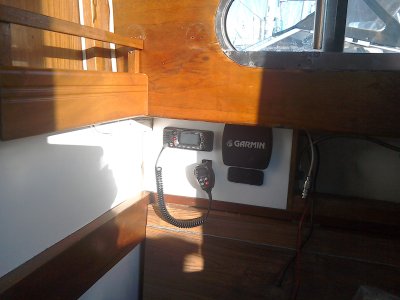
View attachment 163194
This is the side view of what is behind the panel.
You want to rewire, where do you start?
ConcertoLast year on my Fulmar I fitted a new switch panel as I did not have enough circuits and wanted to change from fuse to circuit breakers. Everything else is working, so I saw no need to replace all the cabling. Most of the time slight corrosion after 40 years is what causes problems with the electrics.
The cables behind the electric panel are a mess as these photos show. The thought of rewiring is a dauting and expensive task, so I have to ask why you want a full rewire? If you have a problem with a circuit, then trace the cables using cable tracer like this. CABLE FINDER TONE GENERATOR PROBE TRACKER WIRE NETWORK TESTER TRACER KIT 5051259025035 | eBay
It would be nice having my boat rewired, but it will not make any difference to the value when it finally comes for me to sell. Personally I would do the minimum to keep it working and spend you money on new standing rigging/running rigging/sails/headlining/electronics/engine as these are what buyers always look for.
View attachment 163192
The new switch panel from ASAP
View attachment 163193
The view behind the panel with all cables labeled.
View attachment 163194
This is the side view of what is behind the panel.
You want to rewire, where do you start?
")