MiToS re-built/fit- versilcraft Mystery43

MapisM

Well-known member
Joined
11 Mar 2002
Messages
20,435
Visit site
Regarding the hawsehole placement, isn't the side facing ones you have a bit excessive and demanding "rich" space to use them? Unless you cross them over to the other side (as in line from port hawsehole going over the bathing platform to the stbrd bollard in the deck), slightly confused there...
Yep, you perfectly spotted the weak point of the hawseholes on the sides.
In fact, below is a pic of how they work with crossed lines, and in this respect the hawseholes in the transom are definitely better.
I might still use the upper (steel) cleats on the coamings, but their raised position interferes with the passerelle.
All considered, I think your idea to leave the hawseholes where they are and the lower cleats as well is a good one.
Re. the winch(es), you might also consider fitting just one on one side.
If you don't have any fixed obstruction in the middle of the cockpit, you can always use it also for the line on the opposite side.
BartW has this type of setup on BA, for instance.
Stern-to.jpg
 

rbcoomer

Active member
Joined
23 Nov 2010
Messages
3,329
Location
The Tropics of the English Riviera!
www.swfbr.org.uk
Hi Vas,

Yes all understood and agreed regarding stern door and mooring - there does seem little to gain by changing if mooring is stern-to. Always good to explore all the options however and I can certainly see why you'd like a full width seat. You'll have to be a little creative in the carpentry once again! :)

Best regards,

Robin
 

vas

Well-known member
Joined
21 Jun 2011
Messages
8,016
Location
Volos-Athens
Visit site
long time no posting!

following two weeks of v.heavy load on real work, things are easing a bit (as in students got their projects going at last), weather is dry and cold and I decided to have a go at replacing the aft deck. That's the last bit of original deck left (ok, apart the f/b which I'm not replacing! ) on MiToS, and since we've done the broom jokes last year, I'll continue with the report :p

Last week managed to get an orange tarpaulin over the f/b deck and the sides all the way to the aft deck and secure it (not very well I must admit as the shape is not helping much). Main problem is that aft deck is straight on the sea facing NNW where is the prevailing COLD winds down here. Since the mount Pelion is snow clad over the last week, temps are down considerably.
red_tarpaulin_1.jpg


Three days ago it rained A FCKING LOT resulting in around 10 large buckets of water on the lazarette #yes it was covered...# I also stupidly forgot to cover the f/b port, so had to empty a few buckets off there as well!
red_tarpaulin_fullofwater.jpg


So a bit of head scratching, tried to sort out the manual bilge pump to empty it and promptly destroyed one of my two gulper220 :( And it was plain stupidity on my behalf, as I could see the pump struggling and flexing and I didn't stop it immediately. What happened was that some debris got stuck on the bleeding exit to the skin fitting and blocked completely the exit. Result the plastic (WFT, why plastic:???# gear that runs the cam that operates the membrane is flatspotted. Works under minimal load, but will jump if pushed...

So, took the opportunity to dismantle, clean, rebuilt and test the two Rheinstrom pumps I bought s/h a few months back. Finally all the duckbill valves cleaned nicely and worked fine, so I now got two 1.5inch diaphragm pumps in working order. On Wed morning, I fitted the one in the bilges and connected it to the blackwater tank. Didn't have a 48mm drill bit (how do you call them btw? ) so couldn't fit the seacock and finish off the installation.
duckbill valves in an el-cheapo ultrasound bath #ok, that's before!#
rheinstrom_valves_3.jpg

assembling the pump:
rheinstrom_pump_1.jpg

and in place plumbed #half of it#
blackwaterpumplayout_1.jpg


blackwaterpumplayout_2.jpg


yes, finally opted for a below w/l exit for the blackwater and will install magsensor on the truedesign seacock and wire it to the BMS. This way none will be able to operate the pump unless the seacock is open #thanks JFM for the idea!#

The other one is going to the lazarette bulkhead and will be connected to a 3X1.25inch custom made collector as a manual bilge pump system. MiToS originally had a 3/4inch collector and a manually switched pump with flex hose connections to the three main bilge sections.
This uprated manual system will be supplemented with two independent auto systems, one in the e/r and one in the cabins. Plus two of these waterwitch sensors hooked to the BMS sending text messages if something goes wrong. I hope that's enough to keep her floating :rolleyes:

So today had a constructively destructive day removing some deck. And if I had some spare reciprocal saw blades spare I'd have done much more :eek: Blade broke half a metre into the first cut so had to do the rest manually. Was lucky that I started on the worse affected spot and apart from the glassfibre that PO put ontop of the original ply deck the rest was nicely wet soft and rotten :D
A sort of a casebook set of photos on how ply/timber rots. Sorry pics are orange tinted due to the tarpaulin (I'll try to repair them using more Pshop but not have the time right now...) :

aftdeck_rebuilt_25.jpg


aftdeck_rebuilt_26.jpg


aftdeck_rebuilt_27.jpg


aftdeck_rebuilt_28.jpg


aftdeck_rebuilt_29.jpg


There, tomorrow should get me through the rest of the stbrd 1.2m strip of deck.

Hope you lot in the isle are surviving and not flooded.
cheers

V.
 
Last edited:

rbcoomer

Active member
Joined
23 Nov 2010
Messages
3,329
Location
The Tropics of the English Riviera!
www.swfbr.org.uk
Hi Vas,

Love the Tango'd look! :D I didn't even know anyone made a tarp in that colour - kinda has a lifeboat look about it.

Sorry to see you have yet more manky wood to pull out - it really will be Trigger's Broom when you're finished won't it? It's a bit of a eye-opener to me that it didn't fall apart on the previous owner - did he use it? I guess you're very lucky you have the skills to restore or it would have been an EU sized budget to put right and MiToS has a saviour as she would likely then likely as not have ended up rotting away in the corner of a yard somewhere :(

What's 'COLD' where you are then? I'll bet it's still double figures :rolleyes: Lowest I've had so far is -3.2, but we're in the SW corner of UK so warmer than most! (Mainly dry for me this week too - the East coast seems to have borne the brunt of current storms.)

Looking forward as always to the next instalment...

All the best,

Robin
 

MikeBrazier

Member
Joined
17 Sep 2001
Messages
163
Visit site
Thanks for the update Vas, I didn't nag you this time because I guessed you would have been busy at work.

Always good to see your project progress, you must be running out of places where it is possible to find rot by now so I would think that things will really start to move on for you.

Mike.
 

vas

Well-known member
Joined
21 Jun 2011
Messages
8,016
Location
Volos-Athens
Visit site
Hi Vas,

Love the Tango'd look! :D I didn't even know anyone made a tarp in that colour - kinda has a lifeboat look about it.

Sorry to see you have yet more manky wood to pull out - it really will be Trigger's Broom when you're finished won't it? It's a bit of a eye-opener to me that it didn't fall apart on the previous owner - did he use it? I guess you're very lucky you have the skills to restore or it would have been an EU sized budget to put right and MiToS has a saviour as she would likely then likely as not have ended up rotting away in the corner of a yard somewhere :(

What's 'COLD' where you are then? I'll bet it's still double figures :rolleyes: Lowest I've had so far is -3.2, but we're in the SW corner of UK so warmer than most! (Mainly dry for me this week too - the East coast seems to have borne the brunt of current storms.)

Looking forward as always to the next instalment...

All the best,

Robin

Robin,

I had the option of white, blue and orange. I opted for orange (and had to wait for 2 days to arrive :p ) Well, actually I had to wait for delivery of any colour as it wasn't in stock in Volos...

Re falling apart, believe it or not, these things are heavily overengineered (although they seem thin and flimsy) A solid keel (which seems to be the case in mine) and frame give the structural rigidity for it to float for a long time. Now, if she would get into a F9+ bashing about, I don't know but unless she'd get in the danzi (iirc) cigarette situation that someone posted less than a year ago stupidly going across a 3-4m wave at full speed (braking hull of craft and bones of passengers) she should be ok. Yes, PO was using her regularly.

Re COLD, means cold. Yesterday was 4-9, today 2-9 but with clear skies and sunshine that means you may be on a tee-shirt on covered areas and in need of a decent ski jacket when the wind blows (not too much today, but coming down from the N which means the snow of Pelion and further up north Olympus it's COLD!)


Thanks for the update Vas, I didn't nag you this time because I guessed you would have been busy at work.

Always good to see your project progress, you must be running out of places where it is possible to find rot by now so I would think that things will really start to move on for you.

Mike.
Not to worry, once I get something worth posting I do it, mind xfering photos from mobile, sorting out, pshoping and converting in right size, naming, xfering to my server, writing the post means half an hour min each time I do a reasonable sized post...


So, two pics from last days work (3h until there was a power cut across the city for an hour and went back home)

aftdeck_rebuilt_30.jpg


next photo shows the stbrd side 250lt water tank secured against the e/r bulkhead. You can also just see the 9.9 two stroke merc outboard that has been lying there for 2full years :eek:

aftdeck_rebuilt_31.jpg


Note a design discontinuity in lazerette ending where the deck is removed ie further aft compared to the salon sliding doors. Now this goes all the way down to the frames (which I find v.stupid and plan to change and need confirmation from the experts). So bear with me:

There are used to be 4.5 discreet bilge areas in MiToS, now down to 3.5 or maybe 3. From bow to aft:
  1. Bow cabin (now bow and two heads) A merge of the old crew cabin, barely touching the water and the old bow cabin.
  2. Port and starboard cabins
  3. engine room
  4. lazerette

Assuming you can count :p that's 4. HOWEVER, bow cabin and the prt/strbd ones are NOT fully separated up to cabin floor level (that's an original construction approach not something I did with the bulkhead alterations!) Hence I have toconsider them as ONE.

Further e/r vs lazerette the connecting holes through the frames mean that e/r finishes one frame too early and lazerette "claims" the aft frame of the e/r!
That I find plain stupid. So I plan to have:

  1. Cabins+heads (all in one)
  2. engine room (properly isolated from the bulkhead to the cabins towards the bow to the e/r lazarette aft)
  3. lazerette (bear in mind there's a proper (and v.nice looking btw) door from the lazerette to the e/r.

Any objections?


The other one is going to the lazarette bulkhead and will be connected to a 3X1.25inch custom made collector as a manual bilge pump system. MiToS originally had a 3/4inch collector and a manually switched pump with flex hose connections to the three main bilge sections.
This uprated manual system will be supplemented with two independent auto systems, one in the e/r and one in the cabins. Plus two of these waterwitch sensors hooked to the BMS sending text messages if something goes wrong. I hope that's enough to keep her floating :rolleyes:

This is the collector I mentioned above (old vs new) so a serious upgrade on the manual bilge pump setup:

manualbilgecollector_1.jpg


and the Q of the w/e:

Do I need these fancy (mainly plastic!) bilge switches for the two auto bilge pumps???

It's not a matter of buying them, v.cheap but its a combination of:
finding a reasonable place to install them (may end up putting them both in the lower helm!)
questioning the NEED for them since they'd be on AUTO all the time!
further if I want them off I can turn off the fuse in the el.panel as there's a dedicated fuse for "pompa sentina".
If I want a manual override, I might as well use the manual 1.5inch diaphragm one which has a much greater capacity and can work for hours with no problems

am I missing something?


cheers

V.
 
Last edited:

MikeBrazier

Member
Joined
17 Sep 2001
Messages
163
Visit site
Do I need these fancy (mainly plastic!) bilge switches for the two auto bilge pumps???

I would think that the only benefit to one of those panels with an Off/Auto/Manual switch would be for if you run in to problems and the float switch fails to operate, with a good float switch and another backup available there should be no reason for it and just float switch would be fine.

Mike.
 

vas

Well-known member
Joined
21 Jun 2011
Messages
8,016
Location
Volos-Athens
Visit site
Vas, have to say that you are an inspiration to anyone undergoing a refurb, keep up the great work....:)
thanks Rob, however, I have to point that there was no update from your project for some time now, what's up? :p

I would think that the only benefit to one of those panels with an Off/Auto/Manual switch would be for if you run in to problems and the float switch fails to operate, with a good float switch and another backup available there should be no reason for it and just float switch would be fine.

Mike.
hm,
you have a point.
actually, both auto pumps and the manual take from the same feed. So, effectively if one of the auto fails on ON, then if I turn the fuse off, I cannot use the others :(

Maybe I should get them switches after all...

Progress!

finished with the deck ripping on the stbrd side on Fri, today George came to help handling ply and after a good 8h work we managed to glue/screw the 1/3 of the aft deck in place. Nicely tucked under the iroco beams on stbrd and aft side.

aftdeck_rebuilt_32.jpg


aftdeck_rebuilt_33.jpg


aftdeck_rebuilt_34.jpg


ply in place:
aftdeck_rebuilt_35.jpg


finished at 6pm, was dark, clear and getting chilly:
aftdeck_rebuilt_36.jpg


Plan is to rip the port side tomorrow and Monday afternoon (weather permitting) and put the port side in place on Tue. Before anything else, I'll treat the ply and put the first layer of cloth and epoxy tomorrow folding it up to the bulkhead/side frames making it into a decent watertight layout.

The bit in the middle is a tad more difficult as it involves removing/checking/paintstripping/refitting the hatch but would really like to finish with it before I go to Athens for xmas.
 

vas

Well-known member
Joined
21 Jun 2011
Messages
8,016
Location
Volos-Athens
Visit site
Vas, I guess you will need some drains in the deck corners?

correct Paul.

Originally there was just a round cornered drain around an inch high by the gap between the frames (approx. 250mm). Currently it's a bit of ply missing on both sides, last two frames before the transom. Clearly visible in the 2nd and 3rd pic.
I'll keep them or actually recreate them, not sure I like the idea of plain hole in the hull side though. Not to mention that these holes are large enough to loose pens, mobile phones and other bits and bobs. Maybe add a grill on the inside unless someone has any other ideas?

V.
 

MapisM

Well-known member
Joined
11 Mar 2002
Messages
20,435
Visit site
these holes are large enough to loose pens, mobile phones and other bits and bobs. Maybe add a grill on the inside unless someone has any other ideas?
I'm afraid if those holes would be smaller than a mobile phone, they wouldn't be man enough for their job, if and when you should need them for some green water, rather than just draining the hose fresh water while washing the boat! :D
Never seen any grills on them on any boat though, and I can't think of any better idea, either....
 

longjohnsilver

Well-known member
Joined
30 May 2001
Messages
18,841
Visit site
I'm afraid if those holes would be smaller than a mobile phone, they wouldn't be man enough for their job, if and when you should need them for some green water, rather than just draining the hose fresh water while washing the boat! :D
Never seen any grills on them on any boat though, and I can't think of any better idea, either....

Many years ago I remember reading a report about a boat which had sunk. It was found that the skipper had decided to put neoprene flaps on the scuppers to stop water coming back in. But instead of fitting them on the outside he put them in the boat and then got caught out in some heavy weather.

I wouldn't fit grills, if they get clogged up with debris you could be in trouble!
 

rafiki_

Well-known member
Joined
19 Jan 2009
Messages
11,978
Location
Stratford on Avon
Visit site
correct Paul.

Originally there was just a round cornered drain around an inch high by the gap between the frames (approx. 250mm). Currently it's a bit of ply missing on both sides, last two frames before the transom. Clearly visible in the 2nd and 3rd pic.
I'll keep them or actually recreate them, not sure I like the idea of plain hole in the hull side though. Not to mention that these holes are large enough to loose pens, mobile phones and other bits and bobs. Maybe add a grill on the inside unless someone has any other ideas?

V.
On most boats that I have seen, the drains are piped to an outlet on the transom. I think grills are a good idea, as they should prevent thinks like canopy fittings disappearing down, and being a nightmare to recover. I am making some up for Rafiki.
 

kashurst

Well-known member
Joined
10 Oct 2003
Messages
11,291
Location
Spain
Visit site
Deck drains

Hi Vas
I am amazed at your determination and craftsmanship. Mitos is coming along really well now, thanks for posting.
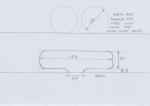
regarding the deck drains, you want them as big as possible and definitely don't put grills on them. Just a couple of examples of why not -
one spring after leaving boat (Sealine 410 - enclosed cockpit no transom door) for a month or so came back to find the cockpit with 6" of water in it. The deck drains on that boat where two 30mm diameter skin fittings set into a trough at the base of the patio door. They were blocked with just twigs and leaves that had blown in through the canopy as wind/storm had collapsed the "tent" covering the flybridge exposing the stairs to the cockpit. The water was just running over the top of the base of the patio door soaking the carpet. Annoying and easy to fix. Another boat a targa 43 had two deck drains inset below the engine hatch with a grill built in to it on a 5mm by 5mm pitch. I used to have to clean them all the time as just bits of fluff, dust hair etc constantly collects, blocking them. This caused a future problem as when they were blocked, the water ran along a different path along the outside of a drainage pipe and dripped onto the jubilee clamps securing the hose from the turbo charger to the inlet manifold. You couldn't have created such a route if you really tried. Some years later the clamps rotted away and failed loosing boost. again annoying and its surprising how much volvo can charge for a posh jubilee clip.

But the big reason for having great big deck drains is for when you get caught out by the sea and you get a cockpit full of seawater. I generally don't go looking for trouble but I had a scary experience a year ago and ended up with a cockpit full of water, believe me you want it gone as fast as possible.

From your pictures I dont think you have a transom door which make a great cockpit drain if there is no lip, so you really want a couple of big holes in the sides that will let a load of water out quickly, because if it can't run out, it will run inside!
I have done a little sketch as a starter idea that will let out a lot of water quickly but leave a lip to stop your mobile/pen/keys/sunglassess shooting straight out. Rafilki if you see this, you really don't want to put grills on your deck drains, spend the money on a few spare canopy fittings instead and a length of the plastic coated spring that old ladies use for hanging net curtains with a little hook on the end, You can usually either hook out anything thats gone down the drain or push it all the way through. Hope this helps.

deck scuppers.jpg
 
Last edited:

vas

Well-known member
Joined
21 Jun 2011
Messages
8,016
Location
Volos-Athens
Visit site
thanks guys for all scary stories and ideas :D

so, we establish that the holes on the hull side are called scuppers (thanks LJS and kashurst!) and since there seems to be a bit of a confusion on MiToS setup let me elaborate:

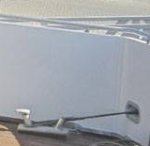
on each side there are two openings/scuppers at the deck level which are approx. 150X30mm and 250X30mm respectively as seen on this pic
translom_side.jpg

NOTE, there's no "inner" skin so to speak originally, so the hole is just on the hull, while the inner lining of the aft deck stops 100mm short to let all water out.

Deck area is 3.6mX2.0m so reasonably large, transom is equally high at around 600 on the corners and 650 in the middle and there's no transom door.
Further, there's a 3/4inch drain off the lazarette hatch opening (we'll all see more of it when I rip it off this week, strip around a kilo of paint and a couple of kilos of sealants out of it...) that goes to a skin fitting above w/l on the transom.

Kashurst, scary story with wet carpets and water everywhere, wouldn't like that happen on my ply salon deck, thank you.
I like your sketch, my only concern is aesthetics as you can see it's fully visible on the side of the hull.

However, this got me thinking that maybe my new layout should feature a full inner skin going right down to the deck, block the hull scuppers as they are, and drill the massive 100mm dia hole kashurst suggests with an exit on the transom on each side just under the bathing platform and above w/l. Pipe is going to be a rather short run with an easy curve, unlikely to block or drink sunglasses and mobile phones :D
Got to think access to the top of this deck hole though as if things manage to slip through the slot they'd get stuck in this 160X70 or 270X70 area for ever :(

what do you recon?

cheers

V.
 

kashurst

Well-known member
Joined
10 Oct 2003
Messages
11,291
Location
Spain
Visit site
I've been trying to think of a better solution, but

You often get waves/swell hitting your transom either when moored or anchored or out at sea - I have a feeling that you may well get a bucket full of seawater whooshing up your 4" pipe and soaking everything in the cockpit.
If your deck is cambered the drain should be on the sides rather than the transom.

Also I wouldn't put a 100mm diameter hole close to the water line without a really good reason - difficult to block if something fails

I think fitting an inner skin in the cockpit could help disguise the scuppers as you could offset the drain holes so you wouldn't see straight through them.

Probably not cosmetically the best solution but its a safe solution that you/George could create with some style.
 

rafiki_

Well-known member
Joined
19 Jan 2009
Messages
11,978
Location
Stratford on Avon
Visit site
My Snazi has 2 x 20 mm drain holes in the stern corners. These drain down a pair of hoses to skin fittings in the transom. These therefore are too narrow for water to backfill, but large enough for any rain or other water to drain down. They are small enough for things to drop down and get trapped which is why i am going to cover them with grills. I would not want anything with a larger diameter, as it would be unnecessary and intrusive.
 
Top