Bestevaer 49

The chain will probably be 120m of 12mm G4. At this stage we have not planned details such as a spare rode.
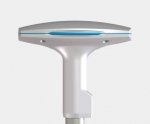
 
If the windlass is fitted then you are almost, committed to 12mm - but 120m x 12mm x G4 is well over strength and immensely heavy. Its a good thing you have a Maxwell windlass :) - I'd hate to need to retrieve by hand.

It depends on how adventurous your are going to be but I predict (given the yacht you will have and if you use it to its potential), spare rode, stern anchoring gear, including rode (in addition to spare) and 2-4 shore lines of 200m each. You obviously don't need them for sitting around in the Med - but other locations? - it will be difficult/expensive or messy to retrofit.
 
I thought they may be some interest in some of the electronic equipment that is to be installed.

Thrane LT1000 GPS compass:

This is an interesting product. Until recently GPS compasses have been very expensive and only used on larger ships. Lately they have come down in price and there have been a number released, mainly by Simrad.

A conventional GPS cannot provide any heading information, only COG. In other words the GPS does not know which way the bow is pointing, only the direction in which it is moving. A GPS compass uses two GPS units and from this information can deduce direction. This is combined with a number of gyros and a conventional fluxgate compass to smooth the output and provide a back up if the GPS signal is lost, for example inside a tunnel.

The technology has the potential to provide better heading information than the best 3D gyro compasses. The primary advantage is that accurate heading information helps the autopilot steer more accurately, but it also has benefits synchronising a radar/chart/AIS overlay and gives improved accuracy for MARPA.

A secondary benefit is they tend to produce a more accurate position output, so for example SOG is stable.

The Thrane unit also has a number of other outputs that are useful. These include the heel angle, trim angle (the amount the bow or stern is pitching), rate of turn, barometric pressure and air temperature. It sends this information out simultaneously on NMEA 0183 and NMEA 2000. Some GPS units that transmit NMEA 0183 and NMEA 2000 force you to select one or the other.

So far I have only mounted the unit in my workshop, so a full report will have to wait until the boat is launched. Installation is easy. The unit can even be switched to include a termination resistor if you want to have it on the end of a backbone. The only difficulty is that to work well it needs to be mounted with a reasonably clear view of the sky and free from multi path distortion. On the plus side, there is less concern with magnetic fields such as from electric wires, providing these are kept a reasonable distance away.

Some parameters can only be adjusted via PC, but there is no need to do this if the compass is mounted level and in line.

The initial impression is very favorable. It responds very rapidly to any heading change and the readout is completely stable if the heading is unchanged. The heading information is slightly changed when there is nearby magnetic field. Much less than a traditional electronic compass, indicating it is primarily using the GPS signal, but obviously integrating a flugate compass together with the gyro into the heading output.

One negative is that the temperature reading is accurate, but the unit slightly heats up, so the temperature is a couple of degrees above the actual air temperature. This would be less with some airflow, but the compass is likely to heat up from sunlight. An offset to the temperature is possible but accuracy is likely to be poor.

The unit is reasonably small for a GPS compass: only 151 mm (about 6 inches) long. This makes it far more practical to mount on a yacht, but it reduces the separation of the GPS units. This will have some effect on the performance and it will be interesting to see how good the heading information is in practice. On the plus side, the compass has more sophisticated GPS units and gyros than the opposition. The claimed heading specifications are more accurate than the equivalent Simrad unit, but it is hard to compare numbers from different manufacturers.

If nothing else, the Thrane unit should provide very accurate 10hz 72-ch. GNSS and GLONASS GPS unit together with useful outputs like the angle of heel and air pressure. It is about 2.5 -3x more expensive than a good quality conventional GPS. Not cheap, but arguably worthwhile for these features alone, even ignoring the heading information.
 

Attachments

  • IMG_1972.JPG
    IMG_1972.JPG
    9.1 KB · Views: 0
Vesper Vision

I have hooked this up on a temporary basis on land. We are on the water's edge so there are plenty of ships on collision course :). This gives an opportunity to try the unit and this is my impression so far:

Firstly the software is brilliant. The dangerous targets are colour coded in two stages (orange and red) and made larger on the screen. In a cluttered waterway this makes it easy to see the ships that have collision potential. The software on the anchor alarm is also much better than is available on most chart plotters, enabling a sensitive alarm with no false positives to be set.

The unit connects easily to virtually any chart plotter, has an internal GPS aerial and also sends this information over wifi so the AIS or anchor alarm can be seen (and controlled) on tablets or smartphones. This is ideal for monitoring the anchor alarm by the bed. The wifi signal is independent of display on the unit so you can have the anchor alarm displayed on your smartphone while the unit displays AIS information. Or two ranges of AIS.

The other great feature is low power consumption. This is especially helpful when using the anchor alarm, as the unit will be on all night.

Drawbacks:

There are going to be newer, higher powered class B transponders released in the near future so if you can hold off purchase it may be sensible.

The Vesper screen is quite low definition with a poor viewing angle by modern standards. This helps contribute to the lower power consumption and the information can seen on the chart plotter or tablet in better definition, but much better screens are available.

The anchor alarm also displays distance to the anchor, bearing to the anchor, heading and depth. All great information, but apparent wind speed would also be useful when monitoring the anchor alarm. This should be a simple software change so perhaps Vesper can incorporate this in the future.

The AIS information is easily displayed on the chart plotter (just plug and play for NMEA20000, but the clever filtering information is not reproduced on the chart plotter (unless there is way to do this that I have not found). I can understand why, there are no NMEA sentences to transfer this information, but perhaps a way around this problem could be found in future. The filtered information is sent over wifi.

One other glitch I have noted concerns the wind speed alarm.

The wind speed alarm is useful when using the anchor watch. There is also a wind shift alarm, all great features.

However, there appears to be a software bug that when the windspeed drops to zero (but the anemometer is still connected to the NMEA network) an alarm sounds to inform that wind data has been "lost".

Power consumption is important and there is very little data from manufacturers so I will post some numbers, which may be helpful.

So @ 13.8v my Vesper Vision in receive mode (I cannot test transmit at the moment) wifi on, with an external GPS aerial is consuming 0.45A at full brightness . At 50% brightness this drops to 0.35A. Interestingly 0% brightness saves very little extra power with a consumption of 0.33A. I expected "Night mode" (a red a black display) to be lower, but it was almost exactly the same.

So if you are setting an anchor watch all night and want to save a little power turn the screen down to 50%, but there is little point going lower, unless the aim is preserve your night vision.

These numbers are very good. Using the Vesper instead of a typical medium sized modern chart plotter for the anchor alarm will save roughly around 1A for most installations. So overnight something like 10 AHrs less (for a 12v system). Older or larger chartplotters often have higher consumption so the savings will be greater.

I will report more when I have installed the unit permanently. Vesper also sell a version without the screen and a version with no screen and no wifi.
 

Attachments

  • IMG_2013.JPG
    IMG_2013.JPG
    26.9 KB · Views: 0
The timberwork has received its last coat of oil and looks truely spectacular. Unfortunately, it is very difficult to catch the effect in a photo. The depth and three dimensional detail of the grain does not show up, particularly the way it changes when it catches the light as you move around.

We specified solid timber rather than veneer. This has the advantage that any marks can be be sanded out without worrying about penetrating a thin layer, but it also gives the timber a wonderful glow. In some large areas this has been attached to plywood backing for stability, but all the timber seen is a minimum of 8mm even when this has been done.

Our request has given the carpenters at KM a lot of headaches. They sent back two whole boat loads of timber, much of which had already been milled to size before they were satisified with the quality.

I will try to take some better photos, but this drinks cabinet that is next to Refleks stove shows some of the detail of the grain. Its too nice to put anything on top :). The two black pieces sticking up are just temporary spacers used to fit the lid correctly.

lwlddlS.jpg
 
Solar installation.

Solar power has produced virtually all our power on our last two yachts. As we will be living aboard this yacht, as we did with the last one, reliable, efficient solar power is essential.

We have installed 3 x Sunpower 335w panels. These are efficient at 21% and by all accounts have good low light and hot temperature performance. Shade is big killer of solar power and our installation is in a very shade free location (for a boat). We have resisted the temptation to install antennas, aerials and radar where they will cast any shadows.

There are two fundamental options when installing a solar controller for this sort of sized installation. The first is one of the large good quality controllers such as the Outback or Midnite. These are wonderful controllers. They track the MPP very well, and have an efficient voltage to voltage conversion. They also have important battery control features (especially important for gel batteries) such as terminating the absorption using battery return amps and proper temperature compensation. The biggest drawback is that when multiple panels are connected they can only use one input voltage. Finally, they have reasonably high self consumption which can really hurt the output on very poor days, which is when you most need an efficient system.

We took this approach with our previous boat, fitting an Outback controller and were very happy the results.

The second approach is to fit a greater number (often one per panel) of smaller controllers. The biggest advantage is redundancy and the ability to track the powerpoint of each panel separately. This latter feature is very helpful when panels are mounted in different locations and/or subject to localised shade. The drawback is the controllers are less sophisticated. The tracking is potentially less precise and most of the features such as using battery return amps and on some units even external temperature compensation are not available. Self consumption is potentially higher because there are more units, although each unit tends to have lower self consumption because the processing power is less.

The cost of one large controller tends to similar to multiple smaller controllers, although this can vary depending on exactly what is needed.

With the new installation we have adopted the multi controller approach with three Victron Smartsolar 100/20 units (one per panel). The primary reason was redundancy. As we live aboard, reliable solar power is essential. Rigid solar panels are very reliable but the same cannot be said for MPPT controllers. The cheap units are very prone to failure and even the expensive units have a reasonable number of breakdowns. Our old system used "12V" panels. So with some care and supervision it was possible to connect the panels directly to the batteries in the event of controller failure. The new panels have a much higher output voltage. It is still possible to connect these high voltage panels directly to batteries, but the output is reduced, and critically if the battery voltage is not monitored very carefully there is the real chance of destroying all the electronics in your chart plotters, instruments etc. In most circumstances it would not be worth the risk. So relying on single controller has far more potential to leave us with no solar power.

The all important performance of the new system will be interesting to see. Data on issues that have an important impact on output such as self consumption, voltage conversion efficiency and tracking ability are often not documented.

I will write another post about why I chose the 100/20 model as opposed to some of the other sizes that are available and could have potentially worked.
 

Attachments

  • IMG_2077.PNG
    IMG_2077.PNG
    94.6 KB · Views: 0
Does "... terminating the absorption using battery return amps" mean "switching from absorption to float when the charging current drops below a certain value"?
 
No, it means terminating the adsorption phase when the battery current drops below a certain value.

The charge controller will still be putting out a higher current, as some of this current will be effectively used by the loads. Many charge controllers will terminate the absorption phase when the current output of the charge controller drops below a certain value, but this is not much use on a boat unless the boat is unoccupied.

Terminating the absorption phase on battery return amps is the most precise way of judging the absorption time, but only a couple of the larger more expensive controllers will do this.
 
Ping! I was thinking they were the same thing - I'd forgotten about the current absorbed by other loads. Now I understand, thankyou.
 
Choice of controller :

Sizing solar controllers always causes confusion so I thought I would outline the reasons for picking the 100/20 units.

The first number (100) refers to the maximium input voltage. The panels have a Voc of 67.9 V and one controller will be used per panel. So at first glance the Victron 75 V models (which are slightly less expensive) would be fine. However, it is important to realise that panels can occasionally produce voltages over the Voc listed in the specifications.

There are several reasons for this. Firstly, solar panel voltage is related to temperature. The 67.9 V is for a panel temperature of 25°C. Lower temperatures will produce higher voltages. Secondly, the solar panel rating is for conditions of 1000 w/m2. This is very bright, but illumunation levels can briefly exceed this in some conditions. A sunny day with scattered cloud is the most common. The panels can briefly receive both direct sunlight and light that is reflected from a cloud. This is called "the cloud edge effect". Finally, good panels are sold with a guarantee of performance. The Sunpower panels have a 0 to +5% rating. This means you can be lucky and receive a panel that is 5% over specification. Most of this is in greater voltage.

The reason this is important is that if the input voltage is exceeded even briefly, the control unit is very likely to be permanently damaged. So most manufacturers recommend the input voltage of the controller is greater than the Voc by at least 15% (more does no harm), so the 100v unit is needed.


The second number is the maximium current the controller will handle. The panels will only put out a maximium 6.23 A and the Imp is 5.85 A. So many people make the mistake of using this number a thinking a 10A controller would be plenty. However, the contoller will take this input and convert this to higher current at a lower voltage to feed the batteries. The controller needs to be rated for the output, not the input current. The maximium output current can be easily estimated. With a 12 V system we take the rated wattage of the panel and divide this by the lowest battery voltage while the solar panels are charging. 13 V is a reasonable number. 335/13= 25.8 A. From this we should deduct at least 5% for losses in wiring and voltage conversion. So this is 24.5 A. This is the very highest you are ever likely to briefly see. The good news is that unlike voltage, most solar controllers will self protect if you try to exceed their current rating so you can size the controller smaller and accept there will be a slight loss of power under exceptional conditions.

With our 24 V system the above numbers are halved so each controller is very unlikely to put out more than 12.3 A even briefly. So the 100/15 unit would be suitable choice. I actually went slightly bigger and purchased the 100/20 unit. The 20 A unit was only slightly more expensive and it gives the option, in the event of one controller failing, of connecting two panels to one controller with very little loss of power. MPPT controllers are not fantastically reliable units so this redundancy is valuable. The other bonus is the controller is likely to have a longer, more reliable life. The 20 A unit has a larger heatsink than the 15 A unit and will run a little cooler. This is especially important for passively cooled controllers. MPPT controllers become very warm on occasions.

Victron currently sell Bluesolar and newer Smartsolar units. The only difference I can find is that the Smartsolar units have the wireless communication to a tablet or smartphone built in. This can be added to Bluesolar units with a bluetooth dongle. The Bluesolar units are being sold on special at the moment, but if you want the bluetooth capability, the Smartsolar units are cheaper than buying the Bluesolar units and the dongle.
 
Last edited:
Fuel filtration:

Feeding the engine with clean fuel is one one the most important things you can do for engine reliability.

There are three Racor 900 series filters. These are large filters for our sized boat, but if there is a problem with dirty fuel, large filters are valuable. For example the Racor 900 will filter over four times the amount of fuel than the slightly smaller Racor 500 series will before clogging.

I have seen boats with diesel bug problems that have needed to replace the primary filter every 15 mins of run time. Of course, it is much better to avoid these problems, but when cruising remote locations fuel quality may be poor. Large filters help buy you time and options if you inadvertently pick up dirty or water contaminated fuel.

One of the three filters is dedicated to the polishing system with a pickup at the very bottom of the tank. The second filter normally functions to filter the fuel before it enters the day tank, but if there is a problem with the day tank the engine can be fed directly from this filter. The third filter further filters the fuel from the day tank, which is then fed to the engine.

So for normal engine operation, which is via the day tank, the fuel has been filtered twice, even ignoring the polishing system, before it enters the engine and the normal secondary engine filter.

This photo shows two of the filters. These are mounted under the aluminium anodised workbench in the workshop/technical area.


r5cKceA.jpg
 
Presumably the main tanks are part of the hull, so they can't have sumps and drains, by far the best defence against water and dirt?
 
Presumably the main tanks are part of the hull, so they can't have sumps and drains, by far the best defence against water and dirt?

They can still have drains, in the form of a dip tube to the very lowest point. If they're at the bottom of the hull then they can't have sumps, of course, without a strange appendage below the boat :)

Any plans for vacuum gauges to show how clogged the filters currently are?

I see you have jubilee clips on the hoses. So do I, but after I'd finished building the system I wondered if I should have gone for those ear crimps instead.

Pete
 
Any plans for vacuum gauges to show how clogged the filters currently are?

My first though too - surely if you are going to the trouble of fitting a system like that you should also fit a vacuum gauge so that you can see what is going on and potentially switch out a clogged filter before the fuel flow stops?
 
Not tempted by glass bowls, so you can see the build up of crud?

Yes a good point it was a tough choice but in the end I went for the all metal filters. This is the reasoning.

The Racor turbine series of filters are available with three different types of bowls: a clear plastic bowl, a clear plastic bowl with a metal shield around the lowest part, (the metal shield increases the time before the the plastic bowl melts if there is fire) and the version shown here with an all metal bowl.

The plastic bowl enables any water accumulating in the lower part of the filter to be seen without draining a sample from the bottom tap. It is a great feature. We had the plastic bowl version of the Racor 900 filters on our old boat and it is very reasuring to see nice fuel in the bottom of the filter. It is something I will miss, although we never detected any water in the fuel in 10 years.

However, as with every equipment decision, there are pro and cons. The plastic bowl does occasionally crack, mostly if the filter is accidentally knocked, but they seem to become a bit more brittle with age. You also have to be careful with the torque of the bolts when the filter is resembled after a thorough cleaning.

Problems are not common, but with the aim of installing the most durable, fuss free, and dependable fuel system, the rigid and durable all metal bowl has some advantages. The filter can take a beating and the all metal bowl is safest if there is a fire. The assembly of the metal bowl is less critical. The bolts holding the lower bowl in place can be tightened to ensure an air tight seal (diesel has an incredible ability to find the tiniest gap) without a risk of cracking the plastic bowl.

The drawback of the metal bowl is convenience. To check the fuel you need to loosen the nut at the bottom and collect a sample. While this is more trouble than looking through a clear bowl it has the advantage if you decant into a clear glass jar that you can more easily see small amounts of water and contamination and also better judge the clarity of the fuel, which can be hard to see when through the thick, curved, tinted plastic bowl.

To offset this inconvenience the filters in the new boat are very easy to access. They are mounted in the technical area/workshop rather than the engine bay. So taking a sample should be as easy and quick as checking the engine oil.

The polishing filter takes fuel from the very bottom of the tank and filters much more fuel. Perhaps a hundred times the amount of fuel the other filters process, so this filter will show problems well before any of the others. If there is no water and crud in this filter it is hard to imagine a mechanism that would cause the other filters to be worse. Normally this would be the only filter that needs checking. The polishing sytem is seperate from the engine supply so if any air is introduced when the fuel sample is collected it cannot effect the main running of the engine. The all metal bowls mean I dont need to be concerned about knocking the filter or something falling against the filter and breaking the bowl.

Even with the plastic bowl models I still took a fuel sample from the bottom of the filter once a month to better check for the earliest sign of a problem, so I don't think a weekly, or even daily fuel sample will be much extra work, given the filters are so easy to access. Time will tell if this was the right decision.
 
Presumably the main tanks are part of the hull, so they can't have sumps and drains, by far the best defence against water and dirt?

Yes, you are correct. With a tank that is integral with the the hull a sump is hard to fit, although in some designs part of the keel can be used.

There is a polishing system pick up from the very bottom of the tank, which partially makes up for the lack of a sump. and under normal operation the engine is only fed from the day tank.

The day tank has a very large sump area with a valve and drain. Because it is mounted higher (so the day tank can gravity feed the engine even if the engine lift pump fails) the sump is very easy to access and drain. However, it is unlikely the day tank will pick up water and crud as all the fuel that enters this tank has already been filtered from the main tanks by one Racor filter.

There is another Racor filter between the day tank and the engine, so normally the fuel passes through two "primary" filters before entering the engine. If there is a problem with one filter, or with the day tank itself, the fuel can be fed via one filter direct from one of the main tanks.
 
Last edited:
Thanks for all the nice comments.

The galley bench-tops have just been fitted. My wife is a keen cook so the galley is an important part of the boat.

The brushed stainless steel bench-tops are surrounded on all sides by a welded raised square profile lip. This contains minor spills and removes the need for a sealant around the edge which invariably becomes mouldy with time.

The central bench-top has an integral handrail along its length which follows the curve of the rear section and has been beautifully finished by KM.

Much of the surface has been covered up for protection while the rest of the interior is completed, but here is a sneak peak.

M5KIHES.jpg


rEKYzvQ.jpg
 
Last edited:
Top