Acrylic window adhesive film thickness

chris-s

Active member
Joined
24 Apr 2019
Messages
577
Visit site
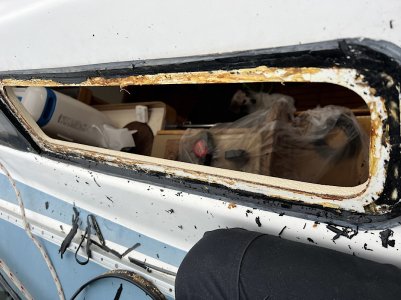
I’m replacing some of the crazed acrylic windows that are bonded with something or other. I’m planning on using either arbosil 1081 or sika 295uv + primers, but am struggling to find the recommended film thicknesses.

Windows are 700mm x 200mm x 12mm with a very slight bow. The adhesive has a minimum of 25mm width around the edges with a black border of paint or primer on the inside. At some point a few screws had been added in the corners and I might do the same.

Initially I thought I could have used some vhb tape but I would need to paint some sort of black border on the inside and not sure what I could have used that would adhere well to the acrylic and the vhb.

Any pointers on film thickness and a source of spacers would be greatly appreciated.

IMG_0037.jpeg

IMG_0038.jpeg
 

Neeves

Well-known member
Joined
20 Nov 2011
Messages
12,231
Location
Sydney, Australia.
Visit site
I’m replacing some of the crazed acrylic windows that are bonded with something or other. I’m planning on using either arbosil 1081 or sika 295uv + primers, but am struggling to find the recommended film thicknesses.

Windows are 700mm x 200mm x 12mm with a very slight bow. The adhesive has a minimum of 25mm width around the edges with a black border of paint or primer on the inside. At some point a few screws had been added in the corners and I might do the same.

Initially I thought I could have used some vhb tape but I would need to paint some sort of black border on the inside and not sure what I could have used that would adhere well to the acrylic and the vhb.

Any pointers on film thickness and a source of spacers would be greatly appreciated.
View attachment 171400

View attachment 171399
Film thickness depends on the adhesive/sealant you choose. Send your chosen supplier an email and ask them. They will have a technical department. I used a sealant adhesive made in Oz, asked the questions but my sealant will be different to yours.

When I refitted acrylic I painted the outside edge with an epoxy paint. If you don't paint the edge you will find you can see the sealant through the acrylic and any white of the gelcoat also shows through. The epoxy paint held the adhesive and the acrylic - and I was working with bigger curves than you.

To hold the curve I used 2 battens, one at each end. I screwed the battens into the underlying structure where the sealant is applied beyond the edge of the acrylic and then filled the screw hole with sealant once the sealant had set off.

I have some pictures of how we did ours - I'll post them later.

Don't rush. :)

Jonathan
 

chris-s

Active member
Joined
24 Apr 2019
Messages
577
Visit site
Film thickness depends on the adhesive/sealant you choose. Send your chosen supplier an email and ask them. They will have a technical department. I used a sealant adhesive made in Oz, asked the questions but my sealant will be different to yours.

When I refitted acrylic I painted the outside edge with an epoxy paint. If you don't paint the edge you will find you can see the sealant through the acrylic and any white of the gelcoat also shows through. The epoxy paint held the adhesive and the acrylic - and I was working with bigger curves than you.

To hold the curve I used 2 battens, one at each end. I screwed the battens into the underlying structure where the sealant is applied beyond the edge of the acrylic and then filled the screw hole with sealant once the sealant had set off.

I have some pictures of how we did ours - I'll post them later.

Don't rush. :)

Jonathan

The epoxy paint you used, that was on the ‘inside’ of the window? Any particular paint? I really don’t want to end up seeing streaks or gelcoat around the edges. That’s one of the reasons I was thinking of using sika with the 209D black primer on the acrylic side and assuming it will create a streak free appearance from the outside.

Thanks for the reply.
 

Neeves

Well-known member
Joined
20 Nov 2011
Messages
12,231
Location
Sydney, Australia.
Visit site
The epoxy paint you used, that was on the ‘inside’ of the window? Any particular paint? I really don’t want to end up seeing streaks or gelcoat around the edges. That’s one of the reasons I was thinking of using sika with the 209D black primer on the acrylic side and assuming it will create a streak free appearance from the outside.

Thanks for the reply.
We painted the side accepting the adhesive - its not an unusual practice, car windscreens are painted (and they usually don't fall out). The paint was, another, local product - described as being an epoxy.

I think you will find your choice of adhesive/sealant is restricted to a choice of suppliers. Most make one formulation specifically for acrylic windows (but I guess used on other windows). 3M make a product, Sika and an Australian manufacturer (FixTech) +..... must be others.

We found out the hard way you need to paint. We applied the sealant as one applies cement for tiles and inevitably there were gaps. We thought that the tops of the ridges would be squeezed to fill the valleys. Our hopes were not of value and we had to take one window off, scrape and discard the sealant and start again. We painted precisely the portion that was the overlap and used making tape to keep the edge as clean as possible as some sealant does squeeze 'out'. We were a bit parsimonious on the outside edge, the rim, and filled any 'gaps' when we 'faired' with a finger the outside edge after the bulk of the sealant had set off.

We had very big overlaps. Our windows looked huge but 100mm of the windows was overlap

We did one window a day and it took 2 of us to apply each window.

More detail and pictures later.

Jonathan
 

Neeves

Well-known member
Joined
20 Nov 2011
Messages
12,231
Location
Sydney, Australia.
Visit site
Here are some pictures.

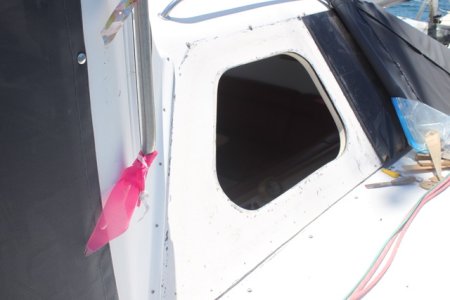
The first one is the cleaned up location. We have removed all the old sealant and ready to go. We chose our weather with care - we did not want to leave Josepheline open to the elements. We applied one window a day

IMG_3073.jpeg

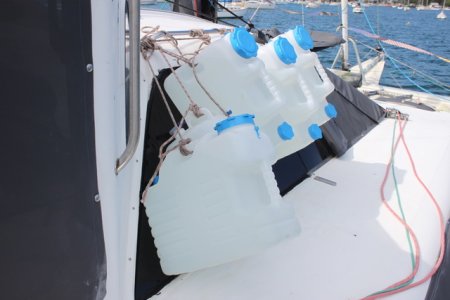
This is the same window with the acrylic applied. We have used 20l water bottles to apply pressure to the window as the sealant sets off. We did think of using those big suckers employed by glaziers and attaching them 'inside' and tensioning with ropes - it was too complex.

IMG_3074.jpeg

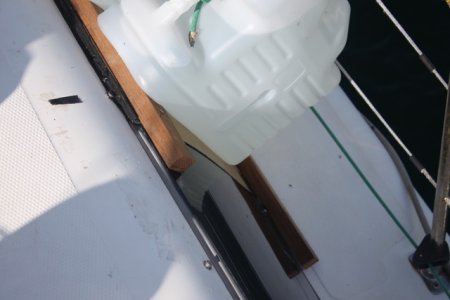
The window, above, is in part of the saloon, and are 'offscreen' to the left in the picture below. The windows below are in the hull, in fact a galley window. Same procedure except the fibreglass is not flat, it has a slight curve, and we have a batten top and bottom, screwed into the fibreglass. We did in fact uncover old holes and the boat builder had done the same thing.

IMG_3089.jpeg

This simply a detail of the picture above and if you are careful (and maybe have a good imagination) see the curve in the window. You can see the screw we used to secure the batten and once the sealant had set, 1 week!, we filled the screw holes, any gaps in the sealant and chamfered the edges, with a finger. You can also see we left the paper film on the acrylic

IMG_3088.jpeg

And a long distance shot of the yacht, the first window, above, is top left, or the aft of the top string of windows.
IMG_4551.jpeg

Jonathan
 

chris-s

Active member
Joined
24 Apr 2019
Messages
577
Visit site
Thanks for all the details. With our boat under a tarp for the winter, the only elements we need to worry about is the cold!

Did you use a particular type of epoxy paint for the border?

If I end up using a few nicely resessed screws, it won’t be the end of the world.
 

Neeves

Well-known member
Joined
20 Nov 2011
Messages
12,231
Location
Sydney, Australia.
Visit site
Thanks for all the details. With our boat under a tarp for the winter, the only elements we need to worry about is the cold!

Did you use a particular type of epoxy paint for the border?

If I end up using a few nicely resessed screws, it won’t be the end of the world.
Paint, nothing special. It was simply described as 'Epoxy' ( and bought from a chandler). Once you have decided which company is going to be favoured with your business - ring them up (or send an email) and ask them to recommend a paint. (My view is they want people to use their product, they have technical departments - helping you, helps them - your money helps keep the technicians in a job - but if you do contact them - they need to know your application details, such as, working in winter, size of overlap, the fact the sealant needs to hold a curve etc

The pdf's I linked are for the specific product we (my wife and I) used. You need to get the similar but appropriate detail for your chosen supplier.

The problem with drilling Acrylic is that you can weaken and have micro cracks at the holes. I am sure it is possible and someone will suggest how to drill to best (or is it least) effect.

Jonathan
 

bluerm166

Active member
Joined
29 Sep 2009
Messages
999
Visit site
The word film is worrying in this connection.
1081 is normally used as a bead between edges and not as a total beddding where it is fully attached to the back substrate.In normal use a foam strip is used at the back of a butt joint to guarantee separation.
Nevertheless you can use it as a 'gasket' plus positioning fixings with clearance and to accomodate inevitable movement it has to have thickness.
I have very successfully bedded our long saloon windows on black 1081 using temporary packing to the perimeter to create an initial 3mm. bed which was fully applied to the back of the acrylic.The original fixings were reused.These are countersunk torx but I note that countersinking is said to increase the risk of cracks .The holes should certainly be oversize to the screw.
The same windows had been twice fixed using neoprene tape/sheet as gasket by experts when we took over the boat but still leaked like a sieve.Have been dry for 6 years.
Having been told by Crittal windows in the 70 s that to back large glass windows on a multi storey building closely with a painted wall that the only colour that we must avoid was black ,you might think that with the large thermal movement of acrylic and a black backing we are asking for trouble - but I do like the effect.
 

thinwater

Well-known member
Joined
12 Dec 2013
Messages
4,304
Location
Deale, MD, USA
sail-delmarva.blogspot.com
In the US nearly all windows are installed using the combination of 1/2-3/4" line of 1/8" thick 3M VHB tape plus a sealant (Dow 795 is most common) around that (at least 1/2" x 1/8" thick). The advantage of using VHB tape is no clamping, and the bond is also powerful and durable, at least as good as the sealant (I've removed windows installed with VHB tape up to 20 years ago).

Try to keep the windows smaller than 30". Longer than that and the expansion failures become far more common.
 

dovekie

Active member
Joined
8 Jun 2003
Messages
394
Visit site
On Southerlies, (glass windows in recessed GRP) the sealant thickness is 6mm. And I gather you can make spacers by squeezing out a bead of sealant on a surface, letting it cure, then cutting spacers of the required thickness from the cylinder of cured sealant. We had ours done by our boatyard, and they used small wooden spacers, and the carefully filled the holes where the wooden spacers were withdrawn. Made a good job of it.
 

Neeves

Well-known member
Joined
20 Nov 2011
Messages
12,231
Location
Sydney, Australia.
Visit site
Try to keep the windows smaller than 30". Longer than that and the expansion failures become far more common.

Owners who are retrofitting cannot change the window size. :). Our windows were huge, failure was not as a result of bond failure in the original fit out but from cracking of the acrylic (after 15 years). There was no pattern to the cracking except always started at an edge (but any edge) and unrelated to whether the window was curved, or not, or very, very large window or one of the few small windows.

Jonathan
 

rogerthebodger

Well-known member
Joined
3 Nov 2001
Messages
12,483
Visit site
Owners who are retrofitting cannot change the window size. :). Our windows were huge, failure was not as a result of bond failure in the original fit out but from cracking of the acrylic (after 15 years). There was no pattern to the cracking except always started at an edge (but any edge) and unrelated to whether the window was curved, or not, or very, very large window or one of the few small windows.

Jonathan

Cracking of Perspex is very obtain to a pressure in the edge of the perspex as I had with my very big laminated glass windows.

To solve this I used foam neoprene that wrapped around the edge so here was a softer material on the edge and preventing a sharp pressure on the edge of the perspex
 

Neeves

Well-known member
Joined
20 Nov 2011
Messages
12,231
Location
Sydney, Australia.
Visit site
In answer to the original question:

What is the correct film thickness?

It varies on the size of the window (bigger window, greater film thickness, to accomodate different thermal expansions), the size of the overlap and the specific sealant/adhesive being used.

The only people who can answer the question are the manufacturers of the sealant/adhesive.

It would be perverse not to actually ask the manufacturer as if you get it wrong your windows may pop out at a very inappropriate moment (and it does happen). I know of one Australian boat builder who changed sealants but did not change practice - windows popped out. Their yachts had been sold and taken to locations all over Australia - because of the risks involved in bring the yachts back to the boat builder they had to send an installer to each location to replace the windows.

Jonathan
 

Neeves

Well-known member
Joined
20 Nov 2011
Messages
12,231
Location
Sydney, Australia.
Visit site
We came back from Tasmania one summer and enjoyed a beam reach of 55 knots. The seas were breaking straight over the cabin roof. For more detail of the windows and overlap see post No 6.
IMG_4754.jpeg
The sealant/adhesive when struck by breaking waves is in compression, its not the sealant (nor screws) you need worry about but the strength of the acrylic in your application (ours was 10mm). The windows were fine - the crew ... slightly apprehensive.

Jonathan
 
Top