AngusMcDoon
Well-known member
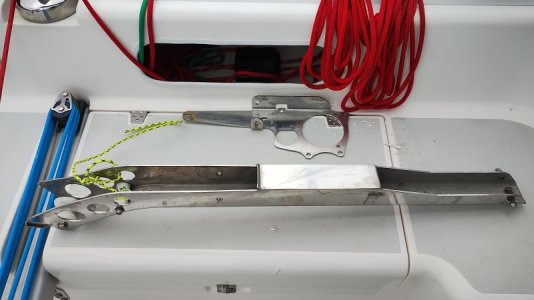
Following my post on what to do with my windlass with salt water in the motor here's an update. First job was getting it off. Although I could get the motor off easily from the front cabin getting the windlass base off was much harder. The body of the windlass is bolted to a stainless plate from underneath and that plate is bolted to the boat from above - but the end of the plate is bolted to and under a channel which leads to the bow roller. All the bolts came out easily but the plate was trapped by the channel so that had to come out as well. Cue battle with reams of Sikaflex which eventually came off, taking chunks of gelcoat with it around the edges.
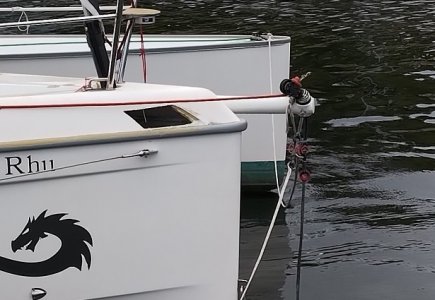
That's where it was...
The plate and channel/bow roller...
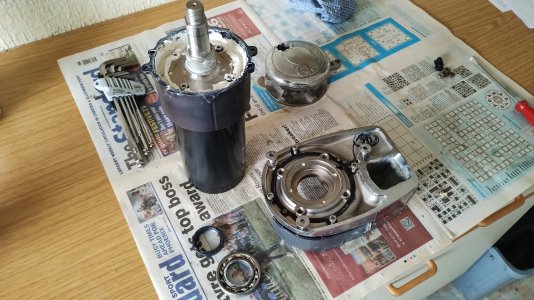
Once the windlass was off dismantling it showed why it was leaking as daylight could be seen through the shaft seal. The windlass itself was a doddle to dismantle needing only a single Allen key. There's no aluminum so there were no seized bolts.
There are 4 bearings - two that are part of the motor, a shaft top bearing which was rough and rusty and a larger sun gear bearing in the gearbox. The shaft seal and the top bearing popped out no problem but the sun gear bearing would need a press to remove. It's not in line with any dripping water, was still full of grease, no rust and running smoothly, so I left that one in place. The sun and planet gears all appear stainless and had no damage.
I had 3 options of what to do - replace the whole windlass with new, replace the motor with new and overhaul the rest, or get the motor overhauled and do the rest myself.
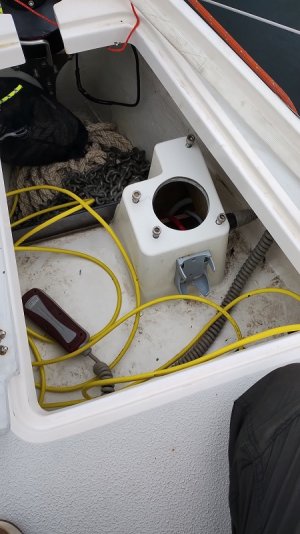
My windlass is obsolete but once I got the base off I could compare it with a footprint of the current model. Quick Italy said that the foot print was the same, but although the 2 major holes for the motor and chain drop haven't changed everything else has. The mounting bolts have moved (which would require base plate work) but also the body footprint is bigger and would now cover one of the bolt holes in the boat. I have a stainless plate fibreglassed into the anchor locker and changing that would be major GRP work, so that was not a realistic short term option.
The stainless plate is within the GRP on the pedestal top...
Option 2 looked hopeful. The current windlass's motor looks identical to mine and a couple of websites even list my model windlass for fitment, but Quick have changed all their part numbers so it was not obvious if it would fit. Both Spares Marine and I tried to find out via Quick UK if it would fit, but Quick Italy just aren't interested in giving out any information on an obsolete model - not even a simple yes/no to do the 2 parts numbers refer to the same thing?
So that left option 3 for the motor. I brought the whole lot home and took the motor off to Clywd Auto Electricals which is an old style workshop knee deep in bits of alternators, starter motors and grime. Within 3 hours they had cleaned it ultrasonically, replaced the brushes, replaced both motor bearings, polished off the rust, skimmed the commutator, replaced the terminals and their insulators, and repainted it - all for £54. Because of their location they do a lot of canal boat work, but they said that my motor was most similar to vehicle winches as found on Land Rovers - and they overhaul a lot of soggy motors for those too for over-enthusiastic off-roaders. They have revitalized far worse than mine from submerged boats.
Quick UK tried to get part numbers or measurements for the top bearing and seal from Quick Italy without success so all there was to go on was the numbers on the parts or measurements. The bearing was easy - a standard still current SKF one. The measurement marks on the seal were too far gone to read but calipers found it to be 40mm x 30mm x 7mm, a common and standard lip seal. SKF do that as well, and both parts came from RS. The seal came in a box of 10, so now I have plenty of spares for a future 2 year replacement schedule.
Reassembling...
So now I have to trundle back to the top of Scotland on umpteen trains and buses with a very heavy bag, and hopefully then good to go.
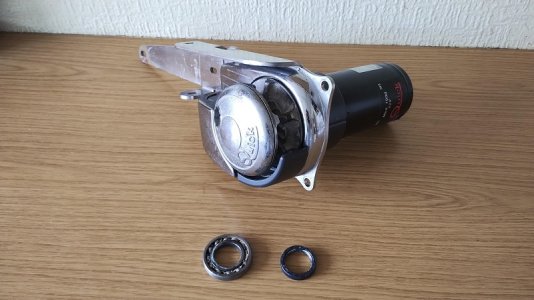
Completed, and the old bearing & seal...
Thank you for the information, suggestions and encouragement in the original thread. It gave me some hope after I had discovered that the current model would require expensive GRP and stainless work to fit. I'd also recommend Clywd Auto Electricals near Wrexham for this kind of overhaul. They are happy to receive and return by courier. Quick UK are friendly and did the best they could, but Quick Italy's response was underwhelming. RS, as always, got the parts to me quickly and when they said they would.
Clwyd Auto Electrical
That's where it was...

The plate and channel/bow roller...

Once the windlass was off dismantling it showed why it was leaking as daylight could be seen through the shaft seal. The windlass itself was a doddle to dismantle needing only a single Allen key. There's no aluminum so there were no seized bolts.
There are 4 bearings - two that are part of the motor, a shaft top bearing which was rough and rusty and a larger sun gear bearing in the gearbox. The shaft seal and the top bearing popped out no problem but the sun gear bearing would need a press to remove. It's not in line with any dripping water, was still full of grease, no rust and running smoothly, so I left that one in place. The sun and planet gears all appear stainless and had no damage.
I had 3 options of what to do - replace the whole windlass with new, replace the motor with new and overhaul the rest, or get the motor overhauled and do the rest myself.
My windlass is obsolete but once I got the base off I could compare it with a footprint of the current model. Quick Italy said that the foot print was the same, but although the 2 major holes for the motor and chain drop haven't changed everything else has. The mounting bolts have moved (which would require base plate work) but also the body footprint is bigger and would now cover one of the bolt holes in the boat. I have a stainless plate fibreglassed into the anchor locker and changing that would be major GRP work, so that was not a realistic short term option.
The stainless plate is within the GRP on the pedestal top...

Option 2 looked hopeful. The current windlass's motor looks identical to mine and a couple of websites even list my model windlass for fitment, but Quick have changed all their part numbers so it was not obvious if it would fit. Both Spares Marine and I tried to find out via Quick UK if it would fit, but Quick Italy just aren't interested in giving out any information on an obsolete model - not even a simple yes/no to do the 2 parts numbers refer to the same thing?
So that left option 3 for the motor. I brought the whole lot home and took the motor off to Clywd Auto Electricals which is an old style workshop knee deep in bits of alternators, starter motors and grime. Within 3 hours they had cleaned it ultrasonically, replaced the brushes, replaced both motor bearings, polished off the rust, skimmed the commutator, replaced the terminals and their insulators, and repainted it - all for £54. Because of their location they do a lot of canal boat work, but they said that my motor was most similar to vehicle winches as found on Land Rovers - and they overhaul a lot of soggy motors for those too for over-enthusiastic off-roaders. They have revitalized far worse than mine from submerged boats.
Quick UK tried to get part numbers or measurements for the top bearing and seal from Quick Italy without success so all there was to go on was the numbers on the parts or measurements. The bearing was easy - a standard still current SKF one. The measurement marks on the seal were too far gone to read but calipers found it to be 40mm x 30mm x 7mm, a common and standard lip seal. SKF do that as well, and both parts came from RS. The seal came in a box of 10, so now I have plenty of spares for a future 2 year replacement schedule.
Reassembling...

So now I have to trundle back to the top of Scotland on umpteen trains and buses with a very heavy bag, and hopefully then good to go.
Completed, and the old bearing & seal...

Thank you for the information, suggestions and encouragement in the original thread. It gave me some hope after I had discovered that the current model would require expensive GRP and stainless work to fit. I'd also recommend Clywd Auto Electricals near Wrexham for this kind of overhaul. They are happy to receive and return by courier. Quick UK are friendly and did the best they could, but Quick Italy's response was underwhelming. RS, as always, got the parts to me quickly and when they said they would.
Clwyd Auto Electrical
Last edited:
