Should I cut my skeg? I've tried everything else...

Joined
7 Jun 2021
Messages
84
Visit site
Lots of really good points made. As soon as you’ve got the saw out you are into rebuilding the skeg which will forever creep into your mind as you’re beating into the roughest seas or running from a squall!
I have no idea if this is possible however if it is… I’d try opposing steel wedges m. One driven in from each side. Once they are in you can administer your choice of heat/cold (don’t be shy with either) and hopefully drive the wedges (think sledgehammer) a little at a time as you heat/cool.
I am pretty sure epoxy will start to “go” before the bronze will.

Edit to add. Might be worth “attacking” the sacrificial(?) hardwood block to gain you a little wiggle room. It’s one less point of resistance. You could easily remake this once you’re reassembling.
 

demonboy

Active member
Joined
11 Oct 2004
Messages
2,234
Location
Indonesia
www.youtube.com
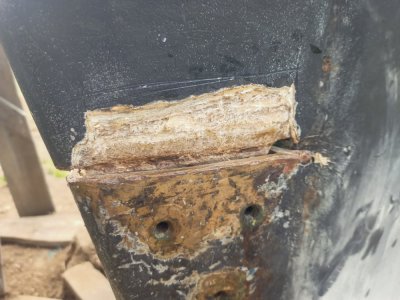
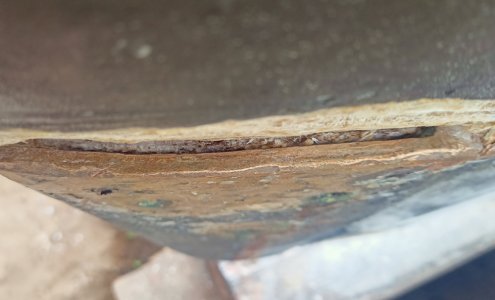
My apologies, I stopped getting updates for this thread and one been busy tackling this. One thing I have done is shave (chisel) away a section from each side of the skeg, just above the join.
IMG20230914073813 (1).jpg
We were hoping this would give us better access to the gap between the bronze and the fin of the skeg to slot a hacksaw blade.
IMG20230914073808 (1).jpg

We've managed to gouge a slot only a few mm deep and realise we're probably not getting enough heat, as a couple of people have previously mentioned. We'll be using blow torches today.
 

demonboy

Active member
Joined
11 Oct 2004
Messages
2,234
Location
Indonesia
www.youtube.com
Do you have access to basic workshop materials like threaded rod, nuts and steel angle? You could make an extractor set like this, screw or bolt the flanges to the skeg and casting and wind them apart; along with heating it should get it off. The threaded rod could be welded to the upper flanges or just fixed with nuts.
View attachment 163792
View attachment 163793
This is an excellent idea, @penfold , thank you. I will consider this next.
 

demonboy

Active member
Joined
11 Oct 2004
Messages
2,234
Location
Indonesia
www.youtube.com
Having watched the video it all becomes clear. Whose bright idea was it to epoxy the thing in place? I think I've had to drop my rudder three times in the last 20 odd years (shaft removal).
It think the bottlejack / sledge hammer shock treatment / high heat is the way to go.

Good luck. Don't do it again.
Originally, Oyster. And then us when we refitted 12 years ago. Funnily enough, I've been speaking to another Oyster 435 owner who did his own refit and had exactly the same problem. He said it was an absolute **** of a job, as we're finding out. When we eventually put it all together, we will NOT be using epoxy!
 

demonboy

Active member
Joined
11 Oct 2004
Messages
2,234
Location
Indonesia
www.youtube.com
Edit to add. Might be worth “attacking” the sacrificial(?) hardwood block to gain you a little wiggle room. It’s one less point of resistance. You could easily remake this once you’re reassembling.
This will have to be removed when we eventually remove the bronze from the rudder, but taking it off now doesn't help. There's a gap between it and the bronze, no pintle.
 

Yara

Member
Joined
26 Jan 2013
Messages
98
Location
Sydney, Australia
Visit site
Have you knocked out the spacer under the lower pintle? (Apologies if this was mentioned prior, but I cant see a pic with it removed.)
Drawing says 5 off screws, I can only see 3 removed?
 
Last edited:

demonboy

Active member
Joined
11 Oct 2004
Messages
2,234
Location
Indonesia
www.youtube.com
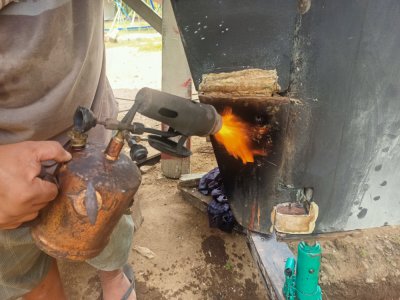
A couple of people said we weren't getting the bronze hot enough...

IMG20230914134601.jpg

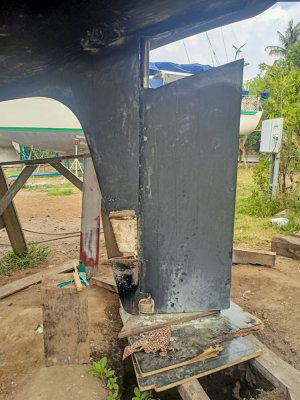
(Notice the missing spacer in the rudder, for those who asked)

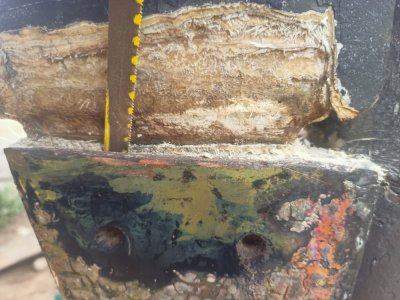
By the time the visible epoxy glue was bubbling, we inserted our special steel V plate into the gap and gave it a few hard whacks. The good news is we were able to shift the casting around 10mm, revealing shiny stainless in the stock that hasn't seen daylight for 12 years...

IMG20230914150103.jpg

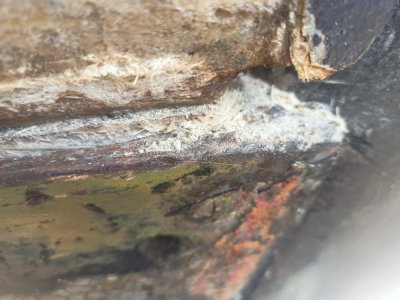
You'd think that was the hard bit done. With a tapered fin the casting should now just slide off. However the fin is damaged so the fibre is matting up in clumps and shreds...

IMG20230914150051.jpg

Running a hacksaw into the gap is pulling up shreds and dust.

IMG20230914150129.jpg

I guess we start again tomorrow and continue as we're doing.
 

demonboy

Active member
Joined
11 Oct 2004
Messages
2,234
Location
Indonesia
www.youtube.com
UPDATE

IMG20230914162742.jpg

IMG20230914162755.jpg

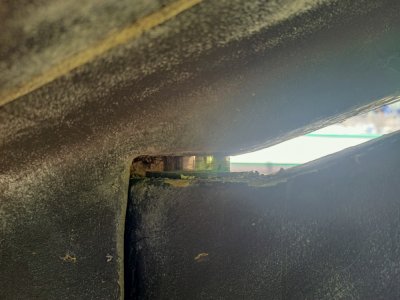
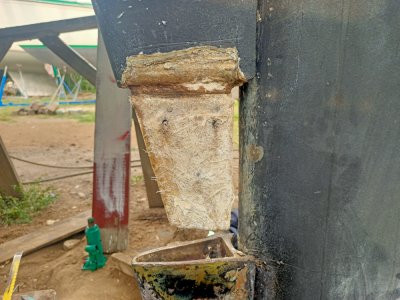
The blow torch did the trick. Thanks to everyone who replied, and especially to those who said we needed to get hotter.

Inside the casting we can see where the epoxy glue bonded onto the painted surface of the fibreglass, which is what was causing the problems.

OK, let the bronze cool off and then we can start looking at the pintle, which I thought we'd be doing four weeks ago 😁
 

Aja

Well-known member
Joined
6 Nov 2001
Messages
4,777
Visit site
UPDATE

View attachment 163929

View attachment 163930

The blow torch did the trick. Thanks to everyone who replied, and especially to those who said we needed to get hotter.

Inside the casting we can see where the epoxy glue bonded onto the painted surface of the fibreglass, which is what was causing the problems.

OK, let the bronze cool off and then we can start looking at the pintle, which I thought we'd be doing four weeks ago 😁
A proper engineering solution.
 
Top