P bracket alignment

Restoration man

Well-Known Member
Joined
3 Jun 2012
Messages
369
Visit site
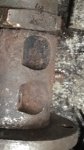
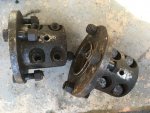
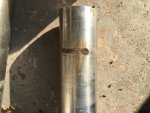
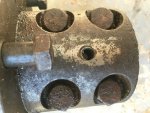
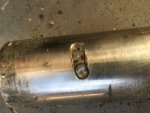
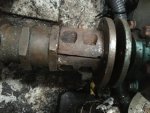
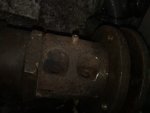
under one of the p brackets on my boat there is a what appears to be a slither of plywood between the hull and the p bracket , and at the other end” the stuffing box end “ the shaft is very low in the prop shaft tube ,please see photos , the back of the gearbox is also very close to the inside of the hull ,i think there has been a problem before as there appears to be a repair to the hull above the propeller (just behind the p bracket ) so the p bracket has been removed and refitted at some time , I’m assuming that maybe they did t want to mess with the engine alignment and put the wooden shim between the p bracket???, I’ve slacked the solid prop shaft coupling and quickly checked the alignment and it’s seem ok , I’m thinking of removing the p bracket and removing the wood and re bolting onto the hull to see if it aligns more central in the pro shaft tube , and re alignment of the engine ,but strangely enough the other side is also low in the prop shaft tube but it doesn’t appear to have the wooden shim ???I planned on removing both the p brackets and cleaning up fitting new cutlass bearings and re sealing anyway so it’s no problem, but wanted to know what you lot think before I rush in and start ripping the p bracket out
 
We could guess what may have happened, like picking up a rope or object and maybe originally bending the p bracket.
The ply is not great as it will rot and crush and leave you with a wobbly p bracket so would say refitting and aligning it would be a good start.

Just now seen pics. Maybe the engine was fitted a little on the low side and they bodged the p bracket to align
 
Last edited:
Probably not the place to say this but photos are easy when you realise that this very poor forum software doesn't allow full resolution photos to be uploaded.
Strange, but the photos taken by virtually all modern phones are too large for this forum software.
Once you know that, it is just a matter of reducing the size and then the forum software works.
Shame, when they re-wrote/configured the software 18 months ago, they spoiled the ship for a ha'porth of tar.
 
In the past have used a "shim" to realign a shaft running in a bent "P" bracket , caused by a rope round the prop.
Boat was on a set of tidal drying blocks to remove rope.
Was noticed that the "P" bracket was bent around 50mm off vertical.
The "temporary" solution plan was to drop bracket to the max length of the six bolts securing bracket to hull and insert a pad to compensate for the distortion.
It need to be simple and fast, tide would ensure that.
Purchased a tin of car repair filler with chopped strand glass .
Masked off area where base of bracket in contact with hull, purely for neatness.
Mixed up filler/ catalyst and filled gap between hull and base of "P" bracket, while filler was still curing, tightened bolts until shaft was turning freely and not binding.
Removed surplus goo as it was squeezed out.
As it cured tidied up edges while still easy to move material.
When cured , shaft checked for free running.
"P" bracket removed and silicone sealer applied and rebolted to hull.
Shaft ckecked again on refloating.
The temporary repair remained until boat was lifted for A/F and anodes the following year. Bracket and shim pad easy to remove ,bracket taken round to a local workshop for straightening. Cutlass bearing kept as 100%.
 
Last edited:
Thanks oldgit that’s prob what’s happened on my boat ?I’m going to remove both p brackets and try see if it’s bent , I’m currently struggling to remove the shaft to gearbox coupling ,I’ve removed the pinch bolts and there is some sort of long bolt with a female alien head in the end that appears to come out the other side of the coupling, I assume is running all the way through the shaft ? It’s properly rusted in and won’t shift with heat , ive mangled the Allen head and managed to snap the producing portion off in the process, so I’ve got no other option but to try drill
It out ????
 

Attachments

  • 0404C3AD-AB92-4585-A5AE-909DEDC0E7A2.jpeg
    0404C3AD-AB92-4585-A5AE-909DEDC0E7A2.jpeg
    34.4 KB · Views: 45
  • FA69CF62-0B58-4375-872F-7D86F296B140.jpeg
    FA69CF62-0B58-4375-872F-7D86F296B140.jpeg
    18.8 KB · Views: 43
Thanks oldgit that’s prob what’s happened on my boat ?I’m going to remove both p brackets and try see if it’s bent , I’m currently struggling to remove the shaft to gearbox coupling ,I’ve removed the pinch bolts and there is some sort of long bolt with a female alien head in the end that appears to come out the other side of the coupling, I assume is running all the way through the shaft ? It’s properly rusted in and won’t shift with heat , ive mangled the Allen head and managed to snap the producing portion off in the process, so I’ve got no other option but to try drill
It out ????
That’s a clamp coupling they are normally the easiest to remove as there is no taper on the shaft or the coupling .
 
That’s a clamp coupling they are normally the easiest to remove as there is no taper on the shaft or the coupling .

i think it’s the rusted in long bolt /grubscrew that I suspect is running through the both the coupling and the shaft that’s to blame , I’m going to try the other side see if that comes off so I can see what I’m working with before I try drill the bolt / grubscrew out
 
Hang on .......is that a roll pin? in the coupling ?????
Before you go near that with a drill.
My couplings had a roll pin similar to this, if well rusted difficult to spot.
On my Princess there was a smaller inner roll pin which you drove out first which then allowed you to knock out the outer and larger roll pin.
You can buy roll pin drifts on Ebay or like me make up a couple.
After that its Heat and Hammer :)
1615453997323.png
Just out of interest, concerned that my "P" bracket was not repairable, told by several "experts" that would need new bracket.
My boat is 30 years old and after several frustrating attempts to discover anything at all who made the brackets for Princess gave up.
Contacted anybody likely to fabricate a new "P" bracket.
In essence the reply was
Send us the old one, we will copy it it, cast new one and machine it .
It will take about 6 weeks and can we have a cheque for £1500 Please .

When boat was out for A/F popped round to my local prop shop with the bracket and said
Can you do anything with this, if I leave it with you.?
Much sucking of teeth and the reply Hang on a Mo !
20 mins laters am walking out with straightend P bracket and £40 worse off.
Invicta Marine | Propulsion | Propellers | Thrusters
 
Last edited:
Hang on .......is that a roll pin? in the coupling ?????
Before you go near that with a drill.
My couplings had a roll pin similar to this, if well rusted difficult to spot.
On my Princess there was a smaller inner roll pin which you drove out first which then allowed you to knock out the outer and larger roll pin.
You can buy roll pin drifts on Ebay or like me make up a couple.
After that its Heat and Hammer :)
View attachment 110961
Just out of interest, concerned that my "P" bracket was not repairable, told by several "experts" that would need new bracket.
My boat is 30 years old and after several frustrating attempts to discover anything at all who made the brackets for Princess gave up.
Contacted anybody likely to fabricate a new "P" bracket.
In essence the reply was
Send us the old one, we will copy it it, cast new one and machine it .
It will take about 6 weeks and can we have a cheque for £1500 Please .

When boat was out for A/F popped round to my local prop shop with the bracket and said
Can you do anything with this, if I leave it with you.?
Much sucking of teeth and the reply Hang on a Mo !
20 mins laters am walking out with straightend P bracket and £40 worse off.
Invicta Marine | Propulsion | Propellers | Thrusters

It appears to be a threaded bar with a female Allen head in one end and and appears to go all the way through the coupling and the shaft , it also had a retaining nut over the exposed section but as you can see I’ve removed that already but my attempts to remove said pin have ended up with me shearing the producing section off so i don’t think I’m going to have any choice but to drill it out next , I’m going to have a go on the starboard one and see if I can remove it without butchering that one and Amy least I will be able to see if the theaded part does go all the way through the shaft
 

Attachments

  • F6154132-8731-4213-80BE-E667CC5B5DBD.jpg
    F6154132-8731-4213-80BE-E667CC5B5DBD.jpg
    26.3 KB · Views: 21
I may be on completely the wrong track but just to add to my above post. That screw COULD be to help release the clamp. Bear with me?. If as I suspect the screw doesn't offer any extra grip on the shaft, but tightening will help to expand the camp to help pull the shaft from the clamp. Maybe don't remove it until your ready to remove the shaft
 
I may be on completely the wrong track but just to add to my above post. That screw COULD be to help release the clamp. Bear with me?. If as I suspect the screw doesn't offer any extra grip on the shaft, but tightening will help to expand the camp to help pull the shaft from the clamp. Maybe don't remove it until your ready to remove the shaft

I’ve wedged the clamp open a bit with 2 stubby flat head screwdrivers and the shaft becomes loose on the clamp but it’s will only move a tiny bit like 1mm left to right and in and out hence my thinking this threaded section goes all the way through or maybe these a dimple on shaft that the screw locates to ??? Anyway I’ve snapped the thread off now trying to remove it?? , I’m going to try get the other side off “as I planned on removing both shafts anyway” hopefully without damaging it and see if I can see how it locates before I get the drill out ???
 
Well just quick follow up managed to get them off, had to drill bolt out and also made bit mess of the shaft but I think it will be ok ?? now to get the p brackets off
 

Attachments

  • 71D04513-EBEC-41F3-A396-3A15F4B054A0.jpeg
    71D04513-EBEC-41F3-A396-3A15F4B054A0.jpeg
    127.1 KB · Views: 24
  • DD2F55B3-4FE9-43E7-B736-AAD550B9CBF1.jpeg
    DD2F55B3-4FE9-43E7-B736-AAD550B9CBF1.jpeg
    128.1 KB · Views: 24
  • F2F17141-97FF-4602-8937-8DC9EC05A2C5.jpeg
    F2F17141-97FF-4602-8937-8DC9EC05A2C5.jpeg
    125.9 KB · Views: 24
  • CA12C700-084F-4962-9C97-8B7F0CA7825A.jpeg
    CA12C700-084F-4962-9C97-8B7F0CA7825A.jpeg
    83.4 KB · Views: 24
Top