Off the wall ideas to deal with a hole on the transom

Canopy Locked

Well-known member
Joined
5 Dec 2006
Messages
1,083
Location
Nth East Scotland
Visit site
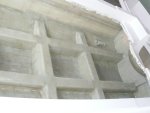
Here's the issue. Have been emptying a small boat of water accumulated between the 2 halves of the mold - all good. I found however that there was water inside the "girders" for want of a better word - These were drained by drilling a hole in the transom directly into the "girders" - These are the 2 longditutional ones in the pic running the length of the boat from the transom.

The problem is I now have to close these, ideally making them water tight on the inside. The constructions is, from the inside, rough gelcoat/ glass, wood core / glass / external gelcoat.
I have no access to the inside, unless I cut a large hole in the top of the girder close to the transom. This I feel may weaken the structure so am reluctant to do it.

My though is turning to getting some dabs of sikaflex around the internal edges of the hole (using a bent bit of wire or such) then pushing some sort of "rubber" skin through the hole from the outside and then pulling back so that it opens and sticks to the internal wall - Once it's cured (doesn't have to be a perfect fit) I can then pack the hole with epoxy resin / dowel and finish with gel coat.

Stuck for ideas - and would welcome any thoughts?
 

Attachments

  • Hull Structure2.JPG
    Hull Structure2.JPG
    927.6 KB · Views: 47

zoidberg

Well-known member
Joined
12 Nov 2016
Messages
6,419
Visit site
A tube of CT1, with the provided narrow nozzle, will do the job in two stages. Cut the nozzle at a sharp angle. Have a bent bit of wire handy, with some 'clear-up' cloths.
 

veshengro

Well-known member
Joined
23 Jan 2023
Messages
1,326
Visit site
1679422976171.png

Ok Rob, you need to get your imagination going here..:)

The centre circle of the sign is the hole you have drilled. Using a fine Hacksaw or straight Hole Saw cut a slot across the hole where Underground is shown. You now have a hole with a fine cut across it.

Take a thin stainless steel washer with a small diameter central hole 4mm or smaller if possible and thread a length of nylon or other synthetic non degrading line through it., and tie a good small, stopper knot in one end.

"Post the washer on it's line through the slot you have cut, the stopper knot going through your drilled hole.
Jiggle the line and pull gently...you now have a washer flat against the hole and slot from the inside.
Pump as much sealant/adhesive as necessary through the slot and hole while holding the washer in position, not too tight against the hole, allow sealant between the washer and back of the hole to build up.


When sealant is set, snip line flush leaving line flush but blocking the hole, and finish off with more sealant.

Get jiggling and post some photos for us...:ROFLMAO:
 

Spirit (of Glenans)

Well-known member
Joined
28 Mar 2017
Messages
3,345
Location
Me; Nth County Dublin, Boat;Malahide
Visit site
+1 to the solutions above, but to anyone attempting to drain water from structures like this (called"floors"), I would advise drilling a hole , or holes in the top, at the deepest part of the hull, and use a pump with a thin tube to extract the water.
An interesting experiment, at first, would be to apply air under pressure into the structure to find out where the leak is.
 

fisherman

Well-known member
Joined
2 Dec 2005
Messages
19,675
Location
Far S. Cornwall
Visit site
These are 'top hat' frames, and 99% sure they wll be foam inside. This foam will still be wet probably. Don't fret about weakening them, you can cut a hole and simply fit an access panel or bung. However, the best would be to fit a bung at the lowest point in each cross member, screw in plastic bung fitted using CT1 and self tap screws.......or just CT1, it's very good. Leave open for a while and see how much comes out.
When you drilled, did a bit of foam come out on the drill bit? Have a grope round in the hole.
Oh, if you want to remake the hull where the hole is, simply make the hole rectangular or oval, then you can feed in a backing piece, ply, plastic etc, with a screw in the middle to pull it against the inside surface.
 
Last edited:

fisherman

Well-known member
Joined
2 Dec 2005
Messages
19,675
Location
Far S. Cornwall
Visit site
I went to see some small boats for sale, decks glassed in, over celotex for buoyancy. Couldn't lift one end, full of water so no buoyancy and more weight to handle. Much is said about closed cell foam but I have never been assured that any of it is in reality. When you have a sealed compartment or deck there will be pinholes or keel fastenings that leak as the temperature changes and the compartment breathes, So hot=expands=blows air out the top. Cools=contracts =sucks water in at the btm.
So I did my sealed deck and provided a sump at the stern with a bung to the underdeck, it may need draining once a year. I also installed a lot of 2lt water bottles.
 

eilerts

Active member
Joined
26 Apr 2016
Messages
141
Location
Trondheim, Norway
Visit site
View attachment 153544

Ok Rob, you need to get your imagination going here..:)

The centre circle of the sign is the hole you have drilled. Using a fine Hacksaw or straight Hole Saw cut a slot across the hole where Underground is shown. You now have a hole with a fine cut across it.

Take a thin stainless steel washer with a small diameter central hole 4mm or smaller if possible and thread a length of nylon or other synthetic non degrading line through it., and tie a good small, stopper knot in one end.

"Post the washer on it's line through the slot you have cut, the stopper knot going through your drilled hole.
Jiggle the line and pull gently...you now have a washer flat against the hole and slot from the inside.
Pump as much sealant/adhesive as necessary through the slot and hole while holding the washer in position, not too tight against the hole, allow sealant between the washer and back of the hole to build up.


When sealant is set, snip line flush leaving line flush but blocking the hole, and finish off with more sealant.

Get jiggling and post some photos for us...:ROFLMAO:

This could actually work.
To just fit an external bung is to set up for disaster, as any new water in the stringers will have access to the transom wood core. So, sealing the inside is essential. As the stringer has been filled with water, the inner surface is probably both damp and covered in slime. This makes it very challenging to get a good seal. I would at least go for a surface tolerant seal like Tec7 or similar products. If there is slime, even Tec7 struggles. The adherence to the hole surface is difficult to control, as any burr will prevent good water tight contact.

What you also can do, is to close the inner hole from the outside. With a hole saw of suitable diameter, you drill out the outer laminate and the core, but stop at the inner laminate. Now you have a clean accessible surface in there. Put a blob of thickened epoxy or sealant there. Don't fill the whole hole in one go, as shrinkage and movement can split it from the inner laminate later. Put some sort of core material in the middle, and do the outside repair.

I would be very careful with pressurized air, as you may risk to blow the frame off the hull. A rubber dinghy pump is more suitable.

If you want to open the stringer to have it properly done, then open the side of it. The side take far less load. Principally zero load at middle height
 

Canopy Locked

Well-known member
Joined
5 Dec 2006
Messages
1,083
Location
Nth East Scotland
Visit site
Wow guys - Thanks never expected so many suggestions. No bungs - I drilled holes in the transom because on the Stbd side they had fitted a transducer screwed straight into the gel coat (so sealant) so I figured I'd explore those holes first - ended up that the external screw had not gone that deep, but something made me drill through and I got over 20l of water out of the Stbd girder (yes they are foam filled to a degree) - I repeated the exercise with the port side and got less out. I would have tried to open the top of the "girder" where it meets the transom to get access to the inside, but alas there is simply no room.

Brilliant suggestion about washer and slot - will try that - have a piece of wood (acting as a dummy transom) where I am trying out various ideas to get a backing cover on the inner wall of the hole.
 

veshengro

Well-known member
Joined
23 Jan 2023
Messages
1,326
Visit site
I cheated slightly Rob because I once did the same trick, but it was ashore and I was patching up amateur wall cupboard hanging damage (previous Tenant) to a flat I rented. No rear access to damage to a plaster board wall. I used big penny washers, adhesive and PolyFilla on that occasion..worked a treat. (y) :D
 

fisherman

Well-known member
Joined
2 Dec 2005
Messages
19,675
Location
Far S. Cornwall
Visit site
I cheated slightly Rob because I once did the same trick, but it was ashore and I was patching up amateur wall cupboard hanging damage (previous Tenant) to a flat I rented. No rear access to damage to a plaster board wall. I used big penny washers, adhesive and PolyFilla on that occasion..worked a treat. (y) :D
Bit of drift, plasterboard repair: cut a patch, any shape, big enough. Draw round it on the wall and cut out. Put battens behind the edges screwed from the outside with drywall screws, screw the patch in the hole, fill and fair..
 

Other threads that may be of interest

Top