new teak capping for gunnel

EuanMcKenzie

Well-Known Member
Joined
24 Oct 2005
Messages
809
Location
Stirling, Scotland
Visit site
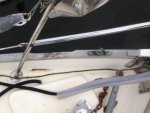
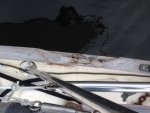
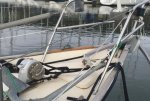
Got caught last week at Port Ellen marina where we were bounced a fair bit on the pontoons. Result was that I tore a forward fairlead off the boat and a chunk of teak capping came with it. I need to replace it and also confront some other scrappy bits.

where does one get wood for such a job and would you do it yourself?

I have a router etc so was thinking of having a go but is it doeable and what do you have to look out for?
 
When part of the teak capping on my Rival split, I had it replaced by a professional shipwright and I'm glad I did not attempt to do it myself. Not 1 cm straight in any direction, so not a simple job.
It is all well if you have experience in woodworking and you have the tools to do a neat job. If not, a bodge is highly likely and your eye will always be drawn to it.
 
Hopefully

This is a bit of a help. We had a similar repair done and it required a skilled wood person and a piece of teak the yard kept in its own stocks for such occasions.

Robbins, get referred to on this forum and I would start by contacting them. I can send photos of the work done for us and the way it was scarfed in, to lock in neatly. Cheers
 
Small areas like that would be a simple job. Use a bit of oversized teak. Cut a nice surface to glue it to. You can be fancy with the router to create a high surface area join but modern glues are so good it is probably not necessary. If you scarf a bit at an angle the same way for each side the piece should slot in flush even if you are a little bit out, remembering that it must be oversize width wise. Shape the piece roughly, only the glue edges need be accurate. Glue in place. Fair with plane, chisels and sanding as required. It will normally be possible to make an almost invisible join. If not perfect use some wood dust in the glue as a fuller.
 
Last edited:
Think I have a go and see how it looks. If too bad I get it done properly

I like woodworking but I'm not a master craftsman.

Its quite a curved bit. Do you machine the curve and leave the grain straight or steam and bend the wood so the grain runs with the curve? can you steam teak?
 
Use the old bulwark as a template if taken off carefully.

If not use some 1.5 mm thick birch ply to make templates. Cut into strips that are wide enough for the length to fit over the gunwale. Glue onto the gunwale using a hot melt glue gun dabbed about 12" blob centres . After the glue has set shape the ply with a craft knife to the width of the gunwale (or scribe the line with a pencil). Once shaped or scribed the template will lift off very easily as hot melt glue is weak. I use a paint scraper and lever it up, it just pops off. You now have the width and curve of the gunwale that you can shape or trace round onto the teak. Remember that the actual bulwark will be wider so scribe a parallel line either side to get the width you want and rebate about 1 mm wider than the template width if you want a slot on the underside to fit over the gunwale.

A kitchen fitter showed me this method and it has made template making very easy. As pmagowan suggests a simple butt joint glued with modern glue will be very strong eliminating the need for scarf joints.
 
OK thanks for all your input

The piece will come off to use as a template as the chunk missing is from the centreline outwards where the bolts were located for the fairlead. I can use an offsetting tool to draw the outside parallel to the inside to make up the missing bit. It does has a rebate underneath.

There are a few bits looking scrappy, rope worn etc now so if this works it will clear the way to do a few bits at a time over the next year or two.
 
If it doesn't go all the way through it might be easier just routing out a geometric shape and then pluging it. As for strength you can only really tell if you are looking at it. If the grain runs off the side of the wood then it will be weaker longitudinally. This may not be an issue anyway. Tight curves can be made strong by moulding thin strips into the correct shape like plywood but all going the one way. If this is done right you won't notice that it is not solid. You do it by making a form in the right curve (or a slightly tighter curve as there will be some rebound) and then clamping a pile of glued strips together like multiple layers of veneer. Leave to cure and remove from the form and do final shaping. Steaming is a bit trickier. I have bent teak quite far with steaming but you need to get it properly hot.
 
I've done such a repair in the past. Getting the new teak to match the old can be tricky. Avocet's is an angle section so that further complicates matters. a 6 : 1 scarf is (as i now know to my cost!) barely adequate to pull the teak round the curve of the gunwhales. If I was doing it again, I'd go for 8 : 1. Someone on here recently posted photos of their synthetic teach capping and it looked very good indeed. That's probably what I'd do when I replace ours.
 
Euan

For material try Gilmour & Aitken in Alexandria

Regards
Donald

I concur. When something similar happeneed to us a couple of years ago the shipwright who did the job sourced a surprisingly large slab of teak from Gilmour and Aitken. He cut the curved piece in the plank so no bending was involved. Looks good and has now weathered in to the extent that the repair is only really evident if it's pointed out. It should be said this was a very skilled guy, I am a reasonable amateur carpenter but could not have done the job to anything like as good a standard.
 
I've done such a repair in the past. Getting the new teak to match the old can be tricky. Avocet's is an angle section so that further complicates matters. a 6 : 1 scarf is (as i now know to my cost!) barely adequate to pull the teak round the curve of the gunwhales. If I was doing it again, I'd go for 8 : 1. Someone on here recently posted photos of their synthetic teach capping and it looked very good indeed. That's probably what I'd do when I replace ours.

there are a few bodged repairs anyway so it isn't perfect - matching will not be such a problem on my boat :)

I may try and scarf a piece in though we'll see
 
I am currently replacing the entire capping rail on my HR352. Have sourced Burmese teak, am cutting it from planks and routing the underneath of it to sit on the rail, and then using the hull as a template to rout the edges so that the new rail matches exactly the shape of the Hull.

much of what is taken off could be used to patch smaller sections of an older boat, send me photo of your damage, perhaps I have a piece that you can fit in or an off-cut, (you can have it for cost of postage.)

tony.
 
many thanks will do but wont be back at boat for a couple of weeks so will get photos then

Its the port hand curved first piece where the fair lead was located. An outside piece of your old rail will probably scarf in and would likely be best match for colour etc.
 
Please find attached a photo at last

If anyone has off cuts that allow this to be repaired I'd be interested

Euan
 

Attachments

  • IMG_1132.jpg
    IMG_1132.jpg
    34.5 KB · Views: 1
  • IMG_1133.JPG
    IMG_1133.JPG
    94.6 KB · Views: 1
  • IMG_1134.JPG
    IMG_1134.JPG
    83.5 KB · Views: 1
seeing another thread on a similar subject reminded me I haven't updated with what i did in the end

Got a 6' plank of teak from Gilmour and Aitken in Alexandria for avery reasonable price. They deliver to Stirling on Wednesdays and dropped it at my house so 10/10 for that. Its done the job and I have a bit more to play with

I then cut out the two damaged pieces to use as templates

Discovered my neighbour had a planing machine so started by planing an oversized length down to the correct thickness.

Cut the block to the right curvature using a jig saw with a bit of planing allowance left on

cleaned it a curve using my hand held power planer

Machined a recess underneath using my router largely by hand. this wasnt so great but it cant be seen so is less of an issue

the section is ovular (right word?) so a bit tricky to shape

I messed about with router bits trying to cut chamfers then i tried using a plane to shape the curvature and it gave the best results once sanded.

I screwed it back onto boat bedding it in and gluing it with black sika 291. Only jobs still to do it are tidy up the sika a bit and plug the screw heads properly. Where do you get teak dowel from?

Anyway boat is usable again, i've learnt a lot and, it didn't cost me much

Picture below
 

Attachments

  • cabatach rail.jpg
    cabatach rail.jpg
    98.6 KB · Views: 1
Top