Leaking lewmar portlights, replace?

gregcope

Well-known member
Joined
21 Aug 2004
Messages
1,624
Visit site
Hi all

I have some c1997 Lewmar size four portlights. They all leak at the rear (and lowest) handle. It is not obvious where the leak is as water appears behind the handle/fixing.

Seals have been replaced. Portlights resealed. O rings replaced. Half a bucket of silicone grease. Tightened everything Yet still they leak.

What am I missing? Are the new ones better?

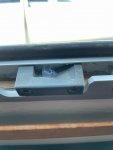
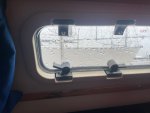
Some pictures… (and yes, the handle is not 100% closed.)
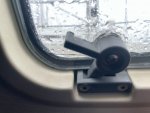
F3FADAA2-443F-4639-96AF-9C6E03D21376.jpegA1477456-7B80-40B0-AFFB-5219E903D481.jpeg
 

Plum

Well-known member
Joined
6 Jun 2001
Messages
4,559
Location
UK East Coast
Visit site
Hi all

I have some c1997 Lewmar size four portlights. They all leak at the rear (and lowest) handle. It is not obvious where the leak is as water appears behind the handle/fixing.

Seals have been replaced. Portlights resealed. O rings replaced. Half a bucket of silicone grease. Tightened everything Yet still they leak.

What am I missing? Are the new ones better?

Some pictures… (and yes, the handle is not 100% closed.)
Hi, this has cropped up before on this forum and another member provided the answer which helped me too. The water enters through the two horizontal joins in the aluminium frame that are half way up the vertical sides. This is because the seal at the joins has failed (maybe just one of them in your case), the water enters the hollow cavity of the frame extrusion, runs inside the cavity and out of the little drainage holes just behind the catches.. I have temporarily stuck small strips of duct tape over my frame joints and the leaks have stopped. Just need to get round to doing a proper sealing job. Hopefully the member that provided this explanation will be along soon to explain more.

www.solocoastalsailing.co.uk
 

TSB240

Well-known member
Joined
17 Feb 2010
Messages
3,206
Visit site
Hi, this has cropped up before on this forum and another member provided the answer which helped me too. The water enters through the two horizontal joins in the aluminium frame that are half way up the vertical sides. This is because the seal at the joins has failed (maybe just one of them in your case), the water enters the hollow cavity of the frame extrusion, runs inside the cavity and out of the little drainage holes just behind the catches.. I have temporarily stuck small strips of duct tape over my frame joints and the leaks have stopped. Just need to get round to doing a proper sealing job. Hopefully the member that provided this explanation will be along soon to explain more.

www.solocoastalsailing.co.uk
I posted some time ago about this problem.

Your persistent leak is as a result of the rubber joint between the top and bottom half of your portlight extrusion going hard. Water will always collect in the cups of the catches at the bottom until a proper seal is made.
This is because water naturally drains down off the top of the extrusion down to the joins and then enters the hollow section of the extrusion at each side. It can then flow down and out of a drain hole inside each of the cups.
I took the inner plastic trim off which is held on with velcro tabs. I removed the cups and the aluminium window retainer. You can then back fill the extrusions with silicone sealant using the drain holes and the tapped screw holes as cavity injection points.
If you try hard enough you can fill it back up to the half way joint.
You then need to cut and completely hook out the half way rubber join seal with a small screwdriver and inject sealant into that joint from the outside to give a smooth and permanent fix.

Don't worry about your portlights falling out as they are usually bonded well in with sikaflex.
 

gregcope

Well-known member
Joined
21 Aug 2004
Messages
1,624
Visit site
Many thanks @Plum and @coopec

Special thanks @TSB240. Your explanation sounds very plausible for a few reasons.

Firstly I have added about 1/2 a tub of silicon grease and water was pooling above this so I could not see how water was getting past. Secondly I thought I saw water leaking from the two smaller, unfilled holes as if it was coming from inside the outside frame, but I could not see how it was entering. Your post explains this. Finally it also explains why the water appears, magically, behind the handle, without appearing above.

@TBS240 your fix does not seem too expensive or time consuming either.

Can I confirm you suggest removing the old, outside between the top/bottom extrusion seal and replace with silicon sealant?

Are there any more posts on this?

I think dissembling the window inner frame screws and cups as there is evidence of galvanic corrosion between the Ali extrusion and SS Machine screws. The rear most cup retainer hex bolt would not move with my cheapo-boat based small hex keys. The others seemed okay as I loosened then retightened all those screws/bolts as an initial fix.
 

Plum

Well-known member
Joined
6 Jun 2001
Messages
4,559
Location
UK East Coast
Visit site
I think dissembling the window inner frame screws and cups as there is evidence of galvanic corrosion between the Ali extrusion and SS Machine screws. The rear most cup retainer hex bolt would not move with my cheapo-boat based small hex keys. The others seemed okay as I loosened then retightened all those screws/bolts as an initial fix.
If you can loosen/remove the screws you are lucky. Most of mine are seized!

www.solocoastalsailing.co.uk
 

TSB240

Well-known member
Joined
17 Feb 2010
Messages
3,206
Visit site
[QUOTE="
Finally it also explains why the water appears, magically, behind the handle, without appearing above.

@TBS240 your fix does not seem too expensive or time consuming either.

Can I confirm you suggest removing the old, outside between the top/bottom extrusion seal and replace with silicon sealant?

Are there any more posts on this?

I think dissembling the window inner frame screws and cups as there is evidence of galvanic corrosion between the Ali extrusion and SS Machine screws. The rear most cup retainer hex bolt would not move with my cheapo-boat based small hex keys. The others seemed okay as I loosened then retightened all those screws/bolts as an initial fix.
[/QUOTE]

My previous post is almost identical from memory.

I can add.
Others have posted short term success by externally removing and replacing the hardened rubber seal with silicone between the two extrusion halves. You will end up repeating this every year or so.
It is not a permanent cure as it's really hard to get any fill and bond onto the ends of the hollow part of the extrusion from outside.
Backfilling the hollow extrusion is really easy with a small nozzle and silicone in a gun just pushed hard against the tapped holes into the hollow section.
If you start with the screw holes above and below the joint you should get a near perfect seal at the joint.
You can with patience get silicone to start oozing out of the half joint.

I managed to fill such that silicone eventually came out of the drain holes in the catch cups displacing any retained water in the bottom of the frame.

You don't necessarily have to remove the bottom catch cups but it makes the job easier as you get two more injection holes!
Make sure you have a good hardened steel hex adaptor bit or Allen key to undo the retaining countersunk cap head bolts.
Removing the stainless posidrive retaining bolts and plate was the most time consuming part and I seem to remember some were a bit difficult due to corrosion. A good screwdriver bit, a bit of heat and plus gas sorted any difficult ones.

I had to do 10 portlights on our 23 year old bendytoy. Not had any leaks since and well worth a days

Steve
 
Last edited:

ddodg

New member
Joined
15 Apr 2012
Messages
19
Visit site
Hi Greg,
I did this job recently on my Starlight and it was very easy. If you want a look let me know as just two boats behind you in the car park.
David
 

ddodg

New member
Joined
15 Apr 2012
Messages
19
Visit site
Hi,
No not via the screw holes. On the outside of the frame there are two horizontal joints. You need to take out as much of the jointing material as possible and then replace these joints with silicone etc. The link fromTSB240 above describes the procedure and is the method I used.
 

gregcope

Well-known member
Joined
21 Aug 2004
Messages
1,624
Visit site
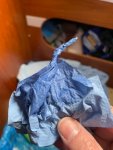
Went to boat today and removed the catch cups. Lots of drips and sucked loads of water out with some blue towel. Removed all the 20 machine screws and retaining plate as well.

F556727F-10F9-4933-964D-207DD1154EB9.jpeg
 
Last edited:

gregcope

Well-known member
Joined
21 Aug 2004
Messages
1,624
Visit site
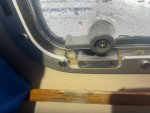
Then squirted in lots of sealant into each hole. Doing most holes, sealant oozes out of adjacent ones. When re attaching screws sealant came out the spare holes. I cold not get any sealant to come out near the mid level join area.

Managed to fit around 200ml of sealant in! Plus broke my sealant gun.

A 18V driver helped remove/replace the 24 screws!

I put all the screws back in with a touch of Durlac. I tested some other window screws and found a few stiff ones. Usually the rear/lowest catch retaining screws.

Will see how this fix fares before doing more. And getting another gun. And more sealant.

4D6B54D9-E4D4-4E31-806B-51FF336FCE3F.jpeg
 
Last edited:

gregcope

Well-known member
Joined
21 Aug 2004
Messages
1,624
Visit site
So, we have had some rain so now on one hand really interested in results but on the other i will be a little sad if this does not work considering all the other things tried.
 

Plum

Well-known member
Joined
6 Jun 2001
Messages
4,559
Location
UK East Coast
Visit site
Then squirted in lots of sealant into each hole. Doing most holes, sealant oozes out of adjacent ones. When re attaching screws sealant came out the spare holes. I cold not get any sealant to come out near the mid level join area.

Managed to fit around 200ml of sealant in! Plus broke my sealant gun.

A 18V driver helped remove/replace the 24 screws!

I put all the screws back in with a touch of Durlac. I tested some other window screws and found a few stiff ones. Usually the rear/lowest catch retaining screws.

Will see how this fix fares before doing more. And getting another gun. And more sealant.
Have you also replaced the sealant in the two joins in the frame?

Www.solocoastalsailing.co.uk
 

gregcope

Well-known member
Joined
21 Aug 2004
Messages
1,624
Visit site
Have you also replaced the sealant in the two joins in the frame?

Www.solocoastalsailing.co.uk

No. The way i understood @TSB240 explanation was that this might need to be replaced and was not really needed with liberal filling.

Filling the top of the bottom screw hole just underneath the join resulted in sealant coming out of the next screw hole down around 30mm away. When i tightened the last screw in (that one) sealant was oozing out about 200mm away at the spare holes in the latches (picture above). So i am pretty sure the bottom void is full of sealant bar the odd air bubble. I had no sealant come out outside of the frame or near the join which i was expecting as I would have thought there was an obvious external entry point for the water.
 

gregcope

Well-known member
Joined
21 Aug 2004
Messages
1,624
Visit site
So … i waited all week. Oh the anticipation! We have had good test weather with lots of driving rain!

and I declare success! No water/moisture!

8813336F-541B-4B05-881F-5042940F445A.jpeg

I then did the three others. In also testing conditions weather wise.

No sealant appeared at the join as before, although with one bubbles appeared as I injected sealant into the last hole nearest the join. The bubbles would be escaping air and water out of the join.

I will do two more tomorrow. One I will only do the areas nearest the join, ie upto just beyond the first latch. Logic being this is a sealed chamber (from the outside bar the join) and stopping water getting in the join is the aim. This will reduce the amount of screws/sealant by about 75%.

I used 1.5 tubes. Some of the sealant leaked out of the tube inside near its plunger. Otherwise little wastage. I used the sealant nozzle as is, ie minimum/smallest aperture. This would just fit into a threaded hole.

If you watch carefully as you inject you can see the sealant fill the void as it pass the next open threaded hole.

As soon as the threaded hole was partially filled I moved on as when you start screwing, the screws fill the threaded parts and also part of the void, forcing out excess out into the latches.
 

gregcope

Well-known member
Joined
21 Aug 2004
Messages
1,624
Visit site
More excitement tomorrow yo go check the three I did today. Weather forecast is promising some good testing weather!

One might leak at the seal as that looked suspect … however armed with sealant I now empowered!
 

Plum

Well-known member
Joined
6 Jun 2001
Messages
4,559
Location
UK East Coast
Visit site
More excitement tomorrow yo go check the three I did today. Weather forecast is promising some good testing weather!

One might leak at the seal as that looked suspect … however armed with sealant I now empowered!
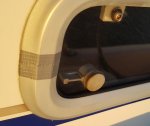
Brilliant. Many thanks for the feedback. I will wait for dry weather to do mine but my temporary fix of a small strip of duct tape over the joins in the frame on the outside has confirmed that my water was only coming through those joins so I am watertight for now.
20230107_231029_resize_8.jpg

Www.solocoastalsailing.co.uk
 
Last edited:

De.windhoos

Active member
Joined
29 May 2016
Messages
197
Visit site
  • There is a small o-ring (2mm thick) on the outside of the handle. Pop the cap, unscrew the handle, change the o-ring. Very easy and cheap fix
  • grease the rubbers with Vaseline or silicone grease once a year
 
Top