Jokani
Well-Known Member
I fitted a new starter motor, and it failed in within 10 - 20 starts.
I removed the starter motor and found that a part had broken off and fallen to the bottom of the flywheel housing.
I believe this was due to the fact that the new starter motor had a slightly larger circumference than the original, only by a few millimeters, they both looked similar enough not to raise any alarms.
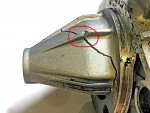
When fitted the engine turned over by hand without any noticeable problems, but whilst starting or running the gear ring must have caught on the starter motor housing causing it to break., the piece indicated by the red arrow:

I have since been refunded of the starter that broke and purchased a new OEM starter motor. Measuring with a micrometer the difference looks to be about 5mm, but I can't be more exact until I retrieve the broken piece.
Now I am not able fit the new starter (and get sailing) until I remove this broken piece, I suspect that there is no alternative but to remove the engine yet again to gain access. So far I have wasted 1.5 days tring to extract the piece with the engine in place, nothing has worked and I wish I had just invested the time in to removing the engine. But, the engine has been in and out a few times this year already ,and i am really loathe to do it again unless there really is no alternative.
I don't believe there is enough room at the rear of the engine bay to remove the housing whilst the engine is in place, and the housing is also the attachement point for the 2 rear engine mounts, So I cannot just disconnect the gearbox, unbolt the engine mounts from the bearers and slide forward as I also need to remove the engine mounts themselves.
The things I have tried so far, all by access through the hole where the starter motor would fit:
Should I bite the bullet, give up, and just crack on with removing the engine?
I removed the starter motor and found that a part had broken off and fallen to the bottom of the flywheel housing.
I believe this was due to the fact that the new starter motor had a slightly larger circumference than the original, only by a few millimeters, they both looked similar enough not to raise any alarms.
When fitted the engine turned over by hand without any noticeable problems, but whilst starting or running the gear ring must have caught on the starter motor housing causing it to break., the piece indicated by the red arrow:
I have since been refunded of the starter that broke and purchased a new OEM starter motor. Measuring with a micrometer the difference looks to be about 5mm, but I can't be more exact until I retrieve the broken piece.
Now I am not able fit the new starter (and get sailing) until I remove this broken piece, I suspect that there is no alternative but to remove the engine yet again to gain access. So far I have wasted 1.5 days tring to extract the piece with the engine in place, nothing has worked and I wish I had just invested the time in to removing the engine. But, the engine has been in and out a few times this year already ,and i am really loathe to do it again unless there really is no alternative.
I don't believe there is enough room at the rear of the engine bay to remove the housing whilst the engine is in place, and the housing is also the attachement point for the 2 rear engine mounts, So I cannot just disconnect the gearbox, unbolt the engine mounts from the bearers and slide forward as I also need to remove the engine mounts themselves.
The things I have tried so far, all by access through the hole where the starter motor would fit:
- Borrowing some small hands - the part is still just beyond finger tip reach
- Magnet - The part is an alloy and non-magnetic
- Flexible claw - Hard to see/feel, could not get a grip. Not enough space to use a clew and endoscope together so have to work blind
- Gaffa tape on the end of a bent piece of metal - Hard to precisely place the gaffa tape blind, not enough room to work with at the same time as an endocope
- Thick battery cable pushed round so that the broken piece can be pushed upwards towards the starter hole - There is a raised ridge at the bottom of the flywheel housing that prevents the cable passing this point.
- Gaffa tape moulded with ridges (like a flapper wheel) and stuck to the gear ring & flywheel - Anything of any thickness stops the engine rotating fully, I thing at the ridge mentioned above, and anything small enough to allow full rotation does not hit the broken piece and raise it as hoped.
Should I bite the bullet, give up, and just crack on with removing the engine?

")