Drilling through fibreglass

eddystone

Well-Known Member
Joined
18 Aug 2013
Messages
1,936
Location
North West Devon
Visit site
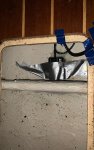
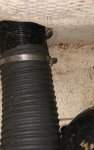
I'm trying to route a transducer cable for a Hawkeye depth sounder (as backup for a not entirely to be trusted Raymarine/Airmar) which is located on the forward port cockpit bulkhead (Sadler 32). Following the example of another S32 owner who posted on this forum, I've temporarily attached the transducer under the aftmost inspection panel before the companionway steps. This puts the transducer on the centreline on a relatively flat bit of hull about 0.5 metres behind the keel (or less). However, to route the cable with its plug (about 12mm) to the instrument I would need to drill through what is effectively a moulded in rib between the hull between the hull and the sole. Access from the compartment itself is impossible so it would have to be from the engine compartment or the locker under the sink. The engine compartment would be easiest but there just isn't room to get a right angle attachment in there; could just about do it in sink locker but would be drilling downwards so could well miss the bit of bilge I'm trying to get to and worst case put a hole in the hull. I've been wondering about a flexi coupling but the problem is it wouldn't be easy to exert enough pressure to get through 2 or 3 cm of lay up; these things don't accept very large diameter bits so I'd have to use a spade bit which may not even go through fibreglass.

Alternatively I could fit the transducer in the locker under the sink which would be far easier cable wise but may not be optimum position
 

Attachments

  • IMG_3Dec2021at112339.jpg
    IMG_3Dec2021at112339.jpg
    166 KB · Views: 41
  • IMG_3Dec2021at112545.jpg
    IMG_3Dec2021at112545.jpg
    112.8 KB · Views: 40
Behind the keel is not recommended, you will get turbulence from the keel whilst sailing and when using the engine it will be even worse, so under the sink may well be the more optimum place, not the lesser.

I'd avoid flat, wood bits for GRP, small hole saw would be better. It looks like you're using the transom mount transducer, mounted in hull, the cable for this can be extended by soldering an extension cable to it, inside the plug. They say that taking the plug off voids the warranty, though i can't see how that's any different to soldering additional wiring inside the plug. Could be worth investigating if it's safe to cut and splice the cable, or to buy the extension cable, feed it back to the transducer and solder it to the plug.

The instructions provide information on using the transducer in hull by epoxying in place. The transducer cable emerging from the back of the instrument is about 10cm and terminates in a socket into which the rest of the cable is attached with a plug, so no need for cutting and splicing.

Take your point about under sink maybe better location (further behind keel although not as dead level) although need to sand off "stipply" flowcoat. I tried a quick test and got plausible reading and a bit of loss of signal but that may be dodgy attachment with vaseline.
 
Behind the keel is not recommended, you will get turbulence from the keel whilst sailing and when using the engine it will be even worse, so under the sink may well be the more optimum place, not the lesser.

I'd avoid flat, wood bits for GRP, small hole saw would be better. It looks like you're using the transom mount transducer, mounted in hull, the cable for this can be extended by soldering an extension cable to it, inside the plug. They say that taking the plug off voids the warranty, though i can't see how that's any different to soldering additional wiring inside the plug. Could be worth investigating if it's safe to cut and splice the cable, or to buy the extension cable, feed it back to the transducer and solder it to the plug.
Sorry this probably seems a dummy question but obviously there is a length of excess cable which needs to be tied in a coil/bundle and secured somewhere - can this affect the transducer signal?
 
If it were me, I would buy the extension cable and find an alternative route, perhaps leading it outboard and then back to its desired destination. With the extra cable you can mount it forward of the keel, which is a much more effective location, and perhaps run it alongside the route of the wiring for the existing transducer, possibly avoiding any drilling.
I don't thing the uneven flowcoat should affect its operation, given proper application of the mounting medium. Consider mounting it in a glassed-in (or Sikaflexed-in) cylinder containing castor oil, (does not go rancid).
 
I wouldn't dare chop a hole through those ribs without some expert advice.

As background I recall that this is the area where the Sadler 32 hull can have a tendency to flex with over enthusiastic backstay tension. And the solution is to glass a bit of plywood between these ribs to increase its stiffness. I don't know what effect a hole there would have on reducing a rib's strength - maybe you'd also need to reglass around the hole or something anyway to protect the rib's core if it has one.

Mike Lucas is a fount of Sadler knowledge. Contactable now through a new (to me) Facebook Sadler and Starlight Yachts Community site. Not the same as the owners association site.
 
Last edited:
The instructions provide information on using the transducer in hull by epoxying in place. The transducer cable emerging from the back of the instrument is about 10cm and terminates in a socket into which the rest of the cable is attached with a plug, so no need for cutting and splicing.

Take your point about under sink maybe better location (further behind keel although not as dead level) although need to sand off "stipply" flowcoat. I tried a quick test and got plausible reading and a bit of loss of signal but that may be dodgy attachment with vaseline.
You may need to clip up the connection where the short cable plugs into the main cable so that it's not just lying in the bottom of the bilge and vulnerable to water damage.
 
The instructions provide information on using the transducer in hull by epoxying in place. The transducer cable emerging from the back of the instrument is about 10cm and terminates in a socket into which the rest of the cable is attached with a plug, so no need for cutting and splicing.

The point of cutting/splicing, is that you can cut the cable, drill smaller holes, then rejoin. There are only 3 wires.

Take your point about under sink maybe better location (further behind keel although not as dead level) although need to sand off "stipply" flowcoat. I tried a quick test and got plausible reading and a bit of loss of signal but that may be dodgy attachment with vaseline.

You should try and get ahead of the keel, it doesn't need to be on the centre line. In fact, some transducer instructions say to avoid the centre line, keeping just to one side. Behind the keel will almost certainly cause problems, and turbulence or aeration will give intermittent/erratic readings.
 
Actually, seemed to give an accurate reading behind the keel but I took heed of the advice not to make holes in the transverse stiffening rib. Also to do so would involve using a flexible extension and I doubt I would get enough pressure to go through the rib. I've found a better position in the sink locker in the heads , ahead of the keel just off the centreline and a potential route for the cable worked around behind the heads and down the port side.
I think the cable (30ft) is long enough and the plug is moulded on, but if I wanted to cut the plug off to make a smaller hole is there any secret to splicing the cable back together?
 
I may have misunderstood part of the problem, and if so I apologise, but might not a 'step drill bit' offer something of a solution?

There are many makes and prices. I've found Aldi/Lidl products good enough for my occasional use, while Screwfix and Toostation offer more 'trade-related' products.

If the idea is new to you ( or anyone else ), here's an example-pic.

51737433927_37fbcec554.jpg


It's easy enough to tape off the diameters larger than the one you want, the way you might with a straight drill bit to limit the depth of bore.
 
I'd pull the old cable out carefully, I imagine it was a retrofit when the yacht was nearing completion). When pulling the old cable out I'd pull through a mouse line (actually 2 mouse lines). I'd use one mouse line for the new cable and the other mouse line for the old cable (if you want to have the old unit as back up). Most of these devices use the same plugs/connectors (why they have not developed a micro plug industry standard is a mystery). When you attach the new cable to the mouse line make sure the joint is very secure and smooth. I'd also attach, yet another mouse line, so that you can pull the new cable through and ease back a short distance if it 'sticks' - it gives you wriggle room. I'd install the new unit where the old unit is, as its probably in the 'right' place and might even be the same fitting. If its a new fitting, and needs a new hole in the hull then its a good idea to cast some epoxy where the new fitting will be installed to give yourself a flat surface to tighten against when you tighten up the threaded washer thing.

Jonathan
 
Top