Best way to weatherproof a 2 into 1 cable joint

mullet

Active member
Joined
16 Nov 2020
Messages
193
Visit site
I need to make a 2 into 1 “Y” cable joint and I’m unsure how to waterproof it for outdoor use (on the cabin coach roof). Space is an issue so it can’t be something bulky (rules out gel-filled connector boxes). Would soldering then a heat-shrink boot be sufficient?

The use case is to combine an NMEA2k cable and a chartpotter power cable (2 cores) into a single cable that can be wired into a Bulgin connector. There will be 3 connectors on the cable: 5-core NMEA2k to chartplotter; 2-core power to chartplotter; 7-core to Bulgin connector. Space where I can make a through deck connection is limited so I can’t just have 2 Bulgin sockets.
 

Refueler

Well-known member
Joined
13 Sep 2008
Messages
18,412
Location
Far away from hooray henrys
Visit site
Heat shrink on its own is not enough ... water will creep in.

What I have done in past - is to solder ..... liberally cover with epoxy resin ... slide heat shrink over while still 'gooey' - then shrink ... making sure epoxy is squeezed out as it shrinks ... wipe away excess .. let set. The heat will speed up the epoxy cure ...
Or use Potting Resin ... same way inside the Heat Shrink.
 

MikeCC

Well-known member
Joined
11 Apr 2005
Messages
1,240
Location
Exmouth, Devon
www.allGadgets.co.uk
Is there any way you can use a gland and make the connection below deck or inside an instrument box or however it's being used? There are two-entry horizontal glands available from Index Marine, possibly Scanstrut too.

If I was being purist, combining chartplotter power and N2K data wires into a 7-core cable is not a great plan as you'll lose the shielding that N2K cable provides. But it may work just fine. If you do go that route, definitely use tinned cable.

Why can't the two cables be run to the plotter?
 

jamie N

Well-known member
Joined
20 Dec 2012
Messages
6,251
Location
Fortrose
Visit site
All of these ways will work, as will simply soldering the connections with appropriate heat shrink, then Scotchkote (or other brand), then self amalgamating tape such as Scotch 23, then Scotchkote again before covering with plastic tape like Scotch 33.
This is the way we do it if the joint is going underwater, albeit with at least 1 more layer of 23, and might seem over the top for your need, but is a simple, easy and bullet proof method of a permanent repair.
For my own boat I'd probably do #6 though!
 

MontyMariner

Active member
Joined
7 Apr 2011
Messages
538
Location
Somerset / Dorset border
montymariner.co.uk
Space is an issue so it can’t be something bulky (rules out gel-filled connector boxes).
I would use a short length of plastic tube / conduit that the connection will slide into, then squeeze sealant into both ends.
The 'Monogel' would be good but it's an expensive solution for a small one time job.
 

mullet

Active member
Joined
16 Nov 2020
Messages
193
Visit site
Many thanks to everyone for the replies - very helpful and much appreciated.

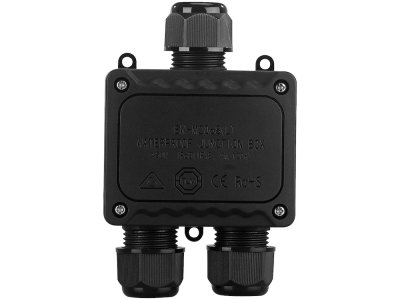
I procured the smallest 2 into 1 waterproof junction box I could find and it has proven too bulky for the planned use - it interferes with the bail mount for the plotter so would need to be fixed somewhere else. That’s not ideal because space is limited and it will be inconveniently in the way, no matter where else it is put.

Now considering trying something like Sugru (“mouldable glue”) around a solder joint and, if that doesn’t work, Scotchkote.
 

B27

Well-known member
Joined
26 Jul 2023
Messages
1,425
Visit site
I've used a mixture of 'hot melt glue' and adhesive lined heat shrink tubing successfully, albeit not on a boat.

Also self amalgamating tape can be pretty effective.

But water finds it's way in eventually unless you get very serious.
 

Refueler

Well-known member
Joined
13 Sep 2008
Messages
18,412
Location
Far away from hooray henrys
Visit site
I've used a mixture of 'hot melt glue' and adhesive lined heat shrink tubing successfully, albeit not on a boat.

Also self amalgamating tape can be pretty effective.

But water finds it's way in eventually unless you get very serious.

Thats' the real killer ... water has that terrible habit of finding any way it can to get into things ...
 

Daydream believer

Well-known member
Joined
6 Oct 2012
Messages
19,804
Location
Southminster, essex
Visit site
I would use a short length of plastic tube / conduit that the connection will slide into, then squeeze sealant into both ends.
Following advice some years ago here on the forum; I had some junctions of several wires. I did as above then held the piece of pipe - which ended up 6 inches long- in place with 2 pipe clips. It was easy enough to destruct some years later when I changed the wiring, as the sealant was only at the ends. I slit the pipe with a dremel & found the connections to be totally dry with no corrosion at all.
 

mullet

Active member
Joined
16 Nov 2020
Messages
193
Visit site
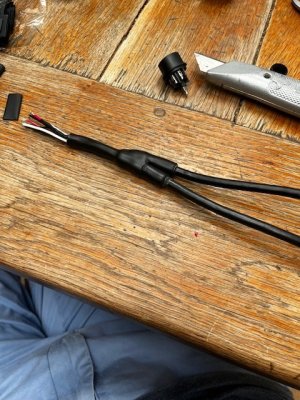
In the end I slightly changed tack: instead of solder joints to make a 2 into 1 joint I stripped back the cables and ran everything to connect straight into the Bulgin plug. This seemed simpler with less room for failure and less chance of water ingress.

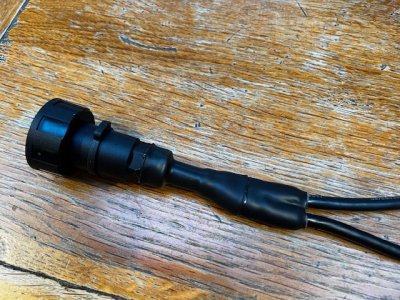
Thin heat shrink to bind the 7 cores (2 for the plotter power, 5 for the NMEA drop cable) together, then heavy duty glue-lined heat shrink to try to waterproof everything. I made an improvised 2:1 boot by slitting heat shrink and passing one of the cables through the slit (similar to what is described here) and shrinking it all, then doing another same for the other cable. Then more heat shrink around the outside to cover all the joints. Good glue squeeze out all around so I reckon it is pretty waterproof but I’ll go over the cable to heat shrink intersections with some sort of waterproofer too.

I could have made it a bit less bulky and a bit more flexible but I prioritised plenty of heat shrink to try to waterproof it instead. Doesn’t look awful though, and only cost pennies.

Thank you to everyone who made suggestions about how to do this.

IMG_7880.jpeg

IMG_7886.jpeg
 

gregcope

Well-known member
Joined
21 Aug 2004
Messages
1,606
Visit site
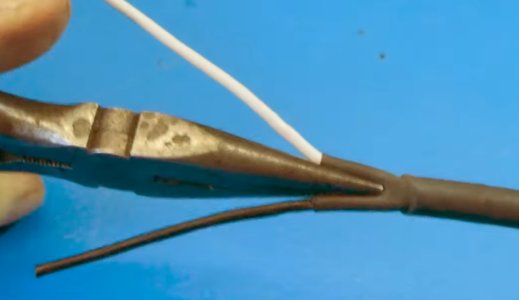
I have used a combination of solder, then those solder heat shrink, glue/epoxy and finally, heat shrink.

One trick is to use pliers to pinch the gap like these. Looks neat;
 

Attachments

  • IMG_0622.jpeg
    IMG_0622.jpeg
    90.5 KB · Views: 2
Top