1980's Beneteau Keel bolts - does this sound right

vyv_cox

Well-known member
Joined
16 May 2001
Messages
25,470
Location
France, sailing Aegean Sea.
coxeng.co.uk
Interesting photos, I look forward to seeing their condition when you have withdrawn them. Do I understand that you have been supplied 8.8 galvanised bolts? I am more used to seeing 8.8s in their natural colour - black..
 

brccd

Member
Joined
19 Apr 2016
Messages
30
Visit site
Thanks for the link...vyv.

Pictures of the replacement bolts from Beneteau... torque spec showed 94 to 195 ft\lb ...so I am figuring if I set it at about 120Ft\Lbs...should be good.

M20 bolt side.jpgm20 top.jpg
 

brccd

Member
Joined
19 Apr 2016
Messages
30
Visit site
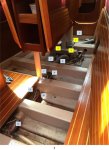
Keel Bolts - more work....Did some cleaning of some of the existing bolts...:

First diagram shows the bolts layout...

FloorKeelBolts3.jpg

there are 11 bolts:
Bolt 1 is a smaller bolt...looks like its mainly for grounding
Bolt 2 , 3, and 4 are covered by fiber glass...will need to work on that when the boat is hauled. Bolts 3 and 4 are under a table support that needs to be drilled or cut to gain access.
Bolts 5,6 ...7,9 ... 9,,10 are paired and what I have cleaned up so far
Bolt 11 if most aft, somewhat cleaned, but still needs more cleaning...

After cleaning the area, chipping protective material off bolt heads, I used a drill with wire brush to clean the metal as best I could.

Pictures:
Bolt 1 and 2
bolts 1 and 2.jpg

Bolts 3 and 4
bolts 3 and 4.jpg

Bolts 5 and 6
bolts 5 and 6 a.jpg

Bolts 7 and 8
bolts 7 and 8.jpg

Bolts 9 and 10
bolts 9 and 10.jpg

Bolt 11
bolt 11.jpg

The bolt conditions don't actually look that bad, and are not leaking...
It looks like one bolt washer is partially gone (#10)

So wondering what others think of these, how they look, worth trying to change or leave alone!?
I can't tell how the bolts are which are fiber-glassed over.

Another note: These bolt heads appear to be slightly tapered! I have seen some other posts that mention having to grind these...will a standard socket not work correctly?
Is the grinding just to square rusted parts?
Is there a special socket set that is actually tapered?

Starting early with all this, in case I found something ahead...will have time to plan!

Boat haul is in April...so some time to plan things!
 
Last edited:

Heckler

Active member
Joined
24 Feb 2003
Messages
15,818
Visit site
Keel Bolts - more work....Did some cleaning of some of the existing bolts...:

First diagram shows the bolts layout...

View attachment 61858

there are 11 bolts:
Bolt 1 is a smaller bolt...looks like its mainly for grounding
Bolt 2 , 3, and 4 are covered by fiber glass...will need to work on that when the boat is hauled. Bolts 3 and 4 are under a table support that needs to be drilled or cut to gain access.
Bolts 5,6 ...7,9 ... 9,,10 are paired and what I have cleaned up so far
Bolt 11 if most aft, somewhat cleaned, but still needs more cleaning...

After cleaning the area, chipping protective material off bolt heads, I used a drill with wire brush to clean the metal as best I could.

Pictures:
Bolt 1 and 2
View attachment 61859

Bolts 3 and 4
View attachment 61860

Bolts 5 and 6
View attachment 61861

Bolts 7 and 8
View attachment 61862

Bolts 9 and 10
View attachment 61863

Bolt 11
View attachment 61864

The bolt conditions don't actually look that bad, and are not leaking...
It looks like one bolt washer is partially gone (#10)

So wondering what others think of these, how they look, worth trying to change or leave alone!?
I can't tell how the bolts are which are fiber-glassed over.

Another note: These bolt heads appear to be slightly tapered! I have seen some other posts that mention having to grind these...will a standard socket not work correctly?
Is the grinding just to square rusted parts?
Is there a special socket set that is actually tapered?

Starting early with all this, in case I found something ahead...will have time to plan!

Boat haul is in April...so some time to plan things!
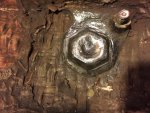
Someone else did this a while back and said afterwards, oh, when I got them out it was only surface rust in the heads, If I was doing it agsin I wouldnt, or words to that effect.
The tapering will be due to the head surface rust.
Keel bolts issues used to arise in wooden boats where moisture would get to the shanks, it is unusual in fi glass ones!
Stu
 

brccd

Member
Joined
19 Apr 2016
Messages
30
Visit site
Hi All, (re the beneteau first 345 (1985))

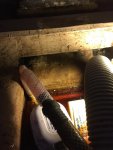
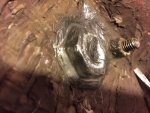
Did some more checking, cleaning of the most forward keel bolt. The initial look was looking like it was bad:

My initial cleaning and some chipping away the resin coating the bolt was looking like this:
IMAG1015.jpg

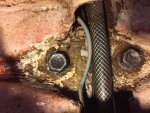
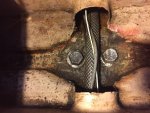
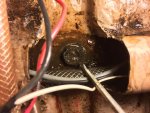
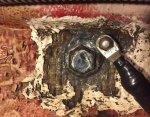
Looks pretty bad right?! My first thought was, this thing is completely shot...but yesterday, went back in the boat and focused on cleaing this up more and expecting to find a real problem, but to my surprise, here is how it looked after getting the rest of the old coating, and grinding away with a dremal tool:
IMG_0337.jpg

IMG_0339.jpg

CleanedGreasedGnd.jpg

The 3rd pic shows the ground wire attached.

I am thinking I actually don't need to change this bolt!

Out of all the bolts, there is one that has a deteriorated washer, and maybe I will try to replace that one when the boat comes out for haul. If it removes easily, maybe go for some others. But, the bolts actually don't look bad after this clean up.

None of the bolts show any sign of leaks, so that is probably another good sign.

I will check the keel hull joint for any seperation.

There are still 3 bolts that have been fiberglassed over and would require cutting through that to inspect those.

Looking for advice from others and their thougths?

Thanks
 
Last edited:

vyv_cox

Well-known member
Joined
16 May 2001
Messages
25,470
Location
France, sailing Aegean Sea.
coxeng.co.uk
I agree with you, the bolts seem to be in good condition. If rusty water is not entering the bilge, particularly during beating in lively seas, I would leave well alone. Carbon steel, as used for the bolts in your case and the washers in very many cases where the studs and nuts are stainless, can look very rusty in a short time without compromising their strength. The traditional remedy of pulling one bolt to inspect would allay any remaining doubts (if you have any!)
 

doug748

Well-known member
Joined
1 Oct 2002
Messages
12,889
Location
UK. South West.
Visit site
As above. I would not meet trouble half way.

I might pull two easy ones out, and replace with new. You then have the originals to show to anyone that might be interested, like a prospective new owner, should you wish to sell, or an insurance company following a loss.

The main thing is it would put your mind at rest and not totally waste your investment in the new bolts, which in any case are on the shelf for the future.
 

brccd

Member
Joined
19 Apr 2016
Messages
30
Visit site
Thanks for your inputs...I believe I will take the tact of taking one or two of the "easy ones' out especially the one with the deteriorated washer. I hope this little experience and photos I have posted will help others with the same circumstances in comparing what they have and what is needed to be done.

Thanks.
 

jonrarit

Active member
Joined
18 Oct 2010
Messages
228
Visit site
I've been asked a couple of times the torque setting for the replacement keel bolts/stud-nuts.

The spec sheet I got from Beneteau is HERE

my replacements were A4-70 M20 so the range is 116-231 ft lb

I set mine to 200 ft lb

Jonathan
 

brccd

Member
Joined
19 Apr 2016
Messages
30
Visit site
Hello Jonathan,

Well, its getting close to that time where I will give those bolts a try (MAY), and just trying to finalize the procedures! Thanks for your info. Looking at the Beneteau paperwork, the A4-70 M20 bolts which you used, are the Stainless type. Beneteau table shows the Torque on those are as you show.. 116-231 ft lb. I have the dacromatised Steel bolts, which their table shows torque range of 94-195 ft lb.

I was trying to confirm where about in that range people actually have their torque setting to...looks like you were in the 90% range.

I have been reading various articles, and some are in the 75% or less.

These articles also have variations due to the use of anti-seize on the bolts, and typically seem to indicate, if that is used, the torque spec should be reduced anywhere from 10 to 50%.

So needless to say, there is some variation! Thus, I question, what I should actually set the torque to.

My original thought was to set it about 125 ft Lb....above minimum, but the lower end. I was planning to use some anti seize, and if the articles are true, would actually be equivalent to a higher torque. From what I have read, the reduced friction from the anti seize while torquing down the bolts relates to how much torque is applied before reaching a point that your are setting. The torque setting really is to provide the right tension on the bolt. Uggghh confusing!

There is concern in these articles about too much torque will start to crush the fiberglass! I don't know for sure, but are the surfaces area under these bolts purely fiberglass? Seems like there should be additional structure for strength. Its worked for 32 years though...so it must be ok! I don't want to crush the fiber glass...that would be bad.

Any thoughts appreciated.
Bert
 
Last edited:

NormanB

Well-known member
Joined
20 Oct 2014
Messages
1,909
Visit site
Well unless you are using a calibrated torque wrench then it is a bit hit and miss anyway.

I would go for bang on in the middle of the tolerance on the assumption that it offers the most safety on an unknown torque wrench.

The difficulty is that recommended torque settings are given for dry bolts, not oiled or greased.

I did find this though - please excuse the formatting:

BOLT TORQUE FACTORS

LUBRICANT OR PLATING TORQUE CHANGES
Oil Reduce torque 15% to 25%
Dry Film (Teflon or moly based) Reduce torque 50%
Dry Wax (Cetyl alcohol). Reduce torque 50%
Chrome plating No change
Cadmium plating Reduce torque 25%
Zinc plating Reduce torque 15%


....... and your bolts look galvanised (zinc).
 
Last edited:

brccd

Member
Joined
19 Apr 2016
Messages
30
Visit site
Thanks for the additional info

Definately would be using my newly purchased torque wrench...bolts are galvonized....planned to put some marine anti seize. So, thinking to set the torque setting at about 125 ft lbs. Thinking is this would take into account the reduction of torque due to these coatings


Update: 3/24/17...uncovered foward keel bolt that was fiberglassed over...and it looks good!...not changing the two bolts foward, and not checking the other 2 under fiberglass...they are probably good as well. Will still try some of the others in May.
 

davey

New member
Joined
25 Jan 2006
Messages
141
Location
Cornwall, UK
Visit site
I changed the keel bolts on my Moody which were mild steel. I was surprised at how short they were, only 5 inch or so. I made enquires at SKF the Swedish factory in Gothenberg that specialize in Mild steel bolt connections. They have a good web page which states that for a blind bolt insert into a solid iron metal the depth of penetration need only be around twice the diameter of the bolt. (slightly less, the web page gives something like 1 5/8 of the diameter of the bolt but I cannot remember the exact figure)

I am still unhappy about bolt on keels to a GRP hull. In the past keels were bolted to wood hulls with a deadwood spacer. The wood will of course compress when torqued up and will actually expand when launched. Not so with GRP which will crush if over-tightened and goodness knows what happens to those co-polymer molecule thingies when stress due to sailing bends them around a bit.

%%%%%%%%%%%%%%%%%%%%%%%%%%%%%%%%%%%%%%%%%%%

Hmm. A lot depends on how hard the boat is going to be sailed. For instance some skippers like to heel the boat so far over that the gunwales are almost level with the water. This puts a lot of leverage on the keel and its bolts. In addition a hard thrash on a beam-reach puts tremendous stress on the rigging. My old mate "Captain Bligh" who is sadly no longer around managed to get his boat to impersonate a yawning crocodile when the fore-deck lifted! So much for the seller's survey "All chain-plates secure" LOL I had actually noticed a dent in the stem-head roller fitting and as I suspected this had fractured the secret-tang that pins the hull and deck together. A brilliant Brixham yacht rigger was employed to fix the "crocodile's mouth". Together they sailed the boat underneath a concrete pier and they employed a prop to force down the deck as the tide rose. Resin and nuts and bolts were at the ready. After a good shake-down the boat made it to the Caribbean!

A forthcoming task is helping out with a partly built Cuttyhunk 41. As yet there is no keel but there are about 11 or maybe 13 bolt holes in the hull. The holes are for 20 mm bolts. Allegedly at that point the hull is about five inches thick. Next job is to study the Kempes Engineer's Yearbook to deduce the size of the washers. Its all about how many pounds per square inch the hull will withstand. One day the boat should get a five ton keel so the static load per bolt will be about half a ton. It is likely that timber will have been glassed-in (don't know what sort) but most timber, excluding Balsa wood has a maximum crush-strength in excess of 3000 psi, parallel to the grain. At a rough guess washers that are three inches square should be OK. That's roughly nine square inches which at 1000 psi will carry approximately 9000 pounds. The washers can be made from off-cuts of sheet-piling which is weathering-steel that is strong enough to withstand heavy blows from a pile driver. That should do it! Of course the plates will need to be galvanised but the cost should be fairly modest.

As to bolt engagement and pull-out resistance. Long ago a friend worked at Evershed & Vignoles, Acton. They had a tensile strength tester and allegedly this revealed that really only the first three threads of a bolt carry the load! The threads deep down don't really do much it would seem because the bolt stretches slightly.
 

davey

New member
Joined
25 Jan 2006
Messages
141
Location
Cornwall, UK
Visit site
Not all impact wrenches are created equal and for some jobs the 1/2" drive type are absolutely useless. The job was trying to dismantle a Chicago Pneumatic jack-hammer that seemed to be clogged-up. The jack-hammer was what could be called the man's model, NOT the ladies model as it was quite a brute. After trying the usual methods it was a case of driving a full-size car onto it to try to hold it down. Next 3/4" drive socketry and scaffold pipe were tried but the car wasn't heavy enough! Off to the tyre fitters but their Mickey Mouse 1/2" impact wrench wouldn't touch it. I've no idea how much it cost but it was useless. Of course most companies no longer run their air at 150 psi owing to HASAWA Next stop was an HGV repair station but to everyone's amazement their 3/4" drive impact wrench still couldn't undo the nuts! It needed the 1" drive impact wrench to get the thing apart! Of course a proper full size jack-hammer vibrates so much that the nuts and bolts have to be extremely tight. Probably they are made from 12.9 grade High Tensile Steel to withstand the extreme tightening. Incidentally air compressors produce moisture which can ruin air tools and the compressors themselves. Factory compressed air is usually OK but air from DIY compressors can be a bit iffy. Hitachi used to make an excellent electric impact wrench but constant use on lorry wheel nuts would cause the epicyclic gears to fail. This was not a big problem when the very astute parts lady worked at the agents but she got poached by a farm tractor outlet.
 

brccd

Member
Joined
19 Apr 2016
Messages
30
Visit site
Update re changing keel bolts...

There are 11 bolts, one of which is smaller, and looks more to be used to connect grounding wire for boat to keel.

I have removed and replaced 7 of these, with not too much trouble, using the right tools...

3 of the remaining bolts are fiberglassed over. I exposed one of them, and it looks to be in good shape. I will probably clear around that one a bit more to see the washer, and may just change it anyway...it is the 2nd from forward...the most forward one is the smaller bolt.

The other two bolts glassed over are under a brace used to support the table in the seating area. If the other bolt that was fiberglassed over looks good, I will leave those alone.

Attached are some pics so far...

7 removed bolts.jpg

7 removed bolts...thread look perfect...note washers...look bad...bolts heads worn, but ok...

row 3 and 4 new installed.JPG

4 of the bolts installed, used marine anti seize on the threads, and a bead of 3m 4200 under the washers. Bolts were torqued to 135 ft/lbs. With zinc coating and anti seize, rates the torque actually about 155 ft/lbs. This after some research, discussion with other people in the field of nuts and bolts!

last and next to last bolts.jpg

most rearward bolts in...note still shiny....I am using a cold zinc coating on the bolts, followed by 2 part expoxy paint once all dry. finally entirely plan to paint over the entire bilge area with expoxy bilge paint....should be good for quite a long time after all this!

Since these original bolts have made it to this point after 32 years, after this, if it gets another 32 years, I will be about 90 years old by then...I am not sure I will care about keel bolts at that point....maybe just daisies!! Ha!
 
Last edited:

brccd

Member
Joined
19 Apr 2016
Messages
30
Visit site
Hi...sure you can use the pictures! I have a lot of other shots of the tools i used, parts, etc....i was going to compile all of this into a word document if you are interested in that?
 

vyv_cox

Well-known member
Joined
16 May 2001
Messages
25,470
Location
France, sailing Aegean Sea.
coxeng.co.uk
Would welcome your text but the topic from my POV would be the one that comes up so often - bolts with rusty heads but no corrosion where the sealing is intact. If you wouldn't mind sending it to the e-mail address on the website but I may have to edit it down.
 

tonygolder

New member
Joined
18 Mar 2018
Messages
1
Visit site
This is a great thread, thanks to people who have contributed. I am just about to look at replacing the bolts on my First 305. When i look at them onboard at the moment they look just like the images of these 345's and i wouldn't have thought it possible to get a socket on them, let alone doing anything other than twisting off the rusty heads.

After a quick google, finding a link to a location to find and order the correct bolts seems to be my initial problem. Can anyone recommend any suppliers?
 
Top