Volvo penta 2030 flexible coupling removal

David_cepi

New member
Joined
7 Nov 2022
Messages
24
Location
Tasmania
Visit site
Hi everyone.

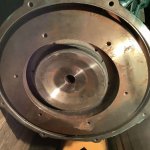
I am reconditioning a 2030 and I got stuck when after removing the gearbox, flywheel casing and bolts of the flexible coupling, this last one doesn’t come off so easily. I was wondering if I have to use a slide hammer or a kind of bearing puller to remove it. I dont want to damage the coupling and that’s why I ask. I have seen a YouTube video which talks about it as if it should come off easily.

Thanks for your time.
 

Tranona

Well-known member
Joined
10 Nov 2007
Messages
41,102
Visit site
Welcome to the forum.

Difficult to advise without knowing what sort of coupling you have. This is not usually related to the engine so could be one of several different types. Also is the problem removing it from the gearbox or from the propeller shaft? Photos would help.
 

parbuckle

Member
Joined
7 Feb 2011
Messages
413
Visit site
You can get information on coxeng.co.uk many years since I removed one you basically tighten certain bolts to extract the rear portion of the unit also they advise not to use any lubricant or solvent the model I am referring to is Centa M 10 /12
 

parbuckle

Member
Joined
7 Feb 2011
Messages
413
Visit site
I am referring to flexible shaft coupling from aft of gearbox to prop shaft this may not be what is in question as there is no picture but I have given details of the unit I am describing
 

David_cepi

New member
Joined
7 Nov 2022
Messages
24
Location
Tasmania
Visit site
Hi guys.

Thanks so much for the replies. Sorry for my poor description.

First of all, the engine is connected to a sail drive via a gearbox. The gearbox spline connects into the flexible coupling which is screwed onto the flywheel.

The machining shop wants me to remove the crankshaft in order to hone the cylinders and this is why I have to remove the flexible coupling + flywheel. I still dont know if it’s really necessary to remove the crankshaft in order to hone the cylinders. Some sources of information say it’s not necessary while others say it is.
 

Attachments

  • F9599C8A-B33D-4159-982A-6A4D26218B48.jpeg
    F9599C8A-B33D-4159-982A-6A4D26218B48.jpeg
    102.9 KB · Views: 37

scottie

Well-known member
Joined
14 Nov 2001
Messages
5,356
Location
scotland
Visit site
I don’t recall there being anything else holding flywheel on
But checking parts list will confirm
This is the later type connection
 

Bilgediver

Well-known member
Joined
6 Jun 2001
Messages
8,103
Location
Scotland
Visit site
Thanks Scottie. I think ill give in a "jank" with a sledge hammer and see if it comes out.

Thanks everyone for your comments.

Even the workshop manual is unclear however pictures suggest to should come apart once the small bolts are removed, I suspect there is another spline connection on the crankshaft which may not have been greased prior to assembly.

https://www.marinedieselbasics.com/wp-content/uploads/edd/Volvo-MD-2010-Workshop-2006.pdf

Page 73 is relevant.
 

MM5AHO

Well-known member
Joined
1 Oct 2007
Messages
2,517
Location
Central Scotland
Visit site
IMG_20220110_123305_557b.jpg This part? I just did mine last winter (MD2030). The whole flywheel comes out with the insulated cehtre peice, which can be taken from the flywheel.
Below, the flywheel with centre piece still in it.
IMG_20220110_145453_986b.jpg
 

David_cepi

New member
Joined
7 Nov 2022
Messages
24
Location
Tasmania
Visit site
Hi MM5AHO:

Yes thats the piece. I just need that flexible coupling out in order to be able to get to those bolts which are marked pink. Once i undo those bolts, the flywheel will come off as you did there.
 

MM5AHO

Well-known member
Joined
1 Oct 2007
Messages
2,517
Location
Central Scotland
Visit site
Here's what's behind it when you get it off. Those 6 bolts go into these threaded holes. To polish the journals on the crankshaft you do need to get it out. And if you're stripping it this far, then do everything, and it'll be good for another 20 years!
IMG_20220110_145457_833b.jpg

I used a boot lace to polish the crank. With metal polish on, and it came up like a mirror. I'd measured it and was still in original spec so no change to bearings.
IMG_20220122_095130_133b.jpg
 
Top