Small refit Merry Fisher 805

jakew009

Well-known member
Joined
29 May 2012
Messages
428
Visit site
Finally had time to start refurbing the MF805 I bought last summer (thread here). I was going to try and do it over winter but was too busy with work and I don't like working in the cold :oops:

This was the last boat project I did Project Cobra - RIBnet Forums

First job was to get the boat moved from Instow back to our car park. It's only about 6 miles from where it's usually moored but I couldn't face traipsing over to the yacht club and back all the time and it's so much easier with all my tools to hand.

This is where it spent the winter (and I totally abandoned it for 5 months knowing I had to do a load of work on it)


And this is where it's now sat

Please excuse the milk crates.

My plan when I bought the boat was to buy the cheapest specimen that was mechanically sound. My thinking was I knew I was going to do a load of work on it anyway, so I didn't really care what condition it was in. However, I didn't want to be messing with the engine.

I used it a fair bit last summer and didn't have too many problems apart from some annoying stuff. However, I didn't particularly trust the electrics and was never going to be happy until I had gone through it top to bottom.

The rough plan

- Replace the rubbing strake all around
- Replace the cockpit lockers by the doors & see if I can fit some more storage in the 'wings'.
- Replace all the through hull fittings and fibreglass the unneeded fittings
- Remove the horrendous china heater install and make good
- Replace the perspex side windows that have crazed
- Miscellaneous GRP repairs
- Vinyl wrap the interior with a modern wood effect (3M Di-noc or similar
- Tart up the cabin table
- Table leg base in the lazarette locker
- Replace the sink / hob with a modern one. Get rid of the awful wooden lid and replace the worktop.
- Flowcoat all exposed plywood in the lazarette / bilge
- New upholstery throughout
- Fix the windscreen wipers
- Replace steering with hydraulic so can fit autopilot
- Get rid of the black tank that takes up half the lazarette and move it under the bed where it should be
- Replace the toilet
- Fit a transom shower
- Fix the hot water
- Fix the bilge pumps
- Fix the lights
- Fix the horn
- Remove fuel tank and clean
- Replace fuel filter with new Racor
- Replace diesel hoses
- Replace exhaust hoses
- Complete rewire
- Replace all the navigation gear (going with Timezero / Furuno PC based system as I'm tight).

Gonna be a busy few weeks :oops:

I've taken loads of photos as I went along as I could find very little info about how these bolts are bolted together or photos of them in pieces.

So today I jumped right in. First job was to rip out most of the electrics and get it back to how it came out of the factory. I also wanted to figure out how to run new wires around the boat.

The Volvo guages are moving and it's all gonna be NMEA2k based (more on that later)


There is masses of space up behind the panel at the front


The wiring was a real mess


The AIS unit was just chucked behind the headliner with no fixings 😔 no wonder it was intermittent.


Dashboard before I rip it apart


Rear of dashboard, lots of bodgery in here


The nautical butcher that added this wire clearly did not have a pair of snips capable of shortening it


Most of the shit removed


Stage 1 complete


Let's see what carnage we have in here

The butcher has actually cut into a bunch of the original Merry Fisher wiring looms in order to find a positive supply for his poxy CO2 detector :(

Looking back towards the rear of the boat from the speaker hole. The far speaker is the speaker under the cockpit canopy. Loads of space in here.


That's an interesting way of drilling a hole


Most of the butchery removed, Wagos are great but they have zero place on a boat


What horrors will hide behind here


Not too bad, but I'm going to rip it all out anyway as it can be much simplified.
https://photos.jkrw.co.uk/images/2024/03/29/A9CC181B-51C3-4B28-AD8A-
C1AF2D8BAFFC_1_102_o.md.jpeg

The locker of horror


Whoever installed that should be shot


It seems he found the bits of wood used to secure the diesel tank on his bonfire
 

jakew009

Well-known member
Joined
29 May 2012
Messages
428
Visit site
Where it belongs


Crispy


Much better, will deal with the exhaust later. He actually installed two outlets, the first was in the wrong place and he couldn't get the exhaust on it.


What will we find under here


Gave up trying to remove this thing, I don't think it's possible to remove.


High quality crimping


First battery out


God knows what they were trying to achieve with this, they seem to have got rid of the leisure battery and just had these two batteries in parallel. And they had bypassed all the original fit isolator and bodged their own nasty thing in


I despair at boat owners


I guess that's where the heater was sucking it's combustion air from then, why oh why


Found this down there


Lovely


Ripped the black tank out. It was a nasty installation and the pipe was all blocked anyway as it virtually went up hill from the toilet. And it took up way too much space in this locker. Will move it to V berth.


Carry 40 litres of piss & shit out of the boat by myself was not the most fun experience


God knows what the previous owner was thinking with this


It stopped raining so i went outside and starting getting rid of the rubbing strake


Got rid of it all the way around but forgot to take a photo. Just ordered new from Wilks Federing. Gonna go for the Click stuff instead


Then decided to start dealign with this. The rough plan is to get rid of the awful wooden lid and then replace the stove / sink with a modern glass lidded version. And a new worktop.


Getting the shelf out was a total pig but it does come out. Underneath you can see access to all the pumps. Whichever French man designed it was a saddist and clearly they assemble it before they put it in the boat.
 

jakew009

Well-known member
Joined
29 May 2012
Messages
428
Visit site
That's looking back towards the centre of the boat, sticking my phone down. And those stupid little filters prevent the bilge pump from doing anything.


The previous owner had obviously used these to try and give the black tank pipe some fall


Need to work out what size the sea cocks are so I can order some new Trudesign plastic ones. Will chop the outside bits off tomorrow


Saw this on another boat and think it's a much more sensible position for the raw water strainer. Once I get rid of the through hull strainer it would be easy to rod from inside the boat


To be continued..
 

Greg2

Well-known member
Joined
24 Jun 2002
Messages
4,464
Visit site
Looks as though you have got your work cut out but a great project and it will be very satisfying to get it all put right.

I have been working on ours all winter but the closest I could get it is about twenty minutes from home but that is better than 1hr 10mins to our marina. So much to do that I couldn’t avoid the cold and have been Billy-no-mates in a cold and windswept yard very weekend!
.
 

PaulRainbow

Well-known member
Joined
16 May 2016
Messages
17,050
Location
Suffolk
Visit site
Lots to do there.

Ref your comments on the pumps etc under the sink..... There is also an access panel in the lazarette, if you haven't seen it. The filter for the bilge pump is, as you say in a stupid place, i fitted an additional one in the lazarette.
 

jakew009

Well-known member
Joined
29 May 2012
Messages
428
Visit site
Not much progress today as I only had a couple of hours this afternoon

Nipped the top of the cabinet off so it's ready to have the new worktop bonded on. Not sure what I'm going to do with the cubby hole you access from the top as the new hob / sink is a bit wider. May make a hole in the side of the cupboard inside.


Thought I was going to have to do battle with the wood support thing the waste tank was stood on, but I gave it a kick and it basically fell apart.


That's better, masses more room in the laz now. And easy access to get the through hulls out.


Decided to pull the fridge out to clean out and remove some bodged wiring that had been ran behind it.


DIY boat electrics should be banned.


Decided to multitool these off from the inside, just sliced the side of the nut off.


The carbide blades are really good.


I assume this is original, didn't really seem anything wrong with it but it was impossible to clean and full of crap.


This thing had a transducer in it that didn't work.


Both gone, I have a new Airmar DST810 to fit but not sure if I need to get rid of the fairing. Also temped to fibreglass in a bit of reinforcement before the seacock goes back in.


Took the toilet through hulls off from the outside.


Gone


The toilet is ridiculously small, it's slightly easier with the door off.


Decided to rip everything out and chuck it in the skip


Much better


That long pipe that went from the toilet to the holding tank was a pig to pull out because it might as well been a piece of rigid pipe. I have no idea why the previous owner didn't put the black tank next to the toilet :confused: pipes would have been so much shorter.


Was like wrestling an annaconda.


Think I'm nearly ready to start putting it back together soon. I'm going to leave the majority of the Merry Fisher factory wiring loom as it's well made and not been bodged too much.

Does anyone have any photos of the original battery arrangement in a MF805?

And also any photos of what the holding tank looks like when installed in the v berth next to the toilet? What size fits?
 

jakew009

Well-known member
Joined
29 May 2012
Messages
428
Visit site
Lots to do there.

Ref your comments on the pumps etc under the sink..... There is also an access panel in the lazarette, if you haven't seen it. The filter for the bilge pump is, as you say in a stupid place, i fitted an additional one in the lazarette.

Yeah it's a bit overwhelming sometimes but you've just got to keep plugging away bit by bit. Only way I can get the boat I want on a budget :)

Before the black holding tank was almost completely blocking access to that hatch. It's a bit easier now with the tank gone but I'm still tempted to move the pumps out from under there and into the laz locker. They would be vastly easier to work on.

I don't suppose you have any photos of what the original battery setup looked like through the hatch under the table? Or even just a description of how it was laid out?

And likewise how the black tank is fitted in the V berth.
 

jakew009

Well-known member
Joined
29 May 2012
Messages
428
Visit site
Bit more today.. off on holiday tomorrow for a few days.

Took the laminate plywood floor up so I could get to this access hatch ready to pull new wires.


This is in the bottom of the wardrobe. The thing on the right is the window demister that runs off the engine coolant loop. One of the air hoses seems to have fallen off it.

Some of the wiring for the windlass was just horrendous. I briefly asked myself why I was putting myself through this and then I come across stuff like this and am glad. An electrical fire would really ruin your day.


And I'm pretty sure this wasn't how the bloke in the Merry fisher factory left the anchor winch :rolleyes: Nor do I suspect he uses household flex to wire it up. And who the hell puts a windlass control here in the forward cabin.


Came across this little treasure, initially I assumd someone must have dropped something and smashed a hole in the liner.


Started digging and found a hole


Then I realised there is one above each stringer and they are just designed to let water flow down to the bile.


All cleaned up. Luckily his fibreglass / bathroom silicon mixture wasn't very strong.


I poked a wire through just to check it went where I thought it did. Anyone have any idea why on earth someone might have done this other than being an idiot and thinking they had a hole in their boat?


Then it was time to pull the fuel tank out so it can be steam cleaned.


Wasn't really very difficult to get out.


Was a bit of a twist to get it out of the locker on my own.


@Bouba you can hire me next time :LOL:


Then decided to get rid of these awful things that were making awful stains


Fitted with woodscrews and the cheapest rawlplugs Homebase sell.


I pulled the exhaust out as well so could measure and order new. Not sure if there was much wrong with it but it's trivial to replace at this point.


I assume this makes it 89mm.
 

PaulRainbow

Well-known member
Joined
16 May 2016
Messages
17,050
Location
Suffolk
Visit site
Yeah it's a bit overwhelming sometimes but you've just got to keep plugging away bit by bit. Only way I can get the boat I want on a budget :)

Before the black holding tank was almost completely blocking access to that hatch. It's a bit easier now with the tank gone but I'm still tempted to move the pumps out from under there and into the laz locker. They would be vastly easier to work on.

I don't suppose you have any photos of what the original battery setup looked like through the hatch under the table? Or even just a description of how it was laid out?

And likewise how the black tank is fitted in the V berth.
Sorry no pics of the batteries or holding tank.

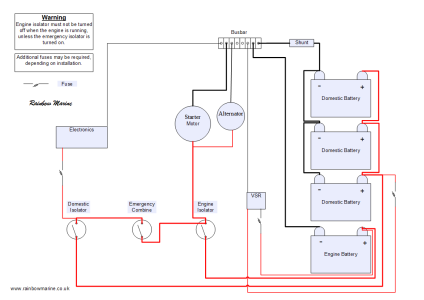
Batteries were originally a single battery, with a second (domestic) battery as an option. Mine had the second battery option. This consisted of two batteries, one for the engine and one for the domestics, each having an isolator switch, with a 3rd switch for the shared negative. The negative switch was (IMO) a waste of time so i re-purposed it to an emergency parallel switch.

Summat like this would be my choice :

Charging-2-banks-VSR.png
 

jakew009

Well-known member
Joined
29 May 2012
Messages
428
Visit site
Sorry no pics of the batteries or holding tank.

Batteries were originally a single battery, with a second (domestic) battery as an option. Mine had the second battery option. This consisted of two batteries, one for the engine and one for the domestics, each having an isolator switch, with a 3rd switch for the shared negative. The negative switch was (IMO) a waste of time so i re-purposed it to an emergency parallel switch.

Thanks, my plan is an AGM engine battery and then a big lithium battery for everything else. I will charge the lithium from solar on the roof and a B2B charger when the engine is running.

I agree with you about the negative isolator. I can’t understand what Jenneau were originally thinking and it makes even less sense being separate isolators rather than some sort of double pole device.

I noticed even their new boats still have a weird isolator / leisure battery setup. It’s strange because the actual wiring harness is well made.
 

jakew009

Well-known member
Joined
29 May 2012
Messages
428
Visit site
Summat like this would be my choice :

View attachment 174814

Sorry saw you added the diagram after I replied.

That’s pretty much what I have in mind except I’m going to use a B2B charger rather than a VSR.

I’m also a bit wary of having an emergency combine with a big lithium battery. If the lithium battery was flat and a fully charged lead acid was parallel a vast amount of current could flow into the lithium as it’s got basically no internal resistance.

I might wire it with some sort of changeover switch that lets me start the engine with the lithium battery in a pinch.
 

PaulRainbow

Well-known member
Joined
16 May 2016
Messages
17,050
Location
Suffolk
Visit site
Sorry saw you added the diagram after I replied.

That’s pretty much what I have in mind except I’m going to use a B2B charger rather than a VSR.

I’m also a bit wary of having an emergency combine with a big lithium battery. If the lithium battery was flat and a fully charged lead acid was parallel a vast amount of current could flow into the lithium as it’s got basically no internal resistance.

I might wire it with some sort of changeover switch that lets me start the engine with the lithium battery in a pinch.
With Lithium, absolutely go for the B2B instead of the VSR. The emergency switch can be used with an isolated bank, as it parallels the loads, not the batteries. If the Lithium was flat, isolate it and turn the emergency switch on, the LA will run everything, but charging can still go to the Lithium. Etc.....
 

paradave

Well-known member
Joined
12 Dec 2019
Messages
454
Visit site
I love this thread.
Blanking off those holes in the lazerette is not uncommon from my understanding. From memory: As the bilge pump doesn’t actually pulp the bilge, just the lazerette, it’s done to keep water somewhere it can be pumped.
Why you’d not just fit a bilge pump instead is beyond me though!
 

Mr Googler

Well-known member
Joined
11 Apr 2008
Messages
5,569
Visit site
I love this thread.
Blanking off those holes in the lazerette is not uncommon from my understanding. From memory: As the bilge pump doesn’t actually pulp the bilge, just the lazerette, it’s done to keep water somewhere it can be pumped.
Why you’d not just fit a bilge pump instead is beyond me though!
Good job the previous owner/s didnt! Might have been no boat left to sell 😂
 

jakew009

Well-known member
Joined
29 May 2012
Messages
428
Visit site
Good job the previous owner/s didnt! Might have been no boat left to sell 😂

The thing is it’s not all the previous owners fault.

The previous owner only had it for 2 years and apart from his horrendous attempt at fitting the heater and some lights, I don’t think he did much to it (probably for the best).

However, the previous owner to that was fastidious about keeping receipts and he paid a fortune for a lot of this work to be done. Both the holding tank and the hot water system were fitted by ‘professionals’ who charged a huge amount of money to do so.

But frankly it’s an abomination and I’m ripping the lot out.

In general I think the marine industry has a few ‘good’ tradespeople and then an army of nautical butchers who shouldn’t be allowed anywhere near a boat. The problem is most owners aren’t very clued up themselves and couldn’t tell the difference between a good job and one done by an orangutan.

It’s kind of amazing more boats don’t have problems, but it also explains why many owners seem to put up with various bits of their boats not working properly. Having something not working properly drives me nuts until I fix it.

I guess half the problem is a tradesperson arrives to fix something, but he is presented by 20 years worth of bodges from previous people. So to fix whatever the current problem is properly he either has to rip everything out and start again, or he simply does yet another bodge.

It’s never economically viable to pay someone to rip everything out and start again, so boats just get gradually worse and worse.
 

PaulRainbow

Well-known member
Joined
16 May 2016
Messages
17,050
Location
Suffolk
Visit site
The thing is it’s not all the previous owners fault.

The previous owner only had it for 2 years and apart from his horrendous attempt at fitting the heater and some lights, I don’t think he did much to it (probably for the best).

However, the previous owner to that was fastidious about keeping receipts and he paid a fortune for a lot of this work to be done. Both the holding tank and the hot water system were fitted by ‘professionals’ who charged a huge amount of money to do so.

But frankly it’s an abomination and I’m ripping the lot out.

In general I think the marine industry has a few ‘good’ tradespeople and then an army of nautical butchers who shouldn’t be allowed anywhere near a boat. The problem is most owners aren’t very clued up themselves and couldn’t tell the difference between a good job and one done by an orangutan.

It’s kind of amazing more boats don’t have problems, but it also explains why many owners seem to put up with various bits of their boats not working properly. Having something not working properly drives me nuts until I fix it.

I guess half the problem is a tradesperson arrives to fix something, but he is presented by 20 years worth of bodges from previous people. So to fix whatever the current problem is properly he either has to rip everything out and start again, or he simply does yet another bodge.

It’s never economically viable to pay someone to rip everything out and start again, so boats just get gradually worse and worse.
A couple of boats ago i had a 805, bought it with about 140 hours on it and one owner, never even been slept on, it was like new. No bodges.

Current boat, the guy we bought it from had owned it for 5 years and managed to find monkeys to do all of his maintenance and repairs, at very expensive rates. With the exception of the engines (fortunately) everyone was a disgrace. Even the simplest job was badly done at premium rates.

After owning the boat for 2 years most things have now been unbodged, updated, replaced etc. Will try and find time to post a report like yours.
 

PaulRainbow

Well-known member
Joined
16 May 2016
Messages
17,050
Location
Suffolk
Visit site
Ref bilges, bilge pump, liner....

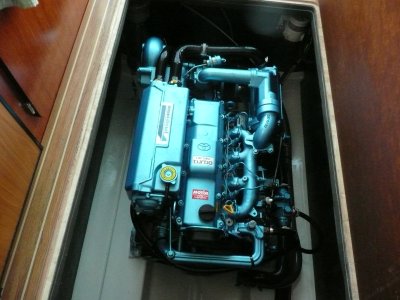
The bilge pump picks up from a small sump in the lazarette, i think water can get there from the liner. There are some large holes in the liner beneath the engine, be careful if you wash the engine, if you get water under the liner it's a pig to get out, don't ask how i know. The liner ends a little short of the transom, so any water under the liner ends up at the transom, i fitted a small inspection "hatch" at the very back of the locker, this allowed any water to be sucked out with a roaming pump. Once dry beneath the liner i don't think any water got in there again.

To make sure water didn't get under the liner from the engine space i fitted a small Whale bilge pump at the front of the engine space.

I like a nice clean engine/engine space.

engine-1.JPG
 
Last edited:

Mr Googler

Well-known member
Joined
11 Apr 2008
Messages
5,569
Visit site
The thing is it’s not all the previous owners fault.

The previous owner only had it for 2 years and apart from his horrendous attempt at fitting the heater and some lights, I don’t think he did much to it (probably for the best).

However, the previous owner to that was fastidious about keeping receipts and he paid a fortune for a lot of this work to be done. Both the holding tank and the hot water system were fitted by ‘professionals’ who charged a huge amount of money to do so.

But frankly it’s an abomination and I’m ripping the lot out.

In general I think the marine industry has a few ‘good’ tradespeople and then an army of nautical butchers who shouldn’t be allowed anywhere near a boat. The problem is most owners aren’t very clued up themselves and couldn’t tell the difference between a good job and one done by an orangutan.

It’s kind of amazing more boats don’t have problems, but it also explains why many owners seem to put up with various bits of their boats not working properly. Having something not working properly drives me nuts until I fix it.

I guess half the problem is a tradesperson arrives to fix something, but he is presented by 20 years worth of bodges from previous people. So to fix whatever the current problem is properly he either has to rip everything out and start again, or he simply does yet another bodge.

It’s never economically viable to pay someone to rip everything out and start again, so boats just get gradually worse and worse.
You’ve called that right there. Some “engineers” are dodgy for sure but…..customers also don’t want to pay for a proper job. If it wasn’t working they want it fixed cheap as possible. Achievable but corners will inevitably have to be cut. I did an engine stop / start panel for a friend of a friend. Sorted lots of wiring and took me a couple of days. All the owner saw was 2 new buttons and asked why it took so long!
 
Top