S drive propshaft

PabloPicasso

Well-Known Member
Joined
12 Feb 2010
Messages
2,907
Visit site
I tackled the job of removing my 120s saildrive propshaft this afternoon (the oil was a milky brown colour, likely inducting water ingress).

It took a little while to release it from its housing with careful, but persistent, tapping with a mallet. I fitted the bronze capture nut that holds the prop on, and a wooden wedge to aim the blows. Once a gap had appeared I used a large flat bladed screwdriver to gently prize the peices apart, working evenly around the hub.

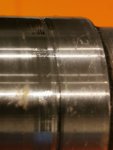
Now, before I fit the new seals and put it all back together, is this "scoring" that needs to be "sleeved", or is still serviceable?

IMG_20221109_191548_edit_1881979956705531.jpgIMG_20221109_191522.jpgIMG_20221109_192512.jpgIMG_20221109_191548_edit_1881979956705531.jpg

Many thanks.
 

Attachments

  • IMG_20221109_192529.jpg
    IMG_20221109_192529.jpg
    344.7 KB · Views: 0
Last edited:
They are rather tough. Not easy pulling the removable part off afterwards and worth making sure you can get a good grip on it first, perhaps even pre-cutting a slight notch in the removable part to make it a little easier to start the tear off.

Also, the installation 'cups' you get with the speedi seals are nowhere deep enough to go the length of the shaft.

I bought some aluminium tube which was either a lucky guess or good estimation but it worked perfectly.

20221109_202047.jpg

The tube I believe I bought was this from a supplier on eBay..

Screenshot_20221109-201124_eBay.jpg
I actually bought a spare piece of tube which you are welcome to borrow if you are anywhere near Portsmouth.
 
Sleeving time.

Follow the SKF installation instructions - they have nice videos on how to do it. As Martin_J has pointed out, the supplied installation tool is useless to you and you need a tube of the right size to push them on. In our case a hosebarb + box spanner to extend it did the job. Also, fill the groove with epoxy and then push on the sleeves while wet, that way the seal will have support underneath instead of risking it being crushed into the groove. Clean up excess epoxy thoroughly before curing.

Tip: Mark the grooves on paper before sleeving so you can locate the sleeves in the right spot (see photo of finished job).

Saildrive prop shaft with two sleeves installed. A yellow note with two black markings aligned with the bearing shows the location of the wear areas.
 
Top