PaulRainbow
Well-Known Member
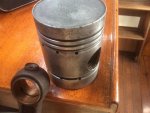
2. The oil feed normally is from the crankshaft pin through into the large end bearing And then up the connecting rod into the small end bush.
3. Sometimes there is a further drilling on the top of the conrod to allow oil to be squirted up into the underside of the piston crown for cooling purposes.
4. So to explain the 3 hole bush:
(I) this is the one I would place at 12 o clock to align with the drilling for piston cooling.
(ii) I would refer to this one as the 5 o clock position this will allow oil from the gallery in the small end of the conrod into the bush when it is not under load ( the load area moves through each rev).
(iii) I would refer to this hole as the 7 o clock position and the same comments from ii then apply.
This is all incorrect for this and most engines, sorry. The hole in the top of the conrod is where the oil comes in, not goes out.