Rebuilding a 1968 Sabb model GG

K-ron

Well-Known Member
Joined
1 Mar 2014
Messages
221
Visit site
Hi folks,
I have decided to start a thread to document the rebuild of my engine.
Any advice, thoughts and questions are most welcome. This is my first rebuild and look forward to tapping into the wonderful experience and kindness from the forum. Many thanks in advance.
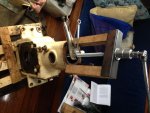
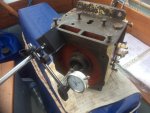
Today's jobs:
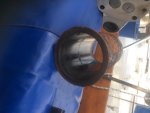
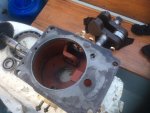
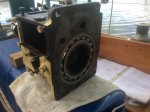
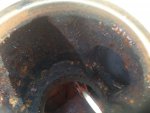
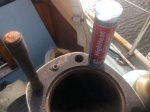
scraping away the rest of the loose rust in the water jacket on block and filling the top of the block where there has been a little corrosion with some epoxy putty. This will ensure that the two rubber washers that seal the water cooling seat properly.

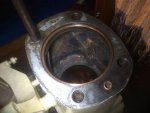
Clean the last remnants of old gasket off both sides of the block and thoroughly wash and wipe down with clean diesel.

Having rechecked the small end bush clearance yesterday and discovering a small bit of movement, I am going to remove the gudgeon pin and check the clearance using a simple equation I have found online.

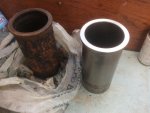
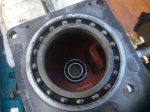
Test fit the new liner, the manual states that it should push in and out by hand without the o-rings fitted.

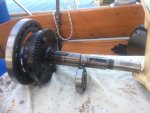
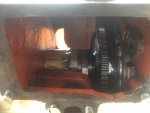
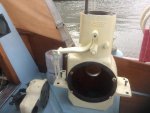
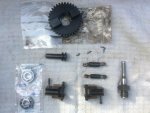
Reassemble the centrifugal governor with new bearings and split pins. I have replacement springs but the old ones are exactly on spec plus the governor is simple to remove with the engine back in position.

I shall report back later. Please chime in at will.

Kieran
 

Attachments

  • image.jpg
    image.jpg
    86.7 KB · Views: 44
  • image.jpg
    image.jpg
    87.3 KB · Views: 45
  • image.jpg
    image.jpg
    90.9 KB · Views: 46
  • image.jpg
    image.jpg
    95.2 KB · Views: 49
The liner was somewhat stubborn to remove. I got as much tension as I could possibly get on the puller then had to get Beth to sit on the block whilst I smacked the bottom of the puller with a club hammer from inside the block. Here are the few tools we have had to make up: the puller two bits of oak, box section and a machined steel disc, an extra long socket to remove the gearbox and the fly wheel puller.

Kieran
 

Attachments

  • image.jpg
    image.jpg
    93.5 KB · Views: 21
  • image.jpg
    image.jpg
    89.5 KB · Views: 22
I like the last photo!

Despite having worked on many engines over many years, I have never stripped an autobox, stripped a steering box or removed a cylinder liner. :)

Richard

Cylinder re-lining used to be a regular job for me in the 70's with fragile Jap motorbikes. I've also done steering boxes, differentials and manual gearboxes. Like you, never done an auto box.
 
Finished cleaning up the engine block today, all the old gaskets removed and chipped off all loose rust in the water jacket. When I went to test the fit of the liner it was a little tight still so some of the internal corrosion is protruding beyond the smooth machined section where the liner o-rings will sit. So I will have to address that tomorrow, don't want to snag the o-rings when I drive the liner in.

Removed gudgeon pin from piston and checked clearance, it came out at 0.0929 and max allowed is 0.1 so I will get a new bush.

The governor didn't go very well. Unfortunately I mushroomed the end of the spindle when drifting out the bearings so I will have it turned on a lathe to rectify. It won't effect its operation as the sleeve that rides on the spindle is fine. Whoops. Also I have decided to replace the springs because I already have them, they came with the boat, but I have no idea how the end of the springs are bent over to retain the eye holders. I tried to remove the old ones with long nose pliers with no luck. Any ideas people?

Kieran
 

Attachments

  • image.jpg
    image.jpg
    92.4 KB · Views: 22
  • image.jpg
    image.jpg
    91.3 KB · Views: 23
  • image.jpg
    image.jpg
    89.9 KB · Views: 22
  • image.jpg
    image.jpg
    89.6 KB · Views: 22
Finished fairing the top of the engine block and test fitted the new liner. All good.
Cleaned up the gear housing and replaced o-ring in the water pump flange.

Tomorrow I will reassemble the cam shaft on its new bearings into the gear housing. The question I have is what order to fit the new bearings? My plan was to heat the large bearing in oil on the hob, place it on a flat surface and tap the cam shaft down onto it. Then, having left the small bearing on the cold plate in the fridge over night, heat the whole housing with a paint stripper gun and drop the small bearing in with a little persuasion if needed with a piece of pipe/socket on the bearing race. Next, drop the cam shaft into the housing. Any advice or alternative suggestions welcome. This is how it came apart but in reverse.
The photos show where the bearings will sit on the shaft and housing. Hope this all makes sense.

Thanks.

Kieran
 

Attachments

  • image.jpg
    image.jpg
    92.3 KB · Views: 16
  • image.jpg
    image.jpg
    88.1 KB · Views: 16
  • image.jpg
    image.jpg
    91.3 KB · Views: 16
  • image.jpg
    image.jpg
    91.2 KB · Views: 16
  • image.jpg
    image.jpg
    94.9 KB · Views: 16
Certainly it's good practice to put anything that needs to be as small as possible into the freezer overnight and to warm up anything that needs to be as big as possible, usually "holes" but also bearings if they are to be fitted onto a shaft.

I don't have a paint stripper gun so don't know how hot they are or how evenly you can apply the heat but I usually put the whole assembly in the oven for 30 minutes at 100C if it's oven-friendly or pour boiling water over the area I need to expand if it's not.

Richard
 
Cylinder re-lining used to be a regular job for me in the 70's with fragile Jap motorbikes. I've also done steering boxes, differentials and manual gearboxes. Like you, never done an auto box.
Ive relined lots of wet liner diesels in my 50 years of repairing, rebored lots of petrol engines but never relined a "fragile" jap motorbike one!
Stu
 
Cheers folks,
Anybody got any ideas for bending the ends of the governor springs mentioned in #6?

Kieran
 
Springs for this purpose are normally formed with the mounting turn finished (ready to fit) on both ends.

Are you sure you have genuine spare springs?

If you still have the originals - size them up and enter details on this website - they may be stock items.

Linky
 
Last edited:
Ive relined lots of wet liner diesels in my 50 years of repairing, rebored lots of petrol engines but never relined a "fragile" jap motorbike one!
Stu

Small 4 stroke Hondas had a habit of dropping valves if over revved, like missing a gear. Luckily the twins had removable liners.
 
Cheers folks,
Anybody got any ideas for bending the ends of the governor springs mentioned in #6?

Kieran

You need a wire bender that will handle piano wire, like http://www.chronos.ltd.uk/cgi-bin/s...talforming___Cutting_Tools_340.html#a50166001 Other supliers are available and they arent particularly difficult to make. The difficult bit is keeping hold of the spring wire whilst you bend it - be prepared for plenty of swearing as springs are real pigs to work with and bend, and wear goggles.
 
Thanks Norman. They came with the boat but in Sleeman hawken packaging with the correct parts number. Maybe that's why they weren't fitted. It is possible that later engines had a slightly different arrangement for attachment. I will checkout your link.

Kieran
 
Small 4 stroke Hondas had a habit of dropping valves if over revved, like missing a gear. Luckily the twins had removable liners.
Used to do spannering for a sidecar racer in the early 70s, got up to national winning level and we were set for the World Championship circus when the sh it hit the fan. Anyway, at Oulton one time, Mike Hailwood was there, got to know his mechanic, "Nobby" Clark, he showed me an engine he had rebuilt overnight, the hole in the crankcase had been repaired with araldite after they fitted a spare crank. I must say that I found road going Jap engines pretty bullet proof. Saw worn cam bearing surfaces in the heads, pretty badly worn I must say! But they still ran, just!
Stu
 
I must say that I found road going Jap engines pretty bullet proof. Saw worn cam bearing surfaces in the heads, pretty badly worn I must say! But they still ran, just!
Stu

Some were obviously better than others. The Honda engines had pretty bullet proof bottom ends, the two weak points were dropping valves and the cam bearings you mention. Some were machined into the back of the points housing one side and a lump of cast ally the other side. That Jap ally was some "interesting" stuff. A delight to weld :disgust:
 
Eventually got the gear housing together today. All looking good, the cam shaft turns freely and runs true. It was a bit of a pig, as I was driving the shaft into the small bearing whilst lining up the outer bearing with the housing the eccentric pulley accidentally rotated by a few degrees which in turn bottomed out the cam shaft key. I couldn't understand why it would go in the last 5mm. When I worked it out it was a little late and I had put a burr on the pulley which stopped the eccentric ring rotating freely. So out it all came, some delicate filing and reassembled without too many more issues.

Tomorrow I should be able to fit the hand start sprocket and the front gear cone.

Question: luckily my manual has additional updated notes from Sabb South before they went out of business and within them it states that Sabb controlled swell gaskets don't require any cement just a smear of grease what does the panel think?

Kieran
 

Attachments

  • IMG_0762.jpg
    IMG_0762.jpg
    92.7 KB · Views: 24
  • IMG_0763.jpg
    IMG_0763.jpg
    90.8 KB · Views: 21
  • IMG_0764.jpg
    IMG_0764.jpg
    90.9 KB · Views: 21
Question: luckily my manual has additional updated notes from Sabb South before they went out of business and within them it states that Sabb controlled swell gaskets don't require any cement just a smear of grease what does the panel think?

Kieran

Grease will be fine :encouragement:

For someone who has never rebuilt an engine, you look to be doing a fine job.
 
Top