Leaking saildrive seal? Or what?

Lscott

New member
Joined
29 May 2024
Messages
1
Visit site
Just in case anyone is interested...

Finally got to the bottom of this (literally).

Lifted the boat today. Removed the outer (more or less cosmetic) seal from the saildrive leg and make sure the bilge was full of water. Dried and cleaneed around the saildrive leg and established there was a small trickle of water from an almost invisible gap between the hull and the cylinder shaped inner moulding that the saildrive sits in - right at the base where the inner moulding is attached to the hull. Not an impressive piece of engineering by Dehler on the face of it, but I don't know what might have happened to the boat before it belonged to me.

Looks fixable, at least that's what the fine folks at Gosport Boat Yard tell me, and it avoids the expense of replacing the saildrive gasket which always seemed an unlikely culprit.

Thanks to all of you who proposed possible explanations. Now I'm hoping the fix will be good and Ill have a dry bildge for the rest of the season.
I may have a similar leak. Can you recall what the yard did to fix the leak? I know it was a long time ago.

Thanks
 

Valkyrie Dehler 36

New member
Joined
13 Apr 2024
Messages
2
Visit site
This is late and off direct subject but I own a 2003 Dehler 36 and am planning to replace the Volvo diaphragm sail drive seal this spring. Can you advise if there is enough clearance to remove the saildrive from the engine (bringing up through the tunnel) without removing the propeller shaft at the bottom of the drive? With the backward facing engine there is not much room to slide the engine back into the aft berth area and then tilt the drive as Volvo instructions suggest. Thanks!
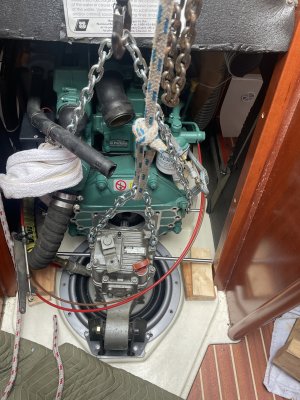
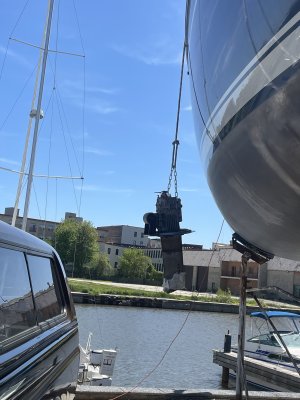
For those with an interest, I replaced my Volvo saildrive bellows (doughnut seal) after sailing 22 seasons on freshwater Lake Michigan. Almost 3 times the Volvo recommended interval and other than some fine cracks...looks almost as good as the new one. But now I have "peace of mind". I was concerned the Dehler 36 might not have enough room to move the engine back but it does and actually it may be easier undoing the saildrive under the campanionway that others who have forward facing engines where you would be working in a aft berth. My learning's for those who care:
1. You must remove the shaft at the bottom of the saildrive. This is really not hard at all just have the two new o-rings and take care to stow the shaft carefully to protect the gear facings
2. You need to remove water inlet to saildrive hose, transmission shift linkage (just remove L-bracket and the cable to keep settings), Throttle cable at the pin, raw water pump hose between pump and anti-siphon, Disconnect raw water hose from anti-siphon to heat exchanger rubber end cap at back of engine. Remove step screws at hinges at bottom of steps to remove entire engine cover. You can gingerly place the steps back through the process but don't step on the top stair! Having access is a big deal since it is not fun to climb up out of the v-berth hatch!
3. I connected an engine chain hoist hung from a 4x4 over companionway top to bolts I screwed into the engine on bell housing sides. I used the main halyard attached to the saildrive to hoist it up out of the boat, and down to the ground.
4. Once the engine is supported by the chain hoist it is easy to move. I marked the engine mounts on the bed before removing so I could place it exactly back later on. Be careful moving the engine back to ensure it doesn't press on anything at the rear. I put cardboard over the air inlet to give padding for the throttle linkage.
5. With engine raised and moved back I still had to peel the rubber doughnut seal off of the hold down rim. The replacement of the rubber bellows is easy...just take your time and follow the somewhat vague instructions that come with the new seal. Also, with the saildrive out and the engine moved forward I took the opportunity to replace the raw water impeller...so easy with room!!!
6. After fitting the new bellows on the re-install, getting the finicky spline shafts to re-mate takes patience. I had my wife up top managing the main halyard with the saildrive while i finessed the angle and height of the engine with the chain hoist. We were able to "float" the two together until they slipped back together. I did this before bolting the saildrive ring back to the hull
7. Reconnect all that was disconnected. Use torque wrenches on all bolts for the saildrive bellows, the saildrive to engine etc. It's not hard but get it right!
8. Removing the old hull cover where the saildrive enters the boat is not fun but you must get most of the sealant off for a smooth surface to mount the new one. The drain hole on the new one goes forward since the water flow on the hull when draining would go forward as well.
9. Removing 20 year old 3/4 inch water lines is not easy. I cut them at the nipples and installed new 'heater hose" on hoses mentioned above. Easy, cheap and on the saildrive below water line so the right thing to do!!
10. Check, double check and triple check all items that were disconnected. When I launched, I had the boat in the slings with engine running for 10 mins to make sure all connections were good!

There are videos, etc. on replacing the saildrive bellows but hopefully this info specific to the Dehler 36 is useful.
 

Attachments

  • IMG_4723.jpeg
    IMG_4723.jpeg
    2 MB · Views: 10
  • IMG_4716.jpeg
    IMG_4716.jpeg
    1.3 MB · Views: 11

Habebty

Well-known member
Joined
16 May 2001
Messages
4,506
Location
Norfolk/Suffolk
Visit site
Has the boat ever had a "travel lift incident" where the straps have caught under the saildrive while the boat is lifted ? Hoist operator might have noticed and quietly and quickly lowered the boat to reposition the strop having stressed the saildrive mounting frame.
 

Daydream believer

Well-known member
Joined
6 Oct 2012
Messages
21,066
Location
Southminster, essex
Visit site
My son carried the Volvo 130S saildrive up & down the ladder on his shoulder. Same for the original 120S
I fitted the 120 back entirely on my own. I tipped it vertically with a lorry strap round the keel & drive & just ratcheted it until vertical. Then it slid into place on the engine. But for some reason the 130 was a pig to fit & it took 2 of us 3 hours of swearing.
On my boat I was able to leave the prop shaft in place on the drive until in the workshop.
Then I replaced the seals.
Have done the process 3 times now.
As for tracing leaks I would suggest talcum powder, instead of dye as easier to clean afterwards
 
Top