Interior fibreglass / headliner headache...help appreciated

robmdknapp

New Member
Joined
20 May 2015
Messages
21
Visit site
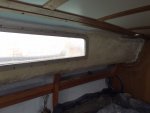
Hi team - I am now onto the interior part of the refit for my Cutlass 27. I want to either paint or reline the interior walls. At the moment they look crap.

Suffice to say I have the following problems:
Most of the saloon is lined with bare fibreglass painted with cracked paint. The rest is either very old & scummy headliner, or the remnants of the foam & adhesive from the headliner.

- I have been scraping paint off the fibreglass in order to key & prime it for either interior paint or for re-lining. This is taking blooming ages & doesn't really leave much of a neat finish (given the undulations in the raw fibreglass). International no longer make Ranch Paint - so if I am painting it, any alternative brands that will allow the fibreglass to breathe/give a good finish?

- I have not managed to get the foam/old adhesive off the other sections. It just gunges up the stripping tool.

- Can anyone recommend a good source of headliner rolls, or someone in East Anglia who fits it?

I know there is much heritage on this subject but have struggled to find original posts or consensus on the way forward.

Any advice/experience much appreciated. Many thanks.
 

Attachments

  • IMG_0050.JPG
    IMG_0050.JPG
    85.6 KB · Views: 6
Get yourself a 'face-off' disc from your nearest builders merchant for your angle grinder and put on goggles and a boiler suit. Very effective at cleaning the old glue off fibreglass without damaging the substrate. Cover your interior furnishings and other surfaces before hand tho! Hawkhouse supply the face-off discs and various lining materials and glues. That's the way I did mine.
 
Have you tried acetone to shift the gunge?
If it does, campare prices of acetone and nail varnish remover for the best price. Strange but when I bought some, bulk nail varnish remover was a lot cheaper.:encouragement:
 
Would some parts be amenable to fixing battens to the fibreglass, then cut pieces of thin ply to size, glue the liner of your choice, usually foam backed vinyl or van lining carpet, to the ply & screw on to the battens. This also gives you a space to run cables should you need to. I've done a forecabin & aft cabin of a boat before with this method, looks neat and obviates the need to spend ages getting the bare fibreglass cleaned up...

18.jpg
 
+1 for the battens and ply sheet approach. My headling was in much the same state as you describe. I resorted to good old mechanical removal, scrapers and the like. Epoxy resin to attach battens in startegic places then cover ply sheet in lining of your choice which then screws to the battens.
 
For paint in the last two boats I've used bog standard DIY shop bathroom or kitchen paint.. the water based stuff... they usually come with fungal/mould inhibitors, always a bonus in a boat.. :)

For removing gungy/glue, when I did it I tried all sorts of things and in the end an old semi blunt half inch chisel did it for me - took a fair amount of time but I just laid on my back listening to Classic FM and got on with it, a foot at a time... :D
 
Appreciate the input. Have ordered some acetone (plus 3M adhesive cleaner if needed) & planning to use some more elbow grease for the rest of the painted parts. Will prob go down the van liner carpet route once the fibreglass is clean.
 
When I built leisure 17's, we just sloshed pure white emulsion all over the interior (We were the laminate kings, no rough finish here thank you). As for carpet liner, do not use spray glue as it doesn't react well with heat.(this has been discussed elsewhere). I also used spray glue for my campervan conversion, and on hitting the south of France, the overhead carpet wasn't happy, not happy at all as the glue failed.
May I also add that a gallon of acetone is brilliant for blowing up wasps nests!:D:D
 
I would get something like this: http://www.ebay.co.uk/itm/SCRIM-FOA...NG-BOAT-CAR-CAMPER-MATERIAL-3mm-/221278683779

It's foam, so light and gives some insulation, has a faux leather textured surface. Use 3M Scotch-Weld to put it on (bombproof - will not come off without force). Due to being 3mm thick foam, surface underneath does not have to be perfectly even (but does have to be grease and dust-free for the adhesive spray to stick). Do get a can of 3M Scotch cleaner for any overspray.
 
KMI Paint and Glue remover looks like it's real good stuff. I've not used it yet but I'll be removing my anti foul at the end of the season and saw their products. They had a part where they were removing glue from the old headliner.... Just an idea..
 
Clean off all loose finishes and glue carpet tiles on
Easy to replace, easy to cut and re do if slight mistake,
Range of colours, cheap
..or very cheap end of roll carpet... Gladys's hull sides are carpeted (the offcut that did the whole boat was less than £20), with Headlining only being above deck level (so inside sides of coach roof)
 
..or very cheap end of roll carpet... Gladys's hull sides are carpeted (the offcut that did the whole boat was less than £20), with Headlining only being above deck level (so inside sides of coach roof)

Trouble with large sheets is that it is harder to get square internal corners when you come up to stringers etc plus you have larger pieces to work with. If you cut one wrong the whole lot os ruined. With carpet squares you may be able to use the badly cut one elsewhere
 
Avocet is a Cutlass 27. I have a couple of stiffeners under the side decks below the edges of the windows though. That said, you could easily epoxy a couple of strips of wood to each side in the same locations. I cut a pair of 4mm plywood panels with cut-outs in them the same shape as the windows. I covered these on the side facing inwards, with 1/4" Scrim Foam.

http://www.ebay.co.uk/itm/SCRIM-FOA...E-3MM-THICK-/221011238809?hash=item33754bdf99

It goes on with the woven side AWAY from the plywood. I just used an aerosol can of some sort of contact adhesive like Evo-Stick. On top of that, I stuck vinyl of the same sort that the seat cushions are covered with.

My headlining is similar to the OP's - wooden inverted T sections, with painted ply panels in between them, so I have an edge on either side. The top edges of these foam and vinyl covered side panels tuck up on either side of the outermost panels, which holds them and finishes off the gap. Along the bottom edge, I've put long screws through them with trim caps over them. The screws go into the stiffeners under the deck at each side.

PICT0010_zps91d102c7.jpg


PICT0009_zpsw4szvy4x.jpg


PICT0012_zpszcuovijv.jpg
 
I dot and dabbed 4mm ply onto the fibreglass using sikaflex as per plasterboard in houses. Worked fine. Mine was covered with teak veneer but you can use any finish you like once you've got it boarded out.
 
Probably a bit late but I just would not bother getting off the remains of glue, foam etc. I had the same job to do and it it so messy and creates lots of sticky residue going everywhere that I left it on. Instead of foam backed headlining I used interior UPVC cladding. it comes in widths between 300mm (3 simulated "planks") 200mm or a single plank of 400mm. Mine has been on 6 years and it is still totally white, only gets a wipe once a year and looks terrific. It will take compound curves and is unbelievable quick to fix. The edge trim is the most fiddly but it is so light (10mm hollow core) and no condensation. I used very small screws hidden in the tongues and going into the stiffening in my coachroof but if I was doing some more I would use builders grab adhesive. My main cabin (cat is about 8ftx13ft and I did it complete in 1 day. you can also route cables through the box section core. Worth considering apart from not having to clean up the cabin roof.
 
Top