I'm not a happy bunny - knackered D9

kashurst

Well-known member
Joined
10 Oct 2003
Messages
11,354
Location
Spain
Visit site
Busy few days stripped engine in the boat as its a chainsaw job to get it out. Found the problem, the bearing assembly in the timing gears from the crank to the camshaft had come apart. A lock ring seems to have unscrewed itself and wizzed around the timing case getting itself chopped into three pieces. Amazingly all 7 gears are undamaged. Not sure if that's good luck or not but new part will hopefully be in Spain in about 5 days. Then its back into the engine bay for @4 days to get it all back together. Why its come off is anyone's guess. Possibly a failed drive coupling introducing a new vibration frequency or just bad luck, poor part ?
 

BartW

Well-known member
Joined
9 Oct 2007
Messages
5,236
Location
Belgium
www.amptec.be
that is good news if you found the problem, and apparently before more serious damage was done.
After replacing the damaged parts you can do further investigation if everything runs smooth and normal,
did you do this all by yourselve ?
how did you move the gearcase ?
can you send some pics ?

now that I know all parts from a diesel boat engine I am hugely interested in other's problems ;-)

good luck finalising the repair !
 

kashurst

Well-known member
Joined
10 Oct 2003
Messages
11,354
Location
Spain
Visit site
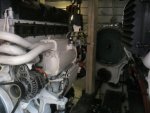
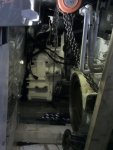
Just for you Bart (and I suspect a few others) a bit of engineering porn. I did the work myself except some help from Andy at Sealine Costa Blanca, lining up the timing marks to get everything at top dead centre before pulling it all to bits and Andy using has brilliant Snap-On Fibre optic camera so we could see inside the engine before taking it apart. The timing marks are on the opposite side to the starter motor hole where the engine turning tool fits so you can´t see what you are doing alone. I wasn´t planning on doing the work myself but the few people around here I trust are all stacked out with work, so its DIY or wait ages (autumn). I suspended the engine and gearbox from the deck above, so braced the deck with timber from the engine bearers. I wasn't sure it was possible to take the gearbox off without moving the engine forwards but after some measuring there seemed to be about 2cm clearance, which fortunately was correct.

Once I removed the gearbox, I took off the oil sump so I could put timber underneath the engine block to support it whilst I removed the timing cover that has all the rear engine lifting points. The tricky bits were getting the drive coupling off the gearbox splines´. It´s an incredibly good fit and took a hour of gentle jiggling with lots of WD40. The flywheel bolts- they must have been tightened with a machine, unbelievably tight. Volvo seemed to use every bolt head size possible so a few trips to buy more sockets. Fingers crossed it all goes back together OK. So far we have examined all the timing gear train for any other damage, camshaft rockers etc.

What is reassuring is that inside there is no evidence of any wear after 1200 hours. I have double checked the harmonic dampers for any signs of leaks or cracks. The D9 has two. One on the crank at the front which is a cast iron ring totally enclosed and floating in some weird silicon oil. The one on the camshaft I think is a ceramic ring (big warning in manual don´t drop it or knock it) again totally enclosed floating in some other weird oil.
 

Attachments

  • IMG_20150522_080356.jpg
    IMG_20150522_080356.jpg
    79.5 KB · Views: 7
  • IMG_20150522_080535.jpg
    IMG_20150522_080535.jpg
    79.2 KB · Views: 7
  • IMG_20150522_140206.jpg
    IMG_20150522_140206.jpg
    36.9 KB · Views: 8
Last edited:

petem

Well-known member
Joined
16 May 2001
Messages
18,785
Location
Cotswolds / Altea
www.fairlineownersclub.com
Just for you Bart (and I suspect a few others) a bit of engineering porn. I did the work myself except some help from Andy at Sealine Costa Blanca, lining up the timing marks to get everything at top dead centre before pulling it all to bits and Andy using has brilliant Snap-On Fibre optic camera so we could see inside the engine before taking it apart. The timing marks are on the opposite side to the starter motor hole where the engine turning tool fits so you can´t see what you are doing alone. I wasn´t planning on doing the work myself but the few people around here I trust are all stacked out with work, so its DIY or wait ages (autumn). I suspended the engine and gearbox from the deck above, so braced the deck with timber from the engine bearers. I wasn't sure it was possible to take the gearbox off without moving the engine forwards but after some measuring there seemed to be about 2cm clearance, which fortunately was correct.

Once I removed the gearbox, I took off the oil sump so I could put timber underneath the engine block to support it whilst I removed the timing cover that has all the rear engine lifting points. The tricky bits were getting the drive coupling off the gearbox splines´. It´s an incredibly good fit and took a hour of gentle jiggling with lots of WD40. The flywheel bolts- they must have been tightened with a machine, unbelievably tight. Volvo seemed to use every bolt head size possible so a few trips to buy more sockets. Fingers crossed it all goes back together OK. So far we have examined all the timing gear train for any other damage, camshaft rockers etc.

What is reassuring is that inside there is no evidence of any wear after 1200 hours. I have double checked the harmonic dampers for any signs of leaks or cracks. The D9 has two. One on the crank at the front which is a cast iron ring totally enclosed and floating in some weird silicon oil. The one on the camshaft I think is a ceramic ring (big warning in manual don´t drop it or knock it) again totally enclosed floating in some other weird oil.

Good work. 10/10 for man skills.

Pete
 

BartW

Well-known member
Joined
9 Oct 2007
Messages
5,236
Location
Belgium
www.amptec.be
Just for you Bart (and I suspect a few others) a bit of engineering porn. I did the work myself except some help from Andy at Sealine Costa Blanca, lining up the timing marks to get everything at top dead centre before pulling it all to bits and Andy using has brilliant Snap-On Fibre optic camera so we could see inside the engine before taking it apart. The timing marks are on the opposite side to the starter motor hole where the engine turning tool fits so you can´t see what you are doing alone. I wasn´t planning on doing the work myself but the few people around here I trust are all stacked out with work, so its DIY or wait ages (autumn). I suspended the engine and gearbox from the deck above, so braced the deck with timber from the engine bearers. I wasn't sure it was possible to take the gearbox off without moving the engine forwards but after some measuring there seemed to be about 2cm clearance, which fortunately was correct.

Once I removed the gearbox, I took off the oil sump so I could put timber underneath the engine block to support it whilst I removed the timing cover that has all the rear engine lifting points. The tricky bits were getting the drive coupling off the gearbox splines´. It´s an incredibly good fit and took a hour of gentle jiggling with lots of WD40. The flywheel bolts- they must have been tightened with a machine, unbelievably tight. Volvo seemed to use every bolt head size possible so a few trips to buy more sockets. Fingers crossed it all goes back together OK. So far we have examined all the timing gear train for any other damage, camshaft rockers etc.

What is reassuring is that inside there is no evidence of any wear after 1200 hours. I have double checked the harmonic dampers for any signs of leaks or cracks. The D9 has two. One on the crank at the front which is a cast iron ring totally enclosed and floating in some weird silicon oil. The one on the camshaft I think is a ceramic ring (big warning in manual don´t drop it or knock it) again totally enclosed floating in some other weird oil.

impressive stuff !!!
you must have some mechanic experience, or at least be really hands on,
especially the potential movement of the engine or gearbox,...
Chapeau !

it seems that you will be ready for the summer,
good luck with the re-assembly

re. machine tightened bolts,
I have some 1,5"diam and 2"diam steel tubes in the boat, (these are for backup of a manual rudder tiller arm...)
using them to make a longer spanner arm, I can loosen almost every bolt (or breack it !)
 

Sandy Bottom

Active member
Joined
11 Nov 2013
Messages
2,627
Visit site
Ks,

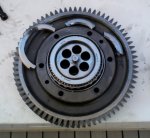
Not wishing to stick my oar in too far but you might just want to take another look at those ring gear teeth in photo three - it might just be the photo / lighting but have a good look at the teeth from about 4 o'clock to 8 o'clock especially the bits in shadow - as I say probably just the photo. :encouragement:

Steve
 

kashurst

Well-known member
Joined
10 Oct 2003
Messages
11,354
Location
Spain
Visit site
re drumbeat - no problem, the teeth are fine its just my rubbish photography. That whole assembly is being replaced as Volvo won´t sell the centre bearing bits separately.
 

kashurst

Well-known member
Joined
10 Oct 2003
Messages
11,354
Location
Spain
Visit site
Bit of an update - put everything back together this week, except propshaft just incase. Engine started first go and sounds lovely (well like a D9 should). Gearbox working increased revs cautiously and everything is looking good. I left it running at 1000rpm for 20 minutes or so to warm it up properly and look for any leaks etc. Everything looking and sounding great. Marvellous, I will align the propshaft in the morning and go sailing tomorrow, next I'm off to the bar. Then whats that!

oil dripping from the flywheel housing about 1 drop every three seconds, what have I done wrong?
turn it all off and go and have a think. I must have done something wrong when I fitted the new crank shaft seal. So rather than go to the bar I take the gearbox off again. I think I might have set a new record, 4 hours. Once the flywheel is off the seal is clearly leaking. Pull it out and all is revealed. About an inch of the lip seal is inverted, I must have caught it whilst jiggling the flywheel housing on. Unfortunately once its on you can´t see the seal as its covered by a felt ring.

anyway I'm sure its character building, I will get there in the end. (ok I admit it I was mildly irritated at this outcome, I might have said one or two rude words)
By the way in the Volvo manual is states to fit the crank lip seal dry, I usually wipe some oil on this sort of seal before fitting. Interested to know what others think.
 

BartW

Well-known member
Joined
9 Oct 2007
Messages
5,236
Location
Belgium
www.amptec.be
good going !

so frustrating when you have to start the dis - reassembling all again,
but much respect to you to have the courage to do so (the swearing is forgiven in this case! ;-)
It appears you'll get ready before the season is at full speed, thats the most important right now

good luck to the final finish, and enjoy the summer !
 

NorthUp

Active member
Joined
1 Sep 2008
Messages
1,497
Visit site
Dry where it fits into the housing, lubricate where the lips run on the crank? Maybe lost in the translation.
 

Latestarter1

New member
Joined
6 Feb 2008
Messages
2,733
Location
Somerset
Visit site
Bit of an update - put everything back together this week, except propshaft just incase. Engine started first go and sounds lovely (well like a D9 should). Gearbox working increased revs cautiously and everything is looking good. I left it running at 1000rpm for 20 minutes or so to warm it up properly and look for any leaks etc. Everything looking and sounding great. Marvellous, I will align the propshaft in the morning and go sailing tomorrow, next I'm off to the bar. Then whats that!

oil dripping from the flywheel housing about 1 drop every three seconds, what have I done wrong?
turn it all off and go and have a think. I must have done something wrong when I fitted the new crank shaft seal. So rather than go to the bar I take the gearbox off again. I think I might have set a new record, 4 hours. Once the flywheel is off the seal is clearly leaking. Pull it out and all is revealed. About an inch of the lip seal is inverted, I must have caught it whilst jiggling the flywheel housing on. Unfortunately once its on you can´t see the seal as its covered by a felt ring.

anyway I'm sure its character building, I will get there in the end. (ok I admit it I was mildly irritated at this outcome, I might have said one or two rude words)
By the way in the Volvo manual is states to fit the crank lip seal dry, I usually wipe some oil on this sort of seal before fitting. Interested to know what others think.

Cummins and Cat have been using Teflon lip seals for over 20 years. Absolutely vital that seal surfaces dry or else seal skids on oil film and burns.
Absolutely vital that seal surface snuff dry with brake cleaner.
 

kashurst

Well-known member
Joined
10 Oct 2003
Messages
11,354
Location
Spain
Visit site
thanks for that info - dry as a bone it is then. I will crack on in a couple of weeks, got to do stuff back in UK for a bit.
 
D

Deleted User YDKXO

Guest
kashurst, huge respect for tackling this job largely on your own. Not many of us could do this and certainly not me!
 

kashurst

Well-known member
Joined
10 Oct 2003
Messages
11,354
Location
Spain
Visit site
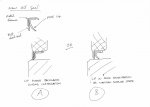
thanks for the encouragement everyone. The new oil seal arrived at home today and I have been having a close look at it. It's not like the old style spring style devices . It has a PTFE lip fitted. I cant work out quite how the lip should be sitting on the crank shaft - or how to get it on without damaging it again. I have attached a sketch (hope it makes sense) I would appreciate some help on this one as I don't want to cock it up. The original one was in position A when I removed it but it could well have been distorted by the mess of metal rumbling about behind it.
 

Attachments

  • oil seal_110615.jpg
    oil seal_110615.jpg
    74.7 KB · Views: 5
Last edited:
Top