Heat exchanger and Oil cooler advice

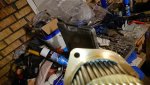
Right I have some pics of the Oil cooler (I will post pics of the after cooler in 1/2 hour I wish I had read your post thoroughly Bruce)

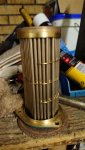
The mating faces had slight corrosion on them particularly on the at the end near the front of the engine.
I have cleaned up the housing and its ends ready for the O rings.


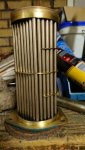
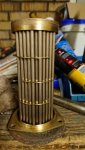
Now as for the Core - Do I dip the entire unit in the brick cleaner ?

Just do yourself a favour. Double check you have nothing but brass on the core there on yours. It's a upgraded version from the 42A so might differ. If it is solid brass yes you can dip it until it stops bubbling. If you are unsure rod it and use white vinegar if you must. No more contention, I'm regretting opening my mouth already.

As for the mating plate (DSC1201) yes there is some corrosion but it doesn't look bad as yet and maybe someone can advise on a suitable inhibitor. However you need to judge if the o-rings are still sealing on a good surface. As my posts above do not be tempted to add grease, sealant or anything else to the mating plate to improve the seal. You will likely do the exact opposite and destroy the o-rings. I dumped 5 litre of oil in as many minutes when I used a small dab of hylomar and only picked it up because I noticed the oil pressure didn't come up to it's usual level and started dropping.
 
Right her are the after cooler pics - they are one of each side and one showing the plug.
what would be the best course of action with regards to the fins ?
jon

That does not look good Jon :(
I dont know what to tell you but the side plates can unhook. If it looks like that all the way through you've wrecked it. If it's just the ends you can try a fin comb and remove loose bits, but that's a very risky call as you really dont want to even contemplate trying to stick that back on and having shards of aluminium fin flying into the engine. Sorry fella. That does not look good. I'd take to a specialist.

:( :( :(

Are we allowed to swear here? I would very much like to.
 
Thanks Bruce - I will post a pic of the core in a minute - fortunately there is a local radiator repair/reconditioner not too far from me

Jon
 
Right here is the oil cooler core it all appears to be brass however looking at the tubes where they meet the ends on the inside the metal looks silver in colour ? on the inside (last 2 photos).

Thanks for the replies so far
Jon
 

Attachments

  • DSC_1216 (Medium).JPG
    DSC_1216 (Medium).JPG
    86.6 KB · Views: 57
  • DSC_1217 (Medium).JPG
    DSC_1217 (Medium).JPG
    86.9 KB · Views: 56
  • DSC_1218 (Medium).JPG
    DSC_1218 (Medium).JPG
    83.9 KB · Views: 54
  • DSC_1219 (Medium).JPG
    DSC_1219 (Medium).JPG
    86.1 KB · Views: 55
  • DSC_1221 (Medium).JPG
    DSC_1221 (Medium).JPG
    143.5 KB · Views: 56
  • DSC_1222 (Medium).JPG
    DSC_1222 (Medium).JPG
    180.9 KB · Views: 55
If that's lead tinned it reacts very slowly with HCL so you would be fine for a quick dip. But the fumes are poisonous. If it's silver solder you're fine. Truth Jon that doesnt look like it needs dipping at all. Peer down the inner tubes and check they are clear. If it's only superficial just rod it.
 
Thanks again Bruce - the build up of Lyme is very light so yes I will rod it - most of it was on the end caps which I have done.
Heat exchanger tomorrow - I will post pictures first before doing anything
Jon
 
1582723424103.jpeg
I hate to say this but that looks destroyed.

The way they build these looks complex. I dont think there is anyway someone could take it apart....certainly without causing further damage.

ive seen the odd one secondhand but not recently. I’ll keep an eye out on line
 
Thank you FARSCO - I went to a local aftercooler specialist (yes I was surprised we had one in our town)
He said that it was too much work required to split it up without causing more damage etc.
So bit the bullet and ordered a new one from volvo.
And I was lucky as volvo only had the one listed on the system.

Jon
 
:( I'd have thought the biggest job was stamping out the fins not disassembly. It's appears to be lead based soldered together not brazed. Maybe that's the issue these days, Pb etc and the throw away society. We used to have to repair radiators often when I was in Africa. Branch damage and flicked stones on dirt roads. Repairs were pennies.
 
Thank you FARSCO - I went to a local aftercooler specialist (yes I was surprised we had one in our town)
He said that it was too much work required to split it up without causing more damage etc.
So bit the bullet and ordered a new one from volvo.
And I was lucky as volvo only had the one listed on the system.

Jon

Oh well.....live and learn. At least it won’t need cleaning for a while! Always an upside ?
 
Thanks for the replies so far - Right now for the heat exchanger am I correct in thinking that it is dismantled by removing the bolt in the end cap?
 
Thanks Bruce Also thank you for reply to my Pm I did get it but couldnt reply as I was driving at the time

Right so what is the best way to clean out the heat exchanger I have the cap removed ?

Jon
 
Stand it upright, pour in your descaler until all tubes are submerged. Leave for an hour or less if it stops bubbling then refill with water and check all tubes are clear by means of rodding it (water becuse it allows any scraped sediment to rise to the surface by the act of rodding). Rinse thoroughly. As I stated previously even after using brick acid at ~10% HCL by volume I still had a couple tubes per exchanger that were blocked.
 
Thanks Bruce - - right I am about to stand the canister upright - is it best to pour the brick cleaner in neat or diluted with water or would I be better with a vinegar water mix and leave overnight?
Jon
 
Great thread, I'm thinking of doing this on our D12s sometime through this year, either by circulating or remove and strip. Haven't worked out the best places to plumb into yet though to ensure full circulation, and I haven't worked out what the flow is to the CACs ?
 
If you didnt see any calcium build up try rodding it first. If there is significant calcium deposits use a descaler / acid wash then rod.

What percentage concentration is your brick cleaner. Jon? Dilute to between 5 and 10% HCL by volume and follow........

Stand it upright, pour in your descaler until all tubes are submerged. Leave for an hour or less if it stops bubbling then refill with water and check all tubes are clear by means of rodding it (water becuse it allows any scraped sediment to rise to the surface by the act of rodding). Rinse thoroughly. As I stated previously even after using brick acid at ~10% HCL by volume I still had a couple tubes per exchanger that were blocked.
 

Other threads that may be of interest

Top