Bukh DV20 Exhaust elbow

morse teleflex clevis clips.jpg


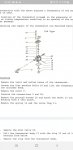
My cables have these spring clips but a clevis pin with split pin would do. So would a screw and a nyloc nut if you haven't the proper thing .

But the advantage of the spring clips as far as I am concerned is that I can fit/remove them with one hand while my other hand is hanging onto something to prevent me doing a nose-dive into the engine compartment!


For a penetrating fluid to use on the thermostat housing bolts I would give them a good soak in PlusGas which seems to penetrate a bit better than diesel.. I use it because I find it usually does the job (and I still have 2 tins of it!) but there are other makes. As Mistroma says, W40 is rubbish.

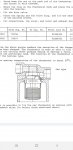
Make sure you have a good quality, perfectly fitting metric hex key and, as Charlie Boy says, you must get the socket really cleaned out so the hex key can go down to the full depth of the socket.
 
The thermo housing is cast Iron the thermostat is brass. I said there was crud not corrosion, it the same crud you get in the waterways of the block, What happens is that the top of the housing sticks to the thermostat and the legs of the thermostat body jam in the guide bits of the thermo housing. Yes you need to undo the 4 long bolts that will allow you split the thermo housing and remove thermostat, also the bottom half come of the manifold. If you can get the screws out it easy. Be careful taking the thermo out if it sticks use some kettle descaler rather that brute force, the thermo is expensive.
You can reuse the rubber gasket round the rim of the thermostat and I have usually manged to reuse the gasket for the base of the housing however I would not want to remove it without spare gaskets.
Good luck wth the screws
David MH
 
Does that style of black O ring have a name I wonder? Interesting, some housings are of yellow metal and some black.(paint never stuck to yellow) Joy what is yours made of? A soaking mix of auto trans fluid plus acetone was the top rated in PBO or a US mag.
 
The thermo housing is cast Iron the thermostat is brass. I said there was crud not corrosion, it the same crud you get in the waterways of the block, What happens is that the top of the housing sticks to the thermostat and the legs of the thermostat body jam in the guide bits of the thermo housing. Yes you need to undo the 4 long bolts that will allow you split the thermo housing and remove thermostat, also the bottom half come of the manifold. If you can get the screws out it easy. Be careful taking the thermo out if it sticks use some kettle descaler rather that brute force, the thermo is expensive.
You can reuse the rubber gasket round the rim of the thermostat and I have usually manged to reuse the gasket for the base of the housing however I would not want to remove it without spare gaskets.
Good luck wth the screws
David MH

Thank you for the info. I have given up on my third attempt to unscrew the water hose from the thermostat housing. Spanner was a good fit, but access difficult to get a hammer to tonk the spanner. I did not push it as I could feel the nut wanting to round.

I then investigated to option of removing the thermostat housing as a way of getting to the hose. Again the allen key bolts well stuck and hard to get any purchase. They still need more cleaning out so I have left with diesel overnight and will scrape around some more inside so that allen key is well located. Even then it is hard to believe they will move!

As the whole exercise is just to fit a new exhaust elbow then I can see two options if I cannot get the hose unscrewed from the thermostat housing.

1) cut off the bitter end of the hose as it goes into the old elbow fitting or try and lever open the crimped end to save the pipe (first try hacksawing the elbow off the hose fitting just in case the screw end can be saved). Then reuse the old hose with Jubilee or similar onto the new elbow. That way I can forget about the thermostat end. The hose is old but intact so I guess reusable.

2) cut off the hose close to the thermostat end. Then hope that I can get a socket over the hose coupling nut and so a better chance of liberating from.the thermostat housing. That way I can fit a new hose and elbow.

In the meantime still soaking in diesel and have even started to think about the 22mm anode bolt (now will that want to move?)

Bukh engine lockdown games. At least I can still work on my boat and I dont expect it will be going anywhere for some time yet.

Pix the bitter end of the hose in the remaining part of the exhaust elbow

20200421_175449_2.jpg
 
Last edited:
Finally......

Sighs of relief.

Now I can reassemble the exhaust without disturbing the thermostat from its lair.

First need to buy a new elbow.

Thank you all for living through the saga with me....so far!

20200425_184158_1.jpg
 
The first one I replaced looked like that!

Thereafter I watched them like a hawk. First sign maybe some discolouration, this might last for a season or so but then a tiny crack might appear. At that point you may be relying on the soot inside holding it together.

And time to replace!

Well done anyway. Can get your batteries sorted out next!

My 40w solar panel blew overboard (dont ask - not a floater) earlier on, so finally getting the pipe off made up for a bad day.

I will need to get the dodgy battery ashore and charge with no engine for the moment. Hopefully will get the new elbow next week to fit.

I will try for the engine anode in the morning, getting the hose off has encouraged me.

Do you think I should at least have a bit of a try for cleaning out the thermostat? It must have been in residence for years and years. I have given the housing bolts a good clean out and have a tight allen key. Getting a hammer or overbar to encourage the Allen key is difficult, but might find a piece of tube or the bilge pump handle to get some purchase. You never know!
 
I just don't know!

I have a set of hex heads for my socket set, I think I might have been using one for the set screw I broke. Basically, I don't think brute force is the answer.

If you can get them moving just a tiny bit, try to get some easing oil, diesel, whatever, around them. And when they do start to move, take it easy, a tiny bit at a time.

If they do come out, it will be so much easier another time, but take all the previous advice about using and preparing new gaskets and seals.

Great idea. Thank you. Just found some hex heads in my socket set. I will see if they fit in the morning. Far better leverage than an allen key! And I think just about room if I swing off the decompressor bar.
 
The thermostat housing is cast iron I think, certainly not brass it's a grey metal.

It is fastened by 4 female hex headed set screws which go through the housing cap, into which the water hose fitting is tapped, through the housing itself and into the exhaust manifold.

I took all mine off to sort out a leaky gasket between the housing and exhaust manifold. In the process one of the set screws sheered off inside the housing, and a section of the housing itself broke off. Luckily the exhaust manifold itself was undamaged, although one of the tappings for the set screws looked like a weak point.

In short I stand by previous advice, don't mess in the area unless you have to. But if you do, be very careful with the set screws and do your best to encourage them to free easily. Some good advice on that above I didn't have advantage of at the time.

Reading the workshop manual there are some small bits and bob's (spring, clip, small screws in a pin running across the housing) etc. That look fiddly and hard to replace if damaged or worn.
 
Reading the workshop manual there are some small bits and bob's (spring, clip, small screws in a pin running across the housing) etc. That look fiddly and hard to replace if damaged or worn.
You are reading the bit about the old style thermostat.

You have the newer bellows unit which comes and should stay in one piece. See the next page of the manual.

There's some pictures earlier in the thread showing the thermostat and its housing.

It's pretty straightforward.
 
You are reading the bit about the old style thermostat.

You have the newer bellows unit which comes and should stay in one piece. See the next page of the manual.

There's some pictures earlier in the thread showing the thermostat and its housing.

It's pretty straightforward.

The (306 page) manual I have downloaded has two diagrams. The first one with a complicated thermostat design with some sort of cross rod and bits and Bob's. It says something about a later design with a diagram that I dont recognise.

As you have seen my housing has the sensor coming in at an angle which doesn't look like either.

See below
 

Attachments

  • Screenshot_20200426-060920_Dropbox.jpg
    Screenshot_20200426-060920_Dropbox.jpg
    442.4 KB · Views: 14
  • Screenshot_20200426-060910_Dropbox.jpg
    Screenshot_20200426-060910_Dropbox.jpg
    569 KB · Views: 15
Google "which penetrating oil" May as well remove now, got to come off sometime and wont get any easier. You got vicegrips?(if the allen keys dont work)
 
The (306 page) manual I have downloaded has two diagrams. The first one with a complicated thermostat design with some sort of cross rod and bits and Bob's. It says something about a later design with a diagram that I dont recognise.

As you have seen my housing has the sensor coming in at an angle which doesn't look like either.

See below
You've got the arrangement in the second diagram. This drawing is a vertical section. You can see where the connectors for the water hoses go in at the top left and right. The body of the lower part of the housing is shown, but you can't see the mounting bolts. And the thermostat sits in the middle.

It's not a very useful diagram really!

Thanks for the clarification. I can see it now. The in and out hoses are offset.

And my socket set has the correct hex attachment. So I will give the bolts a try.
 
Thanks for the clarification. I can see it now. The in and out hoses are offset.

And my socket set has the correct hex attachment. So I will give the bolts a try.

##UPDATE no not interested. I have soaked in diesel for several days. I guess nothing is penetrating as far as the threads down in the manifold. I will try again later two more times. Then add a bit of persuasion with tube over the wrench. Then hammer. I guess will be probably be leaving it for the time being and just fit the new elbow.

20200426_093438_1.jpg
 
If I were you I'd clean away the paint, rust and muck around the screw heads and where the thermostat tower sits on the cylinder head . That will give the penetrating fluid more chance of getting to where it's needed.

Personally I'm not convinced that diesel is as effective as a proper penetrating fluid but others will doubtless disagree.
 
Quiet relief that the engine anode bolt came out.

No washer (which it looks like in the manual). Do I need to get one?

All that is left is the thread. I presume I wind this out and then screw in the new one (after filing down - with or length, or both?)

20200426_103143.jpg
 
Quiet relief that the engine anode bolt came out.

No washer (which it looks like in the manual). Do I need to get one?

All that is left is the thread. I presume I wind this out and then screw in the new one (after filing down - with or length, or both?)

View attachment 89124
'

You will need a new copper joint washer (unless you find the old one and anneal it) an.

When you find the new anode you will very likely find it won't go in the hole because there may be the remains of the old one stuck in there. If so knock it through. It won't do any harm.

I occasionally run a tap through the hole to clean the threads. If you feel like doing that be careful you don't break it otherwise you'll be in the soup bigtime!
 
Top