Bukh DV20 Exhaust elbow

I
I'm not really arguing against the item you've found but 5 years trouble free use is unimpressive. Maybe they were only first produced 5 years ago? Anyway you should expect a year or two longer than that from the Bukh item.

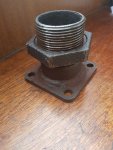
Hopefully your exhaust hose can be suitably oriented as there's no rotational adjustment available.

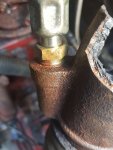
I will review if and when I can get the existing flange off the elbow in one piece. The T Norris Bukh elbow does not come with the flange. Flange is £100 extra, so £251 excluding shipping!
 
Finally extracted the flange.

Diesel soaking, big bench vice, massive stillson wrench with scaffold pole extension, gas blow torch till red hot and no go!

Finally angle grinder through the cast pipe followed by massive hammer and chisel to crack away off the thread.

Can't believe Bukh describe this as a maintenance part requiring replacement every five or six years. Though I guess this one has lasted longer than that.

Only one brass nut damaged.
 

Attachments

  • 20200419_175802.jpg
    20200419_175802.jpg
    919.5 KB · Views: 22
Well done!

Thank you!

I still have to extract the water hose from half the elbow which also feels very solid. I will make a start in the morning.

Even though I have saved the flange I am seriously thinking of getting a s/s one made up rather than the bukh cast option.

The ebay S/S one I was looking at has now been sold unfortunately (maybe someone here lurking saw it as well), anyway I have found a local boat man who can weld if I buy the tube. I was looking at 2mm tube. Is that about the right thickness?
 
I have what I can only assume is a locally made S/S Bukh injection elbow fitted to our Hartley 32 here in Wellington, NZ.

It is VERY simple. It consists of a matching flange and a thick heatproof gasket, the flange welded to a 50mm slightly curved downwards S/S pipe with a 12 mm injection pipe welded to it at an angle, outlet facing rearwards. Inside this is a smaller diameter but thicker wall S/S tube, bent to the same radius. This is centred and then welded to the flange end, inside the flat mating surface. The injected water hits the inner, thicker walled pipe before exiting with the exhaust gasses.

The rear end of the inner pipe might be improved by a couple of small welds to the outer pipe, not enough to reduce flow, but to stop vibration cracking the flange weld.

I soaked the whole thing in caustic soda earlier this year as IMHO the inter pipe clearance is a bit small and had got carboned up. The water output improved 50%. I could not visually see any deterioration/corrosion on either pipe surface, inner or outer after cleaning and inspecting.

If I was in my workshop at home I could knock a similar one out in a couple of hours.
 
Last edited:
When you get home you may find a queue of forumites outside! :D

First thing this morning the British High Commission sent an email re repatriation flights from Auckland or Christchurch. We are in Wellington so to get to either of those cities requires flights or a ferry and long drive or for Auckland a long drive - 8 hours.

We have booked two seats, via Hong Kong where special transit areas are being prepared for these flights. Problem is, flights to Auckland, the best choice, with Air NZ, dont go if not full enough, they delay until they have a full plane. This means we cant guarantee to meet the connection to LHR via HK. Aucland flights booked on flexible tickets, no details yet on LHR connection.

It all a bit worrying at the moment.

I might make a Bukh elbow when I do get home. I might need a tester - my Bukh will be in the other hemisphere!

Safe journey, if you ever make it. I might not be able to wait until you get back to your workshop though!
 
Finally extracted the flange.

Diesel soaking, big bench vice, massive stillson wrench with scaffold pole extension, gas blow torch till red hot and no go!

Finally angle grinder through the cast pipe followed by massive hammer and chisel to crack away off the thread.

Can't believe Bukh describe this as a maintenance part requiring replacement every five or six years. Though I guess this one has lasted longer than that.

Only one brass nut damaged.

Well done. Oddly enough, I have been clearing out some bits and pieces from the garage today. I emptied a box of bits and saw a few BUKH bits go into the bin. I pulled out a hose which is the part form the compression fitting for water injection on the elbow. I saw 4 long bolts which hold the thermostat housing in place (they sometimes corrode away inside and break when dismantling). I saw a large brass nut which might be a new locking nut and very possibly a flange peeking out from the bottom of the bin. Probably all been there for about 15 years or more and not much of a surprise I'd forgotten about it. At least the garage has slightly less junk in it now. :D


Never heard of a cement on the thread. Surely the locknut will settle the threads against each other sufficiently. Cement would just make it more difficult to remove next time wouldn't it?

But never mind, I've only replaced my Bukh elbow about 4 or 5 times in the last 30 odd years with no leakage. Maybe I was lucky!

Ditto, I had a BUKH for about 24 years and never had leaks from those threads. I always assembled dry and just used the lock nut to hold it in position. I did replace the elbow a few times and also fairly regularly to monitor condition and always checked for leaks. I obviously also had a charmed life.
 
Last edited:
The Kittiwake exhaust elbow saga continues for those that are still hanging in.

Now I can't get the hot water bypass hose out of the thermostat housing on top of the exhaust manifold or out of the old (fragmented- it's very brittle) elbow (see pix).

Both seized solid. Diesel treatment not working. I am sure that it's been a long time since it was removed.

At least I am thinking I can reuse the hose if I can get it out of the remaining piece of manifold as the hose is very old, but not perforated yet! That way I can leave the end in the thermostat to rest in peace.

As it is still very much part of the engine room I can't get the angle grinder to it without shore power. I am thinking hacksaw?

Any ideas much appreciated.
 

Attachments

  • 20200421_175449_1.jpg
    20200421_175449_1.jpg
    705.1 KB · Views: 27
Odd that it won’t come out of the thermostat, brass fitting and a cast iron stat housing. If the ’stat housing is that bad (pics don’t show it) then maybe you should be replacing that? Can you remove the thermostat entirely to take it all home? Also, what is the condition of the hose? If that needs replacing then struggling with the hose/elbow connection is pointless and you may as well use the hacksaw on the hose.
I believe Marine Enterprises[url] sell spares, might be worth a call if a replacement thermostat housing is needed.
 
Last edited:
I will concentrate on the thermostat housing. It is less accessible though. More diesel and a good thump tomorrow. I presume I am trying anti clockwise?
 
I'd concentrate on the thermostat end, and get a new hose with the proper Bukh elbow.

I had to remove one at the other end as per your pic. It wasn't possible without damaging the fitting.

A thought, I don't know how the hose fits onto a non Bukh elbow. Maybe you can just cut its end off and slide it on, fixing with a hose clip?

I am tending towards a bukh elbow which will be less hassle to source and fit and will last me the time I expect to have the boat. And in the pictures includes the hose.

So I just need to extract the hose from the thermostat housing (which looks like it has not ever moved so I am reluctant to disturb - even though I would like to check on the thermostat as there is not a very big flow of water when running - just an occasional squirt).

As you say, sourcing or getting built an aftermarket S/S version would mean just cutting off the end of the pipe and then a jubilee clip to secure the existing pipe.
 
Just picked up this thread. I have a Buhk 20 1985 since 2000. In that time time I have changed a couple of exhaust elbows and the posts are all too familiar. As far as the water pipe is concerned when I bought the boat the the water hose had been converted from the Bukh hose to standard rubber engine water hose and the fittings on the thermostat inlet and outlet and exhaust elbow changed to hose tail fittings, The hose is fixed with Jubilee clips. Its worked fine for 20 years. Advantage is its very easy to take off the hoses between the pump and the exhaust and you can always source a piece of rubber water hose. I take my thermostat out at each layup and it does get crudded up and can be difficult to to get out of the housing, a soak in kettle descaler seems to work. I would be concerned if you have not looked at the thermostat for a long time. When you put the housing back on the head the trick is to soak the gasket in oil for a few hours/days to get it impregnated this helps to stop the weep between the housing and the head. You also need to nip the bolts down when the engine gets hot. Its also worth while cleaning out the thermo housing bolt holes in the head they get full of muck and can stop you tightening the housing down. If you have a bottom tap its easy if not lots of penetrating oil a bolt and rags can get rid of most of it.
The exhaust elbow does give you plenty of warning that it is on the way out, on the outside of the bend you get dribbles and sooty black marks.
Last time I spoke the John Cutler before he retired he said that his experience with the stainless elbow was not great, and he stopped doing them, they often lasted very little longer that the cast ones. I would expect the cost of a good stainless one is high these days, a good stainless welder is expensive and you need need someone you can trust as you only have his word for the grade of stainless and the quality of wire he uses. I like to see the welded joint there is no need to polish and grind a good joint.

Hope you engine goes back together ok

David MH
 
"So I just need to extract the hose from the thermostat housing..."

Not entirely sure of this but if you are ready to scrap the old hose, if you cut the other end off you might be able to slide a ring spanner down it for the thermostat connection. Which would be a more robust fit.
 
Last edited:
Just picked up this thread. I have a Buhk 20 1985 since 2000. In that time time I have changed a couple of exhaust elbows and the posts are all too familiar. As far as the water pipe is concerned when I bought the boat the the water hose had been converted from the Bukh hose to standard rubber engine water hose and the fittings on the thermostat inlet and outlet and exhaust elbow changed to hose tail fittings, The hose is fixed with Jubilee clips. Its worked fine for 20 years. Advantage is its very easy to take off the hoses between the pump and the exhaust and you can always source a piece of rubber water hose. I take my thermostat out at each layup and it does get crudded up and can be difficult to to get out of the housing, a soak in kettle descaler seems to work. I would be concerned if you have not looked at the thermostat for a long time. When you put the housing back on the head the trick is to soak the gasket in oil for a few hours/days to get it impregnated this helps to stop the weep between the housing and the head. You also need to nip the bolts down when the engine gets hot. Its also worth while cleaning out the thermo housing bolt holes in the head they get full of muck and can stop you tightening the housing down. If you have a bottom tap its easy if not lots of penetrating oil a bolt and rags can get rid of most of it.
The exhaust elbow does give you plenty of warning that it is on the way out, on the outside of the bend you get dribbles and sooty black marks.
Last time I spoke the John Cutler before he retired he said that his experience with the stainless elbow was not great, and he stopped doing them, they often lasted very little longer that the cast ones. I would expect the cost of a good stainless one is high these days, a good stainless welder is expensive and you need need someone you can trust as you only have his word for the grade of stainless and the quality of wire he uses. I like to see the welded joint there is no need to polish and grind a good joint.

Hope you engine goes back together ok

David MH

I like the idea of checking and cleaning the thermostat. However after experience so far with a engine that has not been looked after (though has always run so far), I am wary of disturbing the whole thermostat assembly. It looks pretty solid and rusty. What do you think, is it just! the four top bolts to loosen? Will I need to buy new gaskets?

As it is I might have to lift the thermostat housing just to get at the hose!

P.S thank you for your input. Is is reassuring to know that you forum peeps out there have been here before with their Bu**ks!
 
Isnt the thermostat housing made of brass?( so no corrosion) And only gasket involved is the c section black rubber seal around the thermostat rim. No battery powered grinder? Use plain hose with hose clips.
 
Top